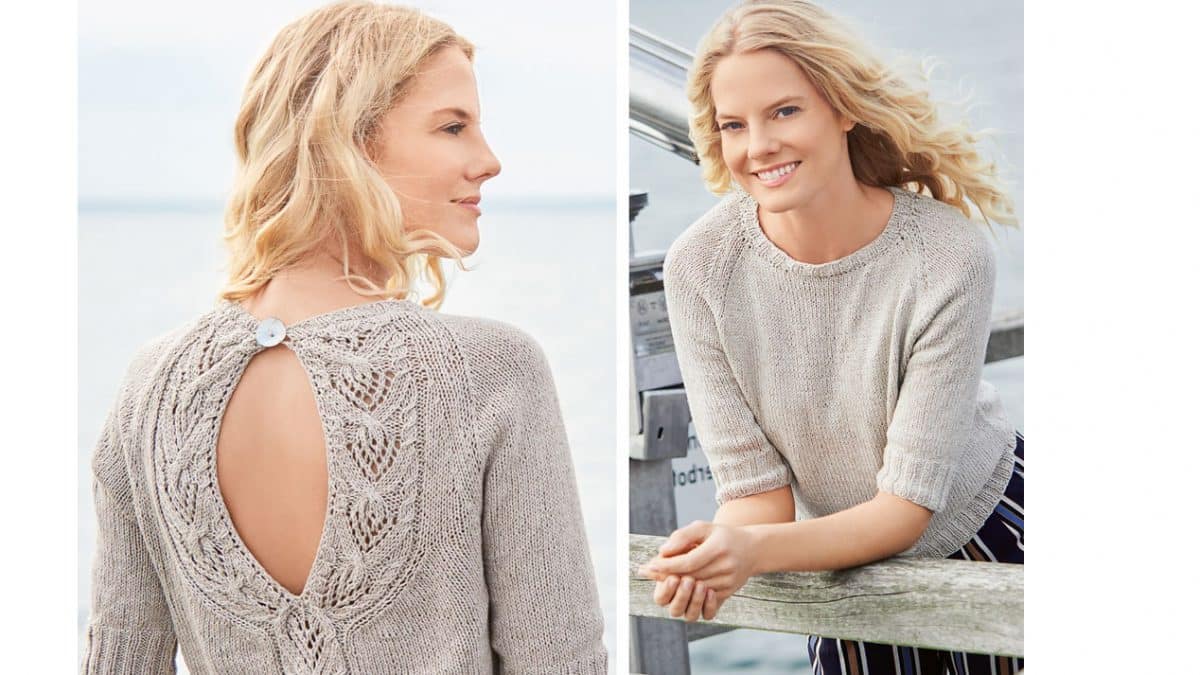
On the other hand... Every thing has its downside, and this pullover is no exception. From the front it looks modest, but on the back it amazes with a deep neckline, framed by wide openwork “braids” and fastened at the top with a mother-of-pearl button.

Dimensions: 36/38, 40/42, 44/46, 48/50

You will need: yarn (40% viscose, 30% cotton, 20% linen, 10% polyamide; 125 m/50 g) – 350 (400-450-500) g grey-beige; knitting needles No. 4 and 4.5; hook No. 4; 1 button with a diameter of 28 mm.
Rubber: knit alternately 2 persons. , 2 p.
Braid patterns AD: knit according to AD patterns
Distribute the loops as described in the instructions.
Repeat in height from the 1st to the 16th row.


Decorative reductions: from the right edge - chrome. , 2 persons. , knit 2 stitches together. From the left edge, knit until the 5th stitch from the end of the row, knit 2 stitches together with a slant to the left (= remove 1 stitch, slip when knitting, knit the next loop, then pull it through the removed loop), k2 . , chrome,
Knitting density: 20 p. x 28 p. – 10 x 10 cm, knitted with stockinette stitch. The sample is made on knitting needles No. 4.5.
Back: On knitting needles No. 4, cast on 86 (94 102-114) sts and knit for the bottom bar with an elastic band, between the edges. start with 1st person. , 2 p., 2 persons. and finish symmetrically.
With a bar height of 6 cm, 21 rubles. switch to knitting needles No. 4.5 and continue work in the following sequence: chrome. , 32 (36 40-46) sts in stockinette stitch, while adding 7 sts evenly, 20 sts using the “braid” pattern A, while after the 10th st in the 1st “braid” add 1 st, 32 (36 40-46) stitches in stockinette stitch, evenly adding 7 stitches, edge. – 101 (109-117-129) p.
Thus knit 64 r. 23 cm, then for the cutout on the back, do it from the right edge in 65 r. first 1 decorative decrease, knit with stockinette stitch until the last 3 stitches before + braid”, knit 3rd and 2nd stitches before “braid - knit together with a slant to the left, k1. and divide the work as follows: knit the first 10 sts - braids - according to the “braid” pattern B then knit from the broach after the 10th st, “braids” 1 st for the future edging. = 49(53-57-63) p.
The loops of the left half are 51(55-59-65) sts. Leave for now and first knit the right side of the neckline as follows: decoratively decrease from the right edge for a raglan bevel, first 18(16-15-14) times in every 4th row. then another 0 (5-9-15) times every 2nd r. 1 p., at the same time, for the cutout on the back, knit according to the pattern 20 (21-22-23) times in each row, the 2nd and 3rd p., next to the loops of the “Braid” pattern B; in the front rows, together with the front one with a tilt to the left, in the purl rows - together with the back row with a tilt to the left.
After 16 r. From the beginning of knitting the Braid-B pattern, it is logical to continue knitting with the Braid pattern A. After 27 (28-29-30.5) cm 76 (78-82-86) r. separating the part, close off the remaining 20 sts.
Knit the left side symmetrically, starting with the edge. and 10 stitches of the “Cross” pattern, then knit in stockinette stitch, while knitting the 2nd and 3rd stitches next to the Braid pattern.” On the front rows, knit together the front stitch, and in the purl rows, knit together with the purl stitch. After 16 r. from the beginning of knitting the pattern - Braid - C, continue knitting with the pattern - Braid D.
Before: on slips No. 4, cast on 86 (94 102-114) sts and knit for the bottom bar 6 cm = 21 r. with an elastic band, while between the edges. start with knit, purl 2, knit 2 and finish symmetrically.
Switch to knitting needles No. 4.5 and continue working with stockinette stitch, while in the 1st r. evenly add 7 sts – 93 (101-109-121) sts.
With a part height of 23 cm = 64 rubles. decoratively decrease on both sides for raglan bevels 1 time for 1 st. then 11 (9-7-6) times in each 4-st. and 12 (17-22-27) times in each 2 m for 1 p. At the same time in 64 (66-70-74) r. first raglan bevels 21 close for the neckline middle 211 (23 (23-25-29) p. and finish the left side first.
To round the cutout, close from the inner edge in every 2 r. 1 time 5 p., 1 time 3 p. and 2 times 2 p.
Finish the other side symmetrically.
Left sleeve: on knitting needles No. 4, take 62 (66-72 80) sts and for the placket, knit 6 cm - 21 cm with an elastic band, while edging. start with k1 p2. , 2 persons. and finish symmetrically. Switch to knitting needles No. 4.5 and continue working with stockinette stitch, while in the 1st r. evenly increase 4 sts – 66 (70-76-084) sts,
After 10 cm – 28 r. from the bar decoratively decrease on both sides 1 time, 1 p., then from the right edge decoratively decrease 9 (8-8-7) times in every 4th p. and 18 (21-23-27) times in every 2nd r. 1 p., and decoratively decrease the left edge 10 (9-9-8) times in every 4th p. and another 14 (17-19-23) times in every 2nd r. 1 p. each
After 25.5 (26.5-27.5-29) cm - 72 (74-78-82) r. from the beginning of the raglan bevels, close 6 (6 7-8) sts from the left edge. Next, in every 2nd r. close 1 more time with 4 (4-5-5) sts and 1 more time with 3 (3-4-4) sts.
The right sleeve is knitted symmetrically to the left sleeve.
Assembly: general recommendations – see page AZ. Perform raglan seams
Then sew the sleeve seams and side seams.
Along the edge of the neckline, using needles No. 4, cast on 84 (86-92-100) sts and knit 5 r for the binding. Rubber
Close the loops.
Crochet the side edges of the cutout on the back and the narrow edges of the binding 1 p. Art. b/n, while on the upper left edge of the binding, make 1 hinged loop in the form of a chain of ch. length equal to the diameter of the button,
Sew a button on the right edge of the trim.

Related posts
About the Author

Welcome !
My name is Lilia. The main hobby of my life is knitting. I started with knitting needles and switched to a knitting machine. In 1988 I got acquainted with crochet - Romanian lace. About 10 years ago I became interested in Irish lace and Shetland knitting. And now I’m trying fillet crochet. On this site I want to share with you my 45 years of experience in various knitting techniques.
Latest publications
Women's pullover “Iclyn”
Sparrow Song jumper
Pink openwork sweater
Jumper with openwork diagonal pattern
Кардиган Fennel
Blog Subscription
Be the first to receive new items!


