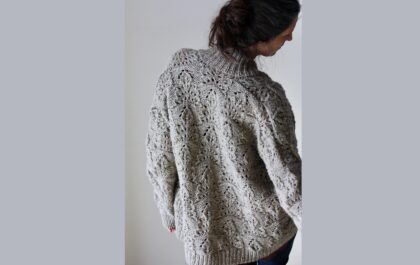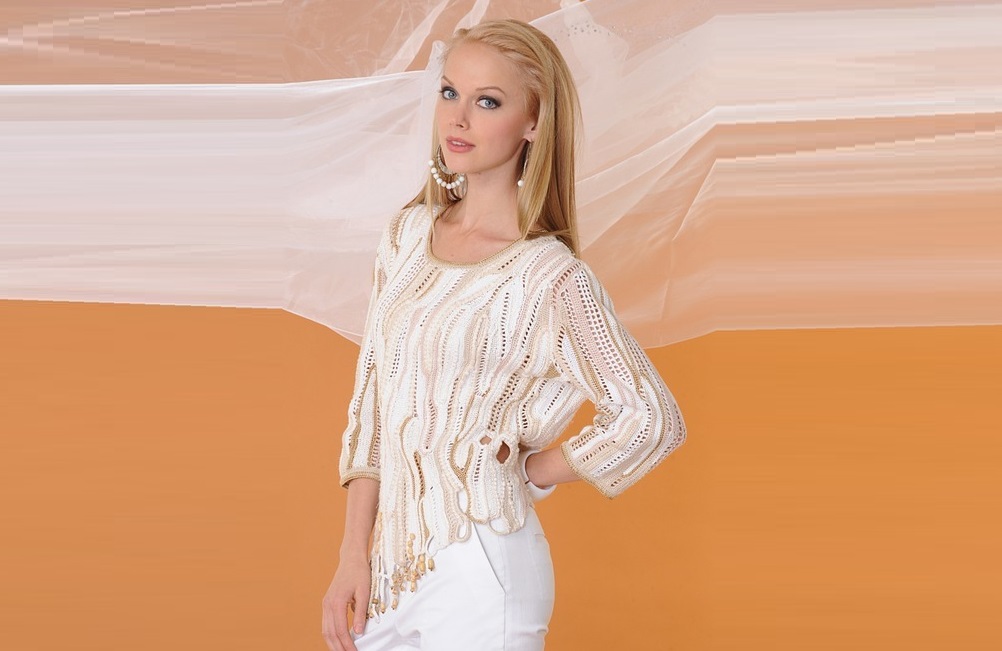
Модный, оригинальный, дизайнерский джемпер связан крючком. Джемпер связан в технике “фриформ”, это значит, что при вязании джемпера вы можете проявит все свои творческие таланты. Джемпер связан из пряжи светлых “песчаных” оттенков. Вязаный джемпер имеет неровные края, что добавляет ему дополнительное очарование. Такой джемпер будет неповторим и уникален.

Модель Елены Синюковой
ДЖЕМПЕР «Пустыня»
РАЗМЕР 50
Модель выполнена крючком в технике фриформ.
Вам потребуется: в общей сложности 900 – 1000 г разнообразных по составу, фактуре, толщине ниток: по 200 г хлопка (400 м х 100 г) белого цвета и цвета «топленого молока», 200 г хлопка с вискозой (400 м х 100 г) светло-бежевого цвета, 200 глина или льна с вискозой (600 м x100г)молочного или сероватого оттенка, 200 г вискозы или хлопка с вискозой (250 мг 100 г) для бурдона; деревянные бусины разного размера для декора, крючки, подобранные по толщине к пряже.
Елена Синюкова – талантливый и самобытный мастер, чьи работы, выполненные в технике фриформ, привлекают особое внимание наших читателей, удивляя и вдохновляя их на новые проекты.
На этот раз автор предлагает вашему вниманию свои новые разработки – произвольное вязание с применением бурдона (смотрите МК ниже).
Скопировать ее практически невозможно, но, освоив приемы техники, проявив фантазию и свободу мышления, вы сможете создать свое уникальное произведение.
Для начала сделайте качественную выкройку из плотного материала с учетом индивидуальных особенностей фигуры. Выбор правильной формы изделия так же будет являться залогом успеха вашей работы.
Затем подберите цвета и фактуру ниток близкие по оттенку в любых пастельных тонах. Нити для бурдона складывайте в шесть сложений для придания рельефности изделию.
Начните вязание с детали спинки в вертикальном направлении от бокового шва, постепенно наращивая полотно и регулярно прикладывая его к выкройке, чтобы не уйти за ее границы.
Так как вяжем разными по толщине нитями, то постоянно надо следить за количеством петель в рядах, выполненных толстыми и тонкими нитями.
Добавляйте петли при переходе с толстой нити на тонкую и наоборот.
Необходимо также следить за количеством петель при поворотах и изгибах бурдона. Формируйте «рваный» край низа изделия.
Со стороны более длинного края изделия выполняйте отверстия на бурдоне (плотно).
Перед вяжите также как и спинку.
Вытачки выполняйте в плечевых швах.
Начинайте вязать от бокового шва, дойдите до вытачки и вяжите полотно с одной стороны вытачки. Затем от высокой точки груди набирайте цепочку из воздушных петель длиной = длине вытачки до плечевого шва. И вяжите с другой стороны вытачки, постепенно наращивая полотно к талии ниже.
Вытачку с другой стороны выполняйте аналогично.
В представленной модели рукава выполнены без использования бурдона. Начините вязание в вертикальном направлении от шва.
Окат плеча делайте строго по выкройке.
Отпарьте связанные части изделия.
Сшейте рукава и обвяжите их по низу столбиками без накида тонкой нитью, не поворачивая изделия, обвяжите еще раз столбиками без накида (вводите крючок в петли предыдущего ряда) и закончите обвязку рукава «рачьим шагом».
Так же выполните обвязку горловины изделия.
Более длинный край низа изделия украсьте деревянными бусинами разных размеров, шнурами, кисточками.


Пояснения к выполнению джемпера “Пустыня”
Для удобства восприятия образец сделан разными по цвету нитками, так как фотография плохо передает разные оттенки и фактуры белого цвета, как в оригинале модели. Подбирать основные нитки лучше близких тонов, но разной толщины. Для бурдона подойдет любая нить с блеском (вискоза, микрофибра). И очень тоненькая контрастная нить для вязания – вискоза.

Вязание выполняется вертикально от бокового шва. Свяжите цепочку из ВП (количество каждый определяет для себя сам, чем меньше петель, тем больше будет зигзагов и поворотов), и выполняем по ней СБН. Провязав пару рядов, снова набираем ВП (1) и вывязываем на них СБН, формируя с одной стороны линию проймы, с другой плавный спуск к талии (2).
Для придания выпуклой и рельефной фактуры полотну используйте вспомогательную нить (бурдон) произвольной длины (3). Выполняйте ВП, подхватывая бурдон в месте сгиба (4), и провязывайте СБН, обхватывая вспомогательную нить (бурдон) через ВП (5). Сделав некоторое количество петель, поверните вязание (6) и продолжите работу СБН через 1ВП, вводя крючок под ВП предыдущего ряда (7). Оставьте вязание с бурдоном и с другой стороны привяжите нить другого цвета (фактуры) (8).

Для придания выпуклой и рельефной фактуры полотну используйте вспомогательную нить (бурдон) произвольной длины (3). Выполняйте ВП, подхватывая бурдон в месте сгиба (4), и провязывайте СБН, обхватывая вспомогательную нить (бурдон) через ВП (5). Сделав некоторое количество петель, поверните вязание (6) и продолжите работу СБН через 1ВП, вводя крючок под ВП предыдущего ряда (7). Оставьте вязание с бурдоном и с другой стороны привяжите нить другого цвета (фактуры) (8).
Выполните СБН (9) несколько рядов. Вязание произвольное, количество рядов, петель и чередование нитей каждый выбирает для себя сам. Оставьте петельку, нить не обрывайте (10).

Поверните вязание, выполните поворот с бурдоном. Обратите внимание: Рабочая нить за работой, петля перед работой! Сделайте ВП, и несколько (2-4) СБН в одну петлю основания (11). Оставьте вязание с бурдоном, привяжите нить с другой стороны, наберите цепочку из ВП и выполните по ним СБН (12). (13) Провяжите несколько рядов СБН (Кто сколько хочет). Я стараюсь поворачивать ряды плавно, чтобы не было ровного края, но это опять же дело вкуса каждой вязальщицы. (14) Дойдите до того места, где оставили бурдон. (15) Выполните поворот (16) и вяжите, таким образом, сколько хочется.


(17) Вернитесь к петельке, оставленной ранее (10), этой нитью выполняйте ССН через одну ВП. НЕ забывайте, что с этой стороны будет пройма! То есть сразу набирайте большее количество петель и формируйте линию проймы. (18) Поверните изделие и вяжите с бурдоном.

Оставьте бурдон (19) и рабочей нитью (в данном случае) выполняйте СБН, формируя линию талии таким образом, чтобы вернуться к бурдону.

(20) Подхватите бурдон и продолжите работу с бурдоном.

Когда бурдон закончится, плотно довяжите СБН, пряча концы бурдона под вязанием. (21) Вот таким образом наращивайте полотно, постоянно прикладывая его к выкройке.


Приемы вязания отдельных элементов и формирование полотна в технике фриформ показаны не с целью копирования, а лишь для примера. повторить модель в этой технике невозможно, да и не нужно, творите и экспериментируйте, ведь в этом главное преимущество фриформа – у вас обязательно получится что-то своё.