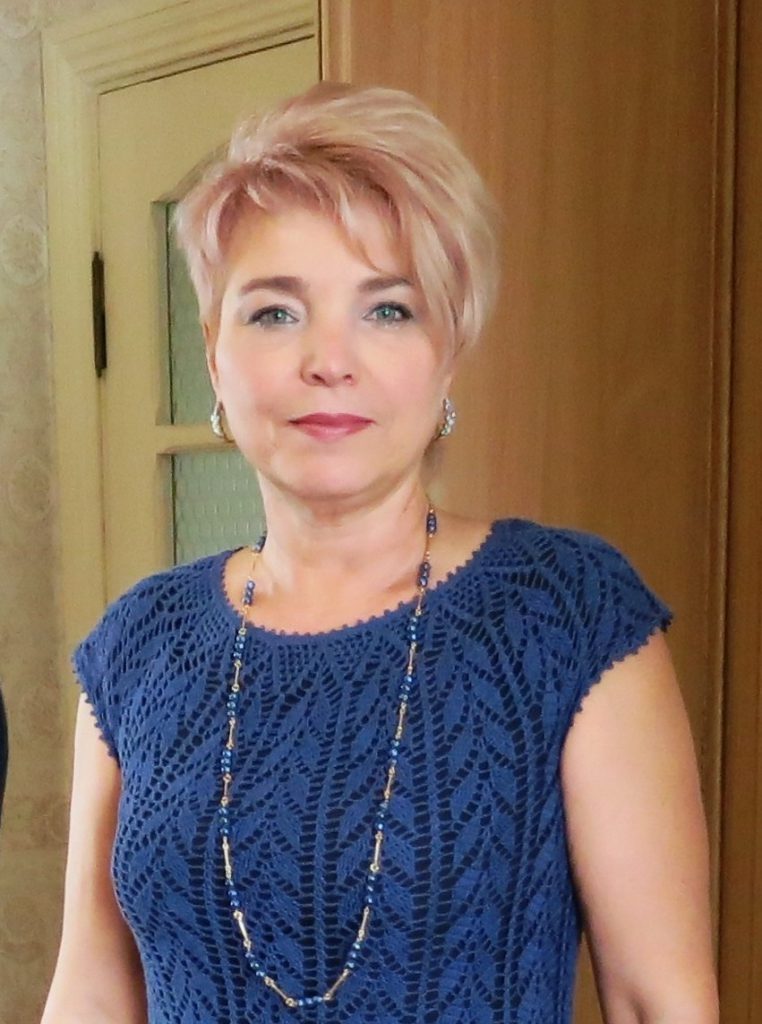
Blouse – White Lily

Pattern Scheme C

Pattern A diagram

Pattern B diagram

Description of knitting a product on a round yoke with a “lily” pattern.
1. Cast on 192 loops and knit 25 rows (3 stripes) according to the yoke pattern.

2. The result was 480 loops and 48 motifs (lilies).

3. Mark the front (15 motifs), back (15 motifs) and 9 motifs for each sleeve.
4. Along the back on 15 motifs, knit 6 rows (strip). This, firstly, widens the armhole; secondly, the back neckline will become higher than the front neckline and will not pull the product back.
5. At the end of the strip, cast on 9 VP and then continue to knit on 15 front motifs, another 9 VP and connect to the back. Next knit in the round. On the 9th VP (between the front and back) knit 1 motif. Total motives: 15+15+1+1=32 pieces
6.Knit 18 rows (3 stripes) with a “B” pattern.
7.Knit from the 19th to the 24th row with the “B, C” pattern.
8.Knit from the 25th to the 48th row with the “C” pattern.
9.Tie the bottom...

10.Knit a sleeve. On the side of the stripe of the back and on 9 VPs connecting the back and front, dial 2 motifs. In total there are 9+2=11 motifs on the sleeve. Knit 12 rows (2 stripes) with a “B” pattern.

11. Finish with binding.

The principle of knitting products on a round yoke is based on the fact that for any size the same number of loops is cast, the main thing is that the head goes through. If it doesn’t work, it needs to be adjusted. We have a cast-on row of 192 loops. Scheme No. 1.. The original suggests knitting in rotary rows. I cast on 192 loops. I closed it in a ring (checked that the chain was not twisted anywhere). 1st row. – 192 columns. She turned and knitted the second row.
SECOND ROW! The most important row in the product! This row forms increases, due to which the yoke expands! The report turns out like this: 5 loops should be formed from 4 loops. *Three chain stitches, 2 SC! from one top of the column of the previous row! * LEGEND! I turned the knitting and knitted the 3rd row. I pulled it through my head and it seemed fine. The report in the product is 10 loops. It will be formed in the second row due to increases. If 192 loops are too few or too many (we increase or decrease the reports). It is advisable to reduce or add an even number of reports. It’s not logical when there are 12 lilies on the left sleeve and 13 on the right sleeve……. The cast-on row is 8 stitches. So we dial like this: 192, or (192 + 8 loops for each additional report). We reduce according to the same principle. After the third row is knitted, we do a control count. If you cast on 192 loops, you should get 24 lilies (or in another way - 240 loops). There shouldn't seem to be any problems until row 10. 10th row - increases are made, but not like in the second row, but already half as often. If the increases are made correctly, then by knitting the 11th row you should get 32 lilies (320 loops). We knit further. In the 18th row we make increases (now after 4 reports)! As a result, we get 400 loops (i.e. 40 lilies). The 19th row was tied up and the lilies were counted. We knit further. Until the yoke is completed. Last row of yoke: double crochets (25th row). It should have 480 loops. Next we separate 150 loops for knitting a sprout. The sprout is knitted like this. We finished the 25th row of the yoke, turned the knitting and began to knit the first row of the sprout on 150 loops (15 lilies). The sprout is knitted in turning rows. Having knitted the last 6th row of the sprout, we turn the knitting and begin to knit the first row of pattern B. It becomes much clearer how it is attached to the sprout if instead of this first row, look at pattern B, the seventh row. The first and seventh rows of diagram B are absolutely identical, but in the seventh row you can see how to correctly attach the row to the lily petals. We knitted to the end of the sprout, picked up 9 air stitches, and attached them to the front of the product. Using 150 loops, we knitted the first (to be clearer, the seventh row) of pattern B, cast on 9 chain stitches and connected them to the back. The circle is closed. Let's move on to the second row of diagram B. You should get 15 back lilies + 1 lily on 9 chain stitches, + 15 front lilies + 1 lily on 9 chain stitches. Next we knit according to pattern B, as many stripes as we want. In the original, you need to knit 3 stripes consisting of 18 rows. Those. from the 1st to the 12th row, and then from the 7th to the 12th. What you see in diagram B above, after the 12th row there are 5 more rows, this is an example of sleeve tying. In the diagram, these 5 rows are united by a bracket, and there is a crossed out letter T. There is no need to knit these rows!!! The sleeves are also knitted according to pattern B. And having knitted them, we will just finish them with a binding, moving from the 12th row to the binding.
In the yoke pattern, between the stripes of motifs there are rows (1st, 9th, 17th) of double crochets. But in the back and front patterns “B”, “B, C”, “C” there are no such rows. Such stripes of columns look more harmonious on the model. Moreover, with the help of such rows you can also expand/fit.
So that the canvas is straight, i.e. so that the number of lilies does not change, you can do this:

Before casting the first row of the pattern, we look at the row of already knitted lilies. Above the gap between the lilies of the previous strip we make 3 VPs, sc across 2 double crochets from the previous row, another sc, three VPs again, sc across 3 scs from the previous row, another sc, etc. The number of lilies remains constant.
Very comfortably. No diagrams needed.
Regarding the expansion of the fabric during the transition from the waist to the hips. If you add three five-petal lilies to the sides, alternating them with four-petal ones (i.e., 5, 4, 5, 4, 5) and knit the first row of the next strip as described above, then the number of lilies in the next strip will increase by one on each side.
Skirt extension. We knit 4-petal and 5-petal lilies through one. But we make sure that the number of 5-petal lilies is a multiple of three. And again we knit the first row of the next strip as described above.
An example of expanding the fabric of a bell skirt in rows:
- 1 – 26 lilies
- 2 – 28
- 3 – 32
- 4 – 32
- 5 – 38
- 6 – 40
- 7 – 44
- 8 – 44
- 9 – 46
- 10- 50
- 11- 50
- 12- 52
Knitting pattern for a sprout on a round yoke

Master class on knitting a sprout


Blouse – Cream Lily

Size: 38.

Required: 300 g of beige yarn (100 % cotton, 50 g/250 m), hook number 2.
Lily pattern for a yoke: diagram 4-1, the diagram shows circular rows.
On the pattern it is indicated by the number 1.
Basic “lily” pattern: pattern 4-2, rows 3 to 10 are repeated, circular rows are indicated on the pattern.

On the pattern it is indicated by the number 2.
Description.
The dimensions, location of patterns and direction of work are indicated on the pattern (Fig. 4-1).
Start knitting from the top of the neckline.
The work is carried out in stages.
First stage (yoke).
Knit a chain of 192 sts. p. (a number that is a multiple of 8), close it in a ring and then knit it with one piece of fabric without seams in a circle with a pattern according to pattern 4-1 (24 repeats).

Connect each row with. With. and knit the required amount in. p. to climb to a new row.
The diagram shows the expansion of the canvas and the line of transition to a new row.
From the 2nd to the 17th row, repeat again
. In the 4th stripe of “lilies” the row has 56 rapports.
Having knitted 4 stripes of “lilies”, finish working on the yoke.
Second stage (lower part).
Divide the fabric into 4 parts (back and front 15 repeats each, armholes 13 repeats each).
Make marks with pins.
Leave the armholes out of work.
Connect the back and front into one fabric, knitting 1 arch of 8 stitches at the armholes. p. (see row 18 in diagram 4-1, highlighted in red).
Next, above the arches you knit 1 repeat of the pattern.
Then knit according to the 4-2 pattern, placing the “lily” rapport one above the other, repeating from the 3rd to the 10th rows.
Knit exactly in the round, placing the rise line for the new row along the side seam. Having knitted 6 stripes of “lilies”, finish working on the bottom part.
Third stage (assembly).
Tie the edge of the hem with the 1st row of stitches. b/n.
Tie the armholes in a circle with a pattern according to pattern 4-2 (from the 2nd to the 8th row).
Finish the work by tying the edge with the 1st row of st. b/n.
Related posts
About the Author

Welcome !
My name is Lilia. The main hobby of my life is knitting. I started with knitting needles and switched to a knitting machine. In 1988 I got acquainted with crochet - Romanian lace. About 10 years ago I became interested in Irish lace and Shetland knitting. And now I’m trying fillet crochet. On this site I want to share with you my 45 years of experience in various knitting techniques.
Latest publications
Top Race the Wind
Ажурный удлиненный пуловер
Ажурный удлиненный пуловер связанный из 100% биохлопка не оставит равнодушным никого. Сияющий коралловый цвет пленит кого угодно!
Pink crochet cardigan
Blog Subscription
Be the first to receive new items!


