
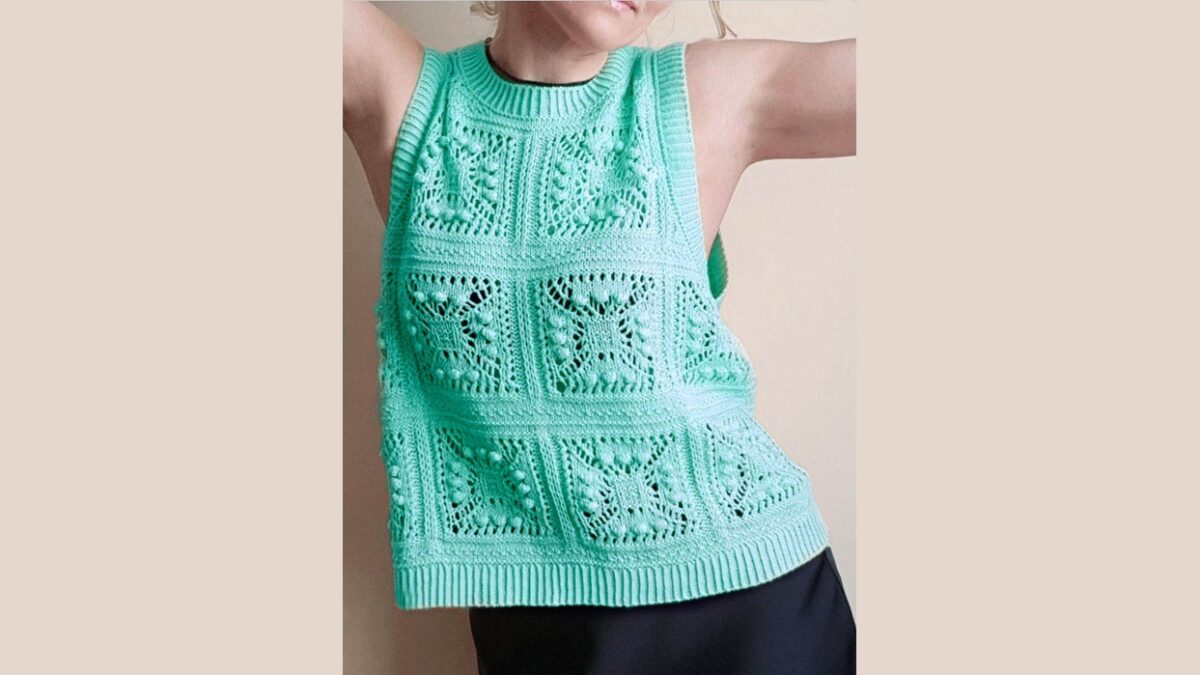
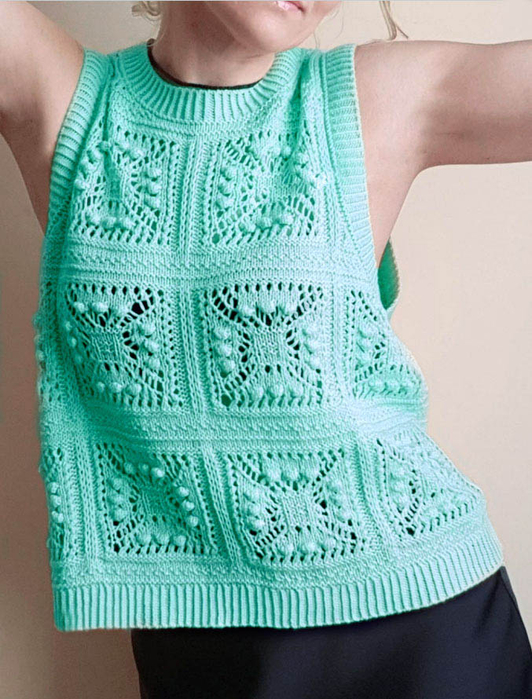
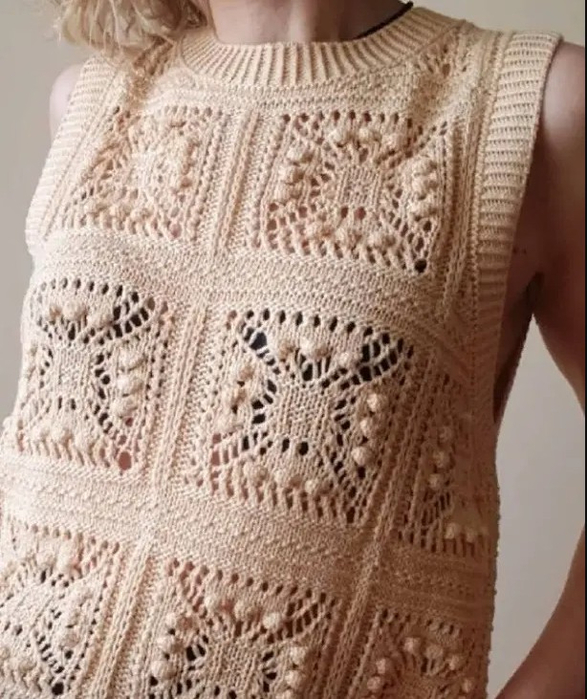
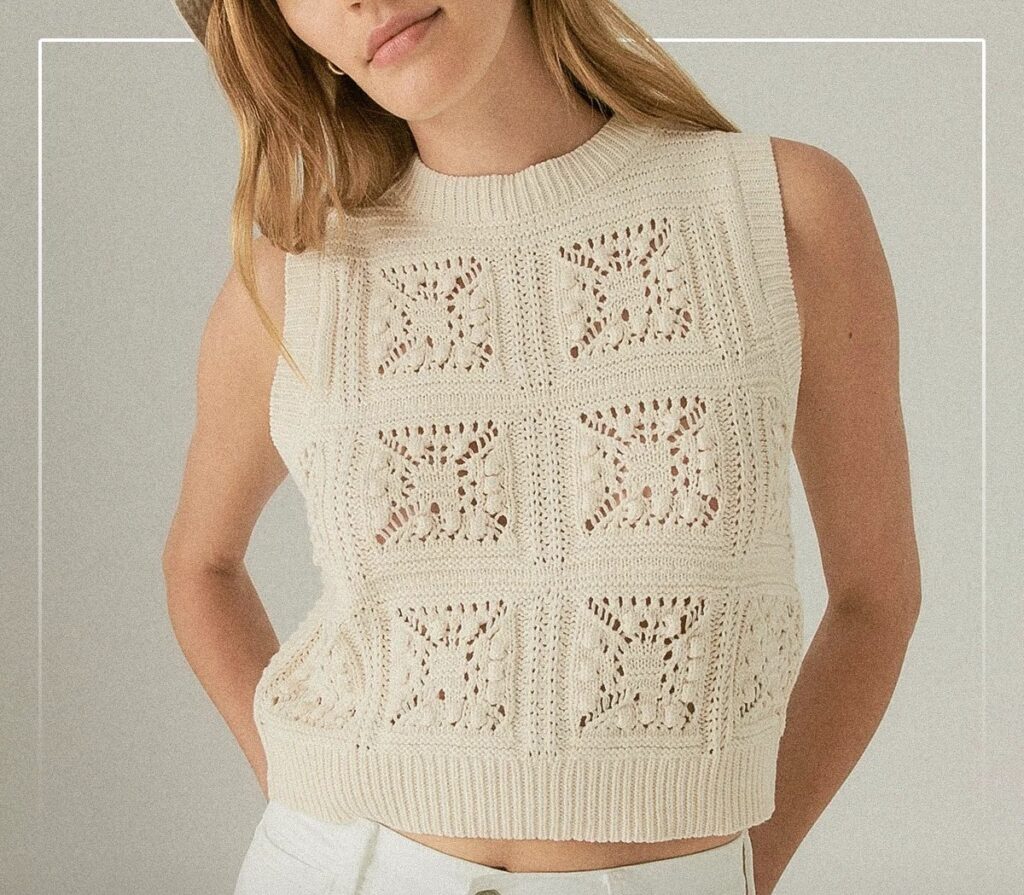
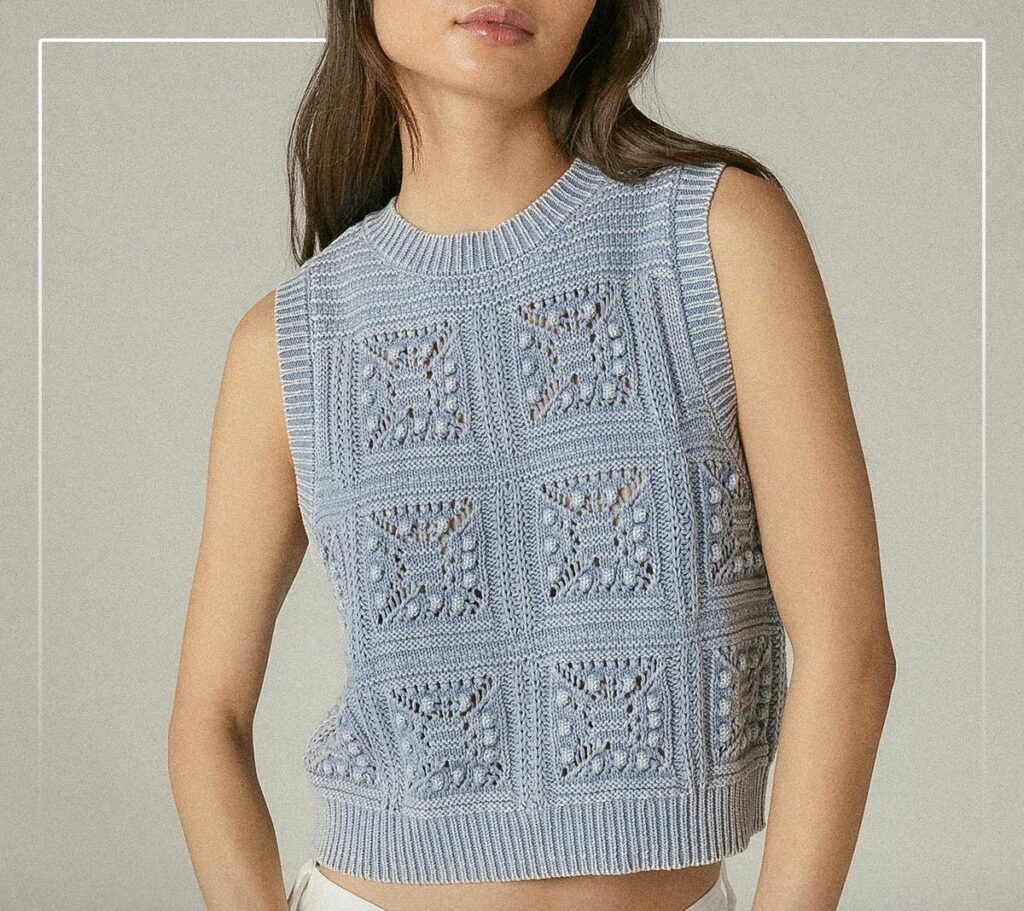
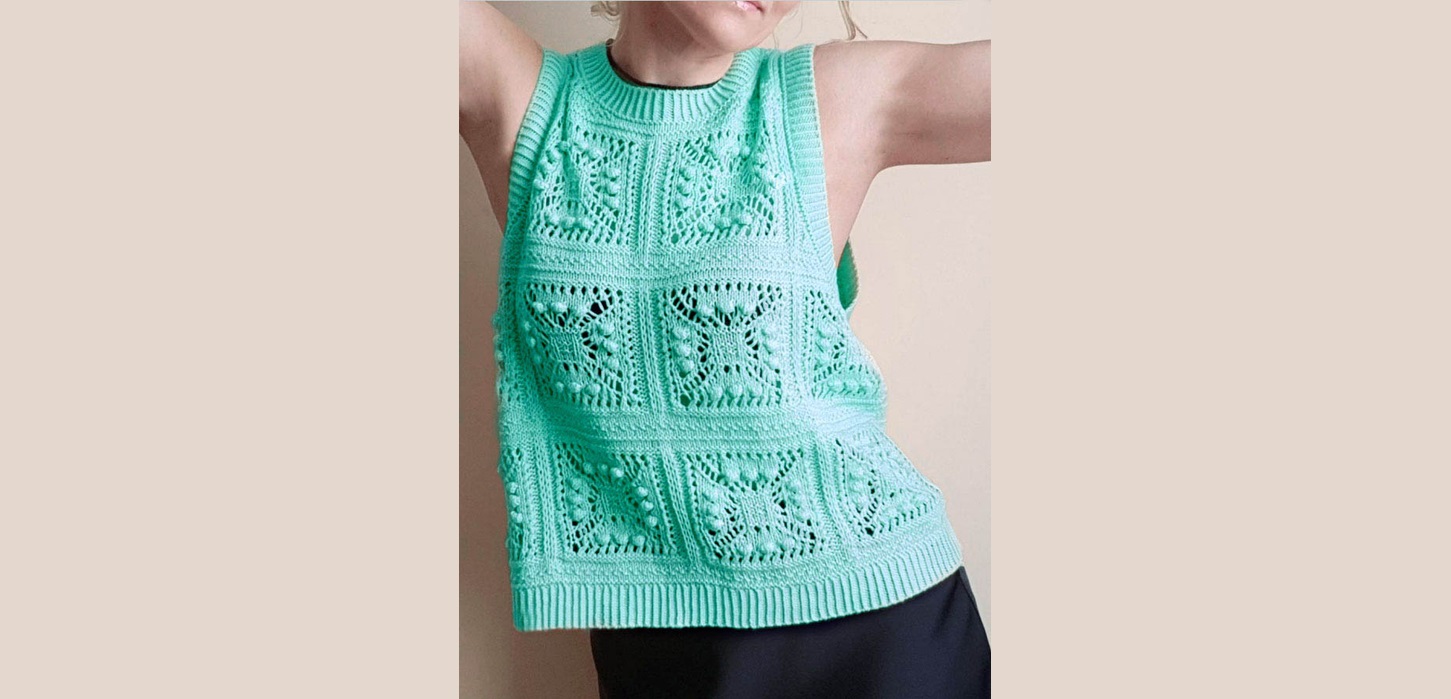
Top knitting with imitation motifs.
Required skills: knitting knit and purl stitches, making yarn overs, knitting 2 and 3 together knit/purl with a right/left slant (ability to observe decrease slopes when knitting both on the front and back sides), Italian cast-on stitches, casting off loops, ability to read patterns , attentiveness.
Size.
Chest circumference 77-84 (85-92, 93-100, 101-108) cm and average height 168 cm, which roughly corresponds to sizes XS (S, M, L).
Here and below, differing data for sizes are given in parentheses.
Design features.
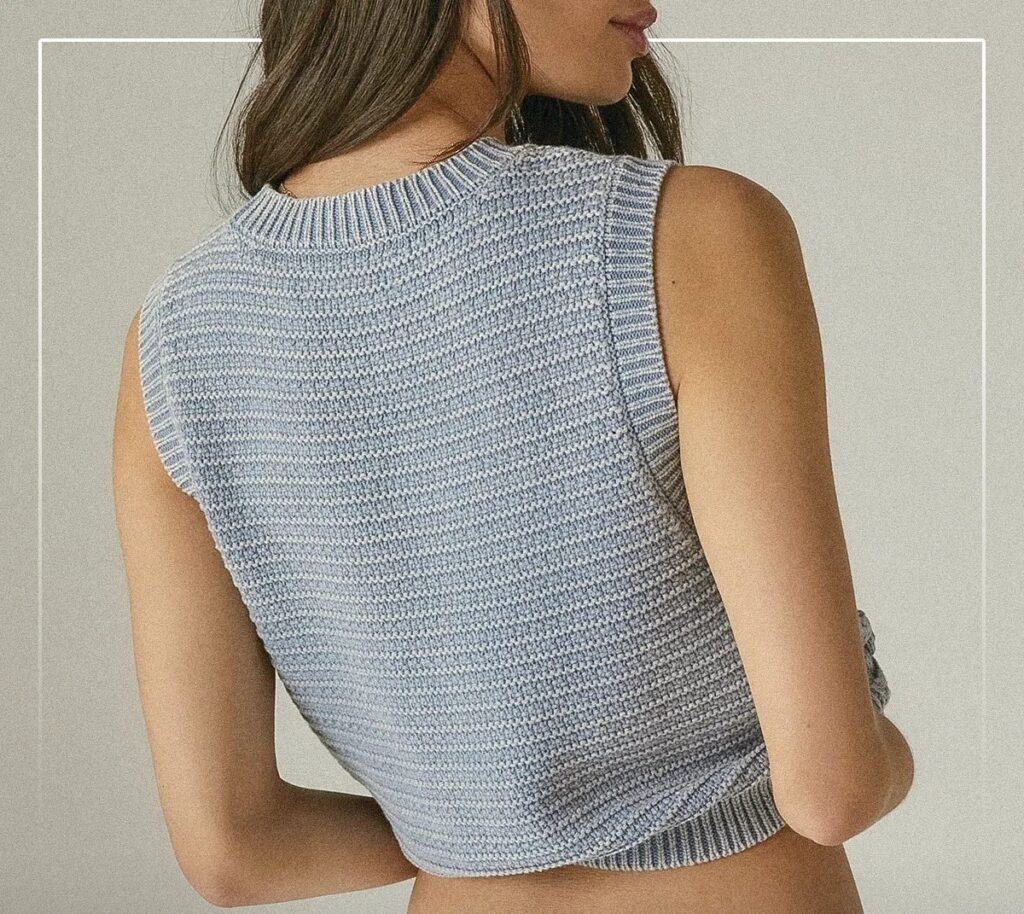
Shortened vest-top “Baroque” with a fit of about 12 cm and deep armholes.
The vest-top is knitted in one piece. First, the body from the bottom up to the armholes, then the division into front/back. Shoulder seams are made. Trims are made along the edges of the neckline and armholes.
Materials.
Blended yarn 50% cashmere, 50% silk; 360 m/100 g. You will need 180 (200, 225, 250) g or 650 (720, 800, 900) m. Consumption is indicated for the length according to the pattern for average height. When adjusting the length, the flow rate will change.
Any cotton yarn, linen, silk or yarn mixed with cotton, silk, flax, etc. with a meter of about 300-360m/100g is suitable, with which you can get into the specified density and at the same time obtain the desired texture of the fabric. In terms of consumption, you should focus on the total consumption in meters, and not in grams, because... All yarn has different meterage, and thicker yarn will take more grams than thinner yarn.
Tools.
̶ 3.5mm circular knitting needles (or others that provide the specified density);
̶ additional circular knitting needles 2.75 mm (or others for knitting elastic bands, which will be selected when knitting the sample);
̶ hook (for removing ends);
̶ needle (for making shoulder seams and closing elastic bands).
Density.
25 p. x 32 r. = 10cm x 10cm with an openwork pattern on 3.5 mm knitting needles after WTO.
30 p. x 46 r. = 10cm x 10cm with crossed ribbing 1x1 on 2.75 mm knitting needles after WTO.
List of abbreviations.
n. - loop;
R. - row;
persons – front loop;
purl – purl loop;
faces.sk. – front crossed loop;
out.sk. – purl crossed loop;
LS – front side;
IS – wrong side;
2 vm. persons etc. – 2 knit stitches together with a slant to the right (= 2 knit stitches together);
2 vm. persons l. – 2 knit stitches together with a slant to the left (= pull through: slip 1 loop as a knit stitch, knit 1, pull the knitted loop through the removed one);
2 vm. purl etc. – 2 loops together, purlwise, tilted to the right (= 2 stitches together, purlwise);
2 vm. purl l. – 2 loops purl together with a slant to the left (= remove 2 stitches alternately as knit stitches, return them to the left knitting needle, purl them together behind the back wall);
3 vm. persons etc. – 3 knit stitches together with a slant to the right (= 3 knit stitches together);
3 vm. persons l. – 3 knit stitches together with a slant to the left (= alternately slip 2 loops as knit stitches, knit 1, pull the knitted loop through the removed ones);
3 vm. purl etc. – 3 loops together, purlwise, tilted to the right (= 3 stitches together, purlwise);
3 vm. purl l. – 3 loops together purlwise with a slant to the left (= remove 3 stitches one by one as knit stitches, return them to the left knitting needle, knit 3 stitches together purlwise behind the back walls);
3 vm. persons c. – 3 knit stitches together with a central loop on top (= slip 2 stitches at the same time as knit stitches, knit 1, pull the knitted loop through the removed ones);
MNR – marker of the beginning of the row.
Edge loops are included in the total count of loops and are knitted in each row. For LS - knit, for IP - purl.
Patterns used.
Rib 1x1 crossed (circular rows, even number of loops) 1st row: *K1, P1, repeat from * to end of row. Repeat row 1.
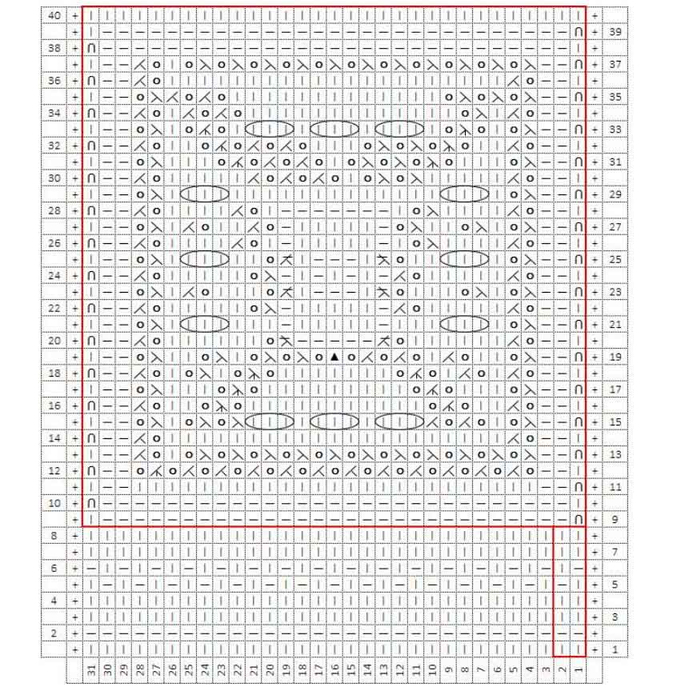
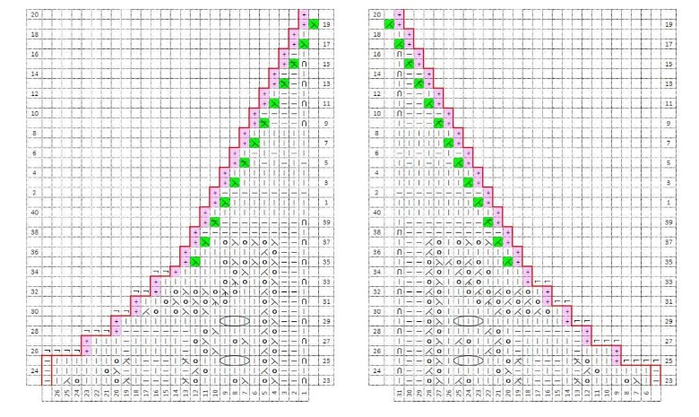
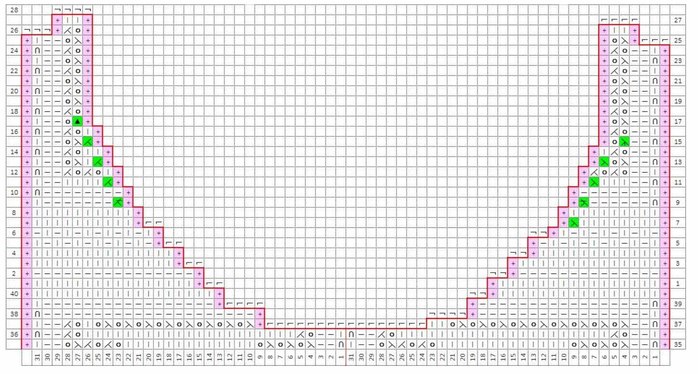
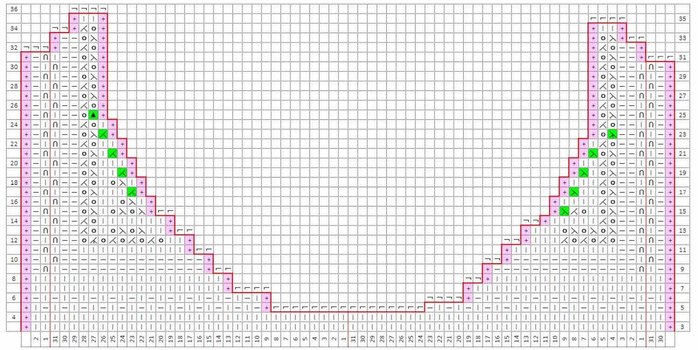
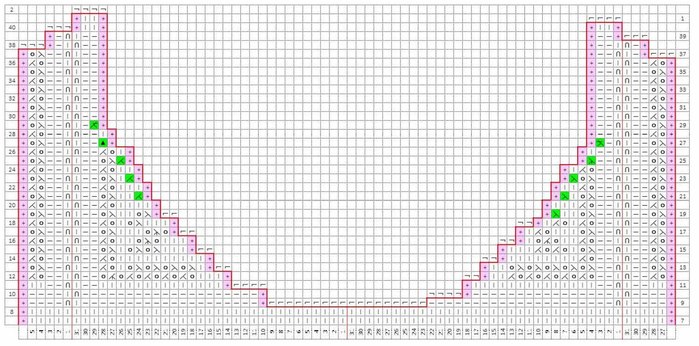
Figure 1. Openwork square pattern.
– All rows are indicated on the diagram.
– Odd rows go along the LS, respectively, read from right to left.
– Even rows go along the IS, respectively, read from left to right.
– All the icons on the diagram are drawn as they look on the LS (the same icon is knitted differently on the LS and IS).
- IMPORTANT!!! Observe tilts when performing decreases so that the openwork pattern is not disturbed.
– The cone can be knitted as suggested in the symbols or in any other way acceptable to you (knitting or crocheting).
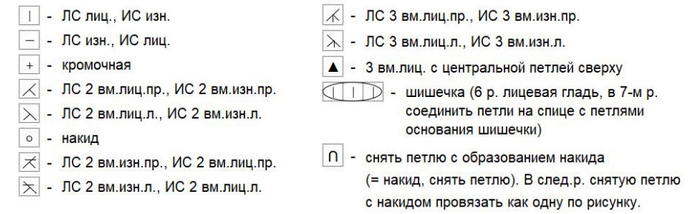
Figure 2. Symbols for the diagram.
The pattern repeat is outlined in red. Please note that in the lower part of the pattern the rapport is 2 p., in the upper part - 31 p.
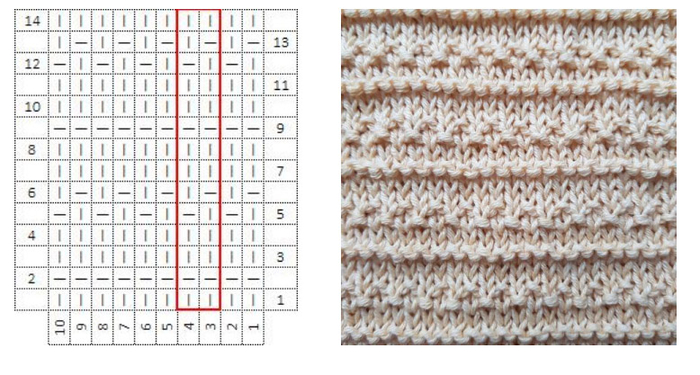
Figure 3. Pattern “relief paths”.
Sample.
Knitting needles 3.5mm. Cast on 33 stitches as usual. Knit 40 rows using the openwork square pattern.
Close the loops. Wash the sample and let it rest/dangle, then measure the openwork pattern as follows:
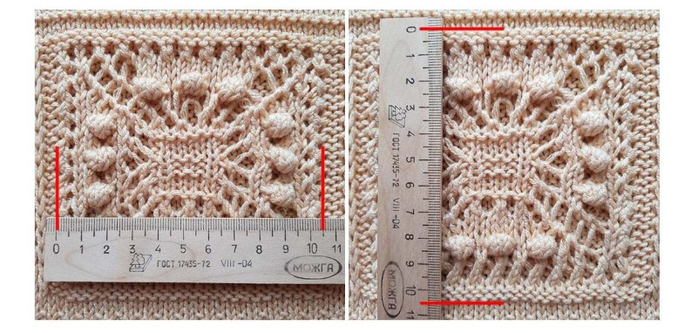
Figure 4.
To ensure the specified knitting density, these measurements should be 10.5 cm.
IMPORTANT! Be sure to select a spoke number that will get you to the desired density. The specified number of spokes does not guarantee that you will hit the specified density, because... Everyone has their own knitting style.
If the width measurement is more than 10.5 cm (i.e. your knitting is looser), you need to change the knitting needles to thinner ones. If the width measurement is less than 10.5 cm (i.e. your knitting is denser), you need to change the knitting needles to thicker ones.
Deviation from the specified density will result in a change in the dimensions of the finished product.
You also need to select knitting needles for knitting elastic bands. Rubber bands are an important part of the design. They should beautifully frame the entire vest and stabilize the armholes. Therefore, the elastic bands must be tied tightly!
There will be 38 elastic stitches per square of the openwork pattern (31 stitches). In this case, the elastic band (after the WTO) should neither fray nor tighten the fabric. She just frames it.
On knitting needles 1 mm thinner than the main ones, cast on 38 stitches and knit 14 rows with a crossed 1x1 elastic band. After the WTO, the following measurements should be obtained:
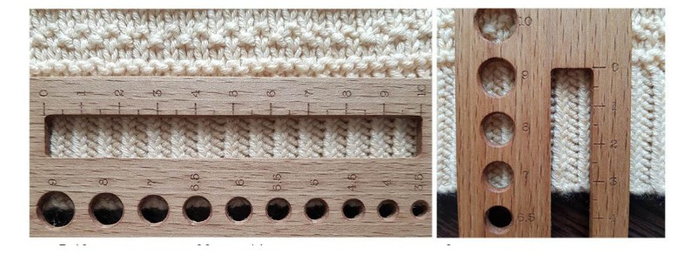
Figure 5.
In 10 cm it turns out to be 30 p., and 14 r. give a height of approximately 3cm.
If there are fewer stitches in the 10cm width, you should knit a new sample on even thinner knitting needles.
Beginning of work.
Before starting work, be sure to read all the introductory information and select knitting needles that provide the specified knitting density. These will be the main spokes. You also need to select knitting needles for knitting elastic bands. All this is selected in the sample section.
Body rubber.
Knitting needles for elastic. Cast on 276 (300, 324, 348) stitches using the Italian method. To prevent the edge from fading, cast on tightly, or cast on even thinner knitting needles than knitting needles for elastic bands.
Without closing the circle, knit 1 row with a hollow elastic band: *K1, remove 1 with thread before work, repeat from * to the end of the row. Close the loops in a circle, bringing the last loop of the row to the first. Hang MPR. Make sure that the set row does not twist.
Knit 16 rows with crossed 1x1 rib.
Transition to the main canvas.
Basic knitting needles.
The entire row is knitted with knit stitches!
*Knit 4, knit 2, repeat from * to end of row. There are 230 (250, 270, 290) stitches on the needles.
Body before the beginning of the armholes.
The loops on the knitting needles are distributed as follows:
114 (124, 134, 144) front, 114 (124, 134, 144) back, and 1 dividing loop between them. Separating stitches are knitted purlwise. The “relief tracks” pattern is knitted on the back loops.
The complete repeat of the openwork square pattern is 31 loops and 40 rows. In the 5th and 6th rows, the alternation of knit and purl stitches should be continuous when moving from one repeat to another.
Adjustment for growth.
If it is necessary to lengthen the top for height or in accordance with personal preferences, after the elastic band an incomplete repeat of the “lace square” pattern is knitted in height. For example, when lengthening the top by 4 cm, you need to knit additionally
14 rows: from the 27th to 40th rows of the “lace square” pattern on the front loops, and full repeat from the 1st to 14th rows of the “relief paths” pattern on the back loops.
Distribution of front loops by size.
XS (114 p.): 26 p. of the “lace square” pattern from the 6th to the 31st loop, 2 full repeats of the “lace square” pattern, 26 p. of the “lace square” pattern from the 1st to the 26th loop.
S (124 p.): 4 full repeats of the openwork square pattern.
M (134 p.): 5 p. of the openwork square pattern from the 27th to the 31st loop, 4 full repeats of the openwork square pattern, 5 p. of the openwork square pattern from the 1st to the 5th loop.
L (144 p.): 10 p. of the openwork square pattern from the 22nd to the 31st loop, 4 full repeats of the openwork square pattern, 10 p. of the openwork square pattern from the 1st to 10th loop.
Important! In incomplete repeats of the openwork square pattern, you need to ensure that the number of decreases corresponds to the number of increases to maintain the total number of loops.
Knit 64 (64, 68, 70) rows in the prescribed order. On the front, the repeat of the openwork square pattern is repeated from the 1st to the 40th row. On the back, the repeat of the “relief paths” pattern is repeated from the 1st to the 14th row.
Because knitting is done in circular rows, then in the patterns all rows go along the LS and are read from right to left.
After knitting the specified number of rows, we finished with the 24th (24th, 28th, 30th) row according to the “lace square” pattern on the front.
Next, the canvas is divided into front and back. Both parts are knitted separately. Knitting is done in turning rows. Follow the direction of reading the diagram and the correct knitting of badges on the LS and on the IS!
Before.
On the front loops, round off the armholes according to the pattern for forming the armholes for the appropriate size. The diagrams additionally indicate 2 rows preceding the beginning of the formation of the armholes, for a better reference. Start working according to the patterns from the 25th (25th, 29th, 31st) row.
In the 25th (25th, 29th, 31st) row, cast off 4 (5, 5, 6) loops, starting with a dividing loop (this loop is highlighted in red lines in the diagram). After completing the specified number of stitches, one stitch will remain on the right needle. It will be edge. Between the patterns of the right and left parts of the formation of the armholes, knit full repeats of the “openwork square” pattern of the current row. Groups of hinges larger than one are closed with a soft close (see below).
Further reduction of the loops occurs due to decreases near the edge. These decreases are indicated on the diagram on a green background.
Eliminating steps from closing hinges in groups.
In the previous row, before closing the next group of loops, do not knit the last loop of the row, remove it without knitting. Expand the work. Remove 2 loops, pull one through the other. One loop is closed. Continue casting off stitches as usual until the indicated number is reached.

Figure 6. Additional symbols for the diagrams.
Having knitted the entire pattern, from the beginning of the formation of the armholes you will get 36 (38, 42, 42) rows.
There are 64 (68, 74, 80) stitches on the needles.
Knit directly another 16 (22, 18, 22) rows, making sure that the decreases and increases in incomplete repeats of the openwork square pattern match.
After knitting the specified number of rows, we finished with the 36th (4th, 8th, 14th) row of the “lace square” pattern.
On the next 37th (5th, 9th, 15th) row, bind off the center 16 (16, 18, 18) stitches and finish both sides separately, following the neckline pattern for the appropriate size. The diagrams additionally indicate 2 rows preceding the beginning of the formation of the cutout, for better reference. Knitting the second shoulder begins with the IC by attaching the thread to the neckline.
After closing the shoulders, leave small thread ends, sufficient to complete the shoulder seams.
Back.
There are 114 (124, 134, 144) back stitches on the needles.
Knitting is done in turning rows. Carefully monitor the correct knitting of the “relief tracks” pattern along the LS and IS. Knitting begins with LS.
Round the armholes in every 2nd row on both sides (close groups of loops of more than one in a stepless way, reduce one loop by decreasing 2 cm next to the edge):
XS: 1 time 3 p., 3 times 2 p., 15 times 1 p.
S: 1 time 3 p., 3 times 2 p., 18 times 1 p.
M: 1 time 4 p., 3 times 2 p., 19 times 1 p.
L: 1 time 4 p., 4 times 2 p., 19 times 1 p.
There are 66 (70, 76, 82) loops on the needles. The back is 2 stitches wider than the front.
From the beginning of the armholes, 38 (44, 46, 48) rows are knitted.
Work directly another 36 (38, 38, 40) rows.
Next row cast off center 24 (24, 26, 26) sts and finish both sides separately. Knitting the second shoulder begins with the IC by attaching the thread to the neckline.
From the side of the neckline, steplessly close in every 2nd row:
XS, S: 1 time 6 p., 2 times 3 p., 1 time 2 p.
M, L: 1 time 7 p., 2 times 3 p., 1 time 2 p.
Simultaneously! In the last 3 (5, 5, 5) rows of knitting the neckline, perform stepless closure of the shoulders, as for the front:
XS: 1 time 3 p., 1 time 4 p.
S: 1 time 3 p., 1 time 2 p., 1 time 4 p.
M: 2 times 3 p., 1 time 4 p.
L: 2 times 4 p., 1 time 5 p.
After closing, leave a thread on one shoulder for further tying of the neckline.
Neck binding.
Sew shoulder seams using the threads left from closing the front shoulders. Then, using the thread from covering one shoulder of the back with knitting needles for elastic bands, cast on the loops along the edge of the neckline:
̶ along the edge with the edge loop (in the vertical sections and in the area where the cutout is formed with decreases near the edge loop) from each row, 1 p. Cast on from the space between the edge and adjacent loops;
̶ in areas with smooth closure, 1 st from each loop under the pigtail from closing. 82 (82, 86, 86) loops are cast on along the front neckline, along the back neckline;
– 56 (56, 60, 60) loops. Close the knitting in a circle, place the MHP.
1st row: purl all stitches.
2nd row: all knit stitches.
Knit 10 rows with crossed 1x1 rib. Close the loops with a needle.
Armhole binding
On knitting needles for elastic bands, cast on stitches along the edge of the armhole, starting from the middle of the armpit:
̶ along the edge with an edge loop from each row, 1 p.
̶ in areas with smooth closure, 1 st from each loop under the pigtail from closing.
There are 166 (180, 186, 196) stitches on the needles. Close the knitting in a circle, place the MHP.
1st row: purl all stitches.
2nd row: all knit stitches.
Work 10 rows with a crossed 1x1 rib, using 2 inch decreases. according to the drawing at the beginning and at the end of the 2nd, 3rd, 5th, 6th, 7th, 9th and 10th rows. The slopes of the decreases go towards the side line.
There are 152 (166, 172, 182) loops on the needles. Close the loops with a needle. The second armhole is tied in the same way.
Shutdown.
Hide the ends of the threads. Wash the vest-top, lay it out on a horizontal surface, straighten it out, and let it dry. Check the final dimensions on the pattern. Ready!
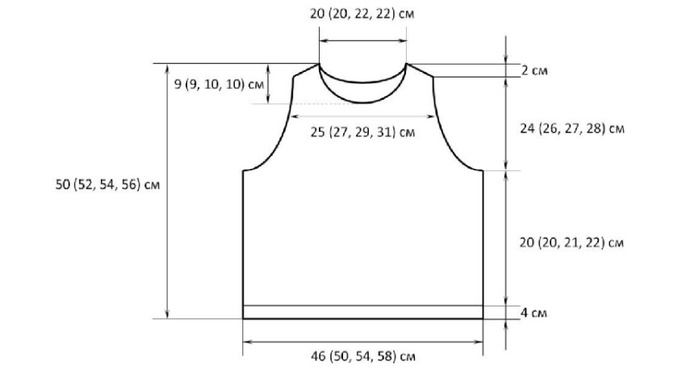
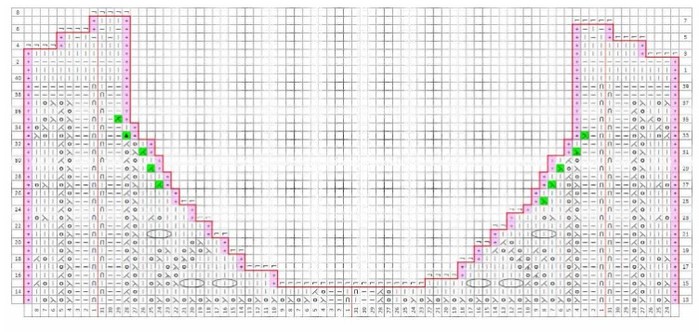
Figure 7. Pattern.
Scheme of formation of armholes. Size XS.
The last decreases to form armholes (in the 19th row of the pattern) are made using the outer loops of adjacent repeats. After them, the loops of two full repeats of the openwork square pattern and 2 edge loops remain on the knitting needles.
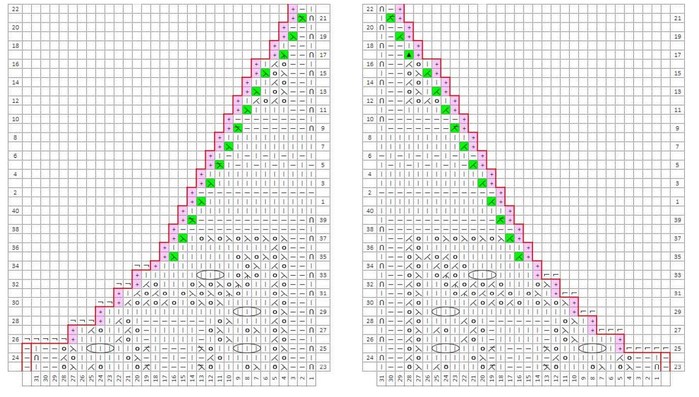
Scheme of formation of armholes. Size S.
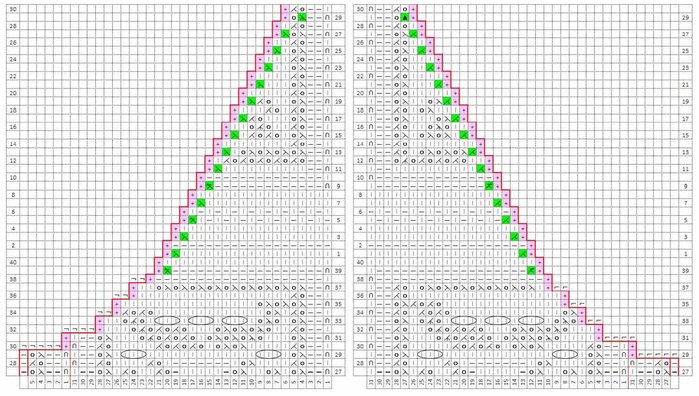
Scheme of formation of armholes. Size M.
Scheme of formation of armholes. Size L.
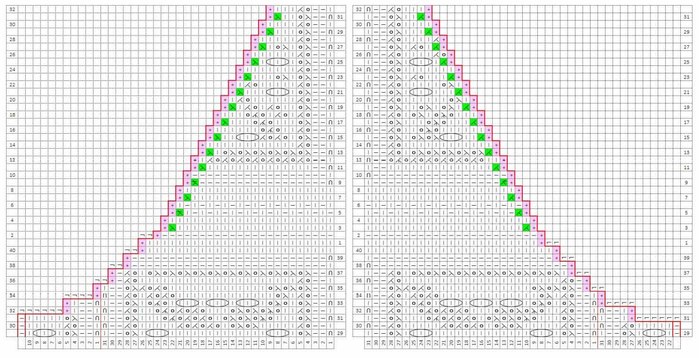
Scheme for forming the neckline. Size XS.
Scheme for forming the neckline. Size S.
Scheme for forming the neckline. Size M.
Scheme for forming the neckline. Size L.

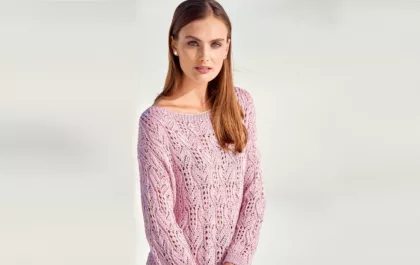
Пуловер с ажурным узором из «листьев»
Пуловер нежно-розового цвета ручной работы, связанный ажурным узором из шелковистой пряжи.
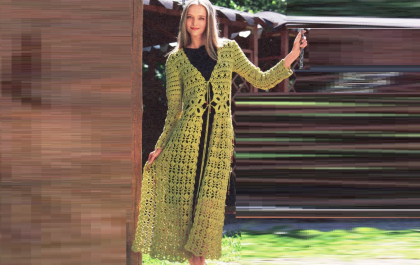
Knitted coat with an openwork pattern in light green color
Knitted coat with an openwork pattern in light green color