
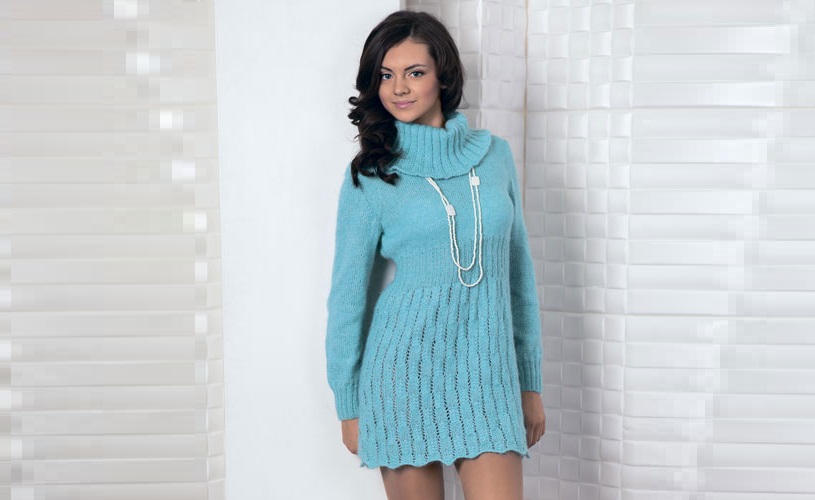

Blue dress with a large collar
This model is somewhat reminiscent of dresses in the style of the 60s, the length can be extended.
Author: Berdyugina V. A.
Size: 44/46

You will need:
- 350 g of Kamtex “Angora Lux” yarn (25 % mohair, 55 % acrylic, 20 % cotton; 200 m / 50 g) blue;
- circular knitting needles No. 2.5 and No. 3.5.
Knitting technique.
Facial surface: persons rows - persons. p., out. rows - purl. P.
Elastic band 2x2: alternately 2 persons. p., 2 p. P.
Elastic band 3x2: alternately 3 persons. p., 2 p. P.
Fantasy pattern: knit according to the pattern.
Knitting density, stockinette stitch on knitting needles No. 3.5: 23 sts x 28 r. = 10 x 10 cm.
DESCRIPTION OF WORK
Fully knitted front and back (lower part). On circular needles No. 3.5, cast on 216 sts and close in a circle. Next, knit 110 rows according to the fantasy pattern.

In the 111th row from the beginning of work, switch to knitting needles No. 2.5. Decrease 40 sts evenly. On knitting needles = 176 sts. Next, knit 32 rows with 2x2 rib. Switch to knitting needles No. 3.5. Increase 18 sts evenly. On knitting needles = 194 sts.
Fully knitted front and back (top). Divide the work into 2 equal parts, using a thread of a contrasting color to mark the side lines. Knit 26 rows in stockinette stitch. To design the side lines, from and to the marked points, increase in every 5th row from the beginning of the front stitch 3 times, 1 p. On the knitting needles = 206 p. Transfer the front loops to auxiliary knitting needles.
Back. On knitting needles = 103 sts. To create an armhole line in the 27th row from the beginning of the front stitch, close 3 sts on both sides, then in each 2nd row 1 time for 3 sts, 1 time for 2 sts, 2 times 1 p. On the knitting needles = 83 p. To design the neck line in the 53rd row from the beginning of the armhole lines, transfer the middle 33 p. to the auxiliary knitting needles, close on both sides of them in each 2nd row 3 times 2 p. On knitting needles = 19 sts. In the 60th row from the beginning of the armhole line, bind off all stitches in one row. Perform the left shoulder in the same way.
Before. Knit like a back. To design the neck line in the 33rd row from the beginning of the armhole lines, transfer the middle 23 sts to the auxiliary knitting needles, close on both sides of them in each 2nd row 1 time for 3 sts, 2 times for 2 sts, 4 times 1 p. On knitting needles = 19 p. In the 60th row from the beginning of the armhole line, close all loops in one row. Perform the left shoulder in the same way.
Right sleeve. On knitting needles No. 2.5, cast on 54 sts and knit 28 r. rubber band 2x2. In the 29th row, switch to knitting needles No. 2.5. Add 8 sts evenly. On knitting needles = 62 sts. Next knit in stockinette stitch. To widen the sleeve, in the 14th row from the beginning of the front stitch, increase on both sides by 1 p., then in each 14th row 4 times, 1 p. On the knitting needles = 72 p. To design the cuff line of the sleeve in the 106th row from the beginning of the front stitch, decrease on both sides by 3 stitches, then in each 2nd row 1 time by 3 stitches, 1 time by 2 stitches, 15 times by 1 stitch, 1 time by 2 stitches, 1 time for 3 sts. On knitting needles = 16 sts. In the 145th row from the beginning of the front stitch, close all the loops in one row.
Left sleeve. Knit like the right sleeve.
Assembly. Sew shoulder seams and sleeve seams. Sew the sleeves into the armholes.
Collar: onto circular needles No. 2.5, transfer front and back neck loops, additionally cast on 64 sts. On knitting needles = 120 sts. Next knit 16 r. rubber band 2x2. To widen the collar, in the 17th row from the beginning of work, add 1 knit in each 3rd and 4th row. p., then in the 29th row from the beginning of work in each 1st and 2nd path, 1 person. p. Next, knit 45 rows with a 3x2 elastic band. In the 76th row from the beginning of work, close all the loops in one row.

Ажурный удлиненный пуловер
Ажурный удлиненный пуловер связанный из 100% биохлопка не оставит равнодушным никого. Сияющий коралловый цвет пленит кого угодно!