
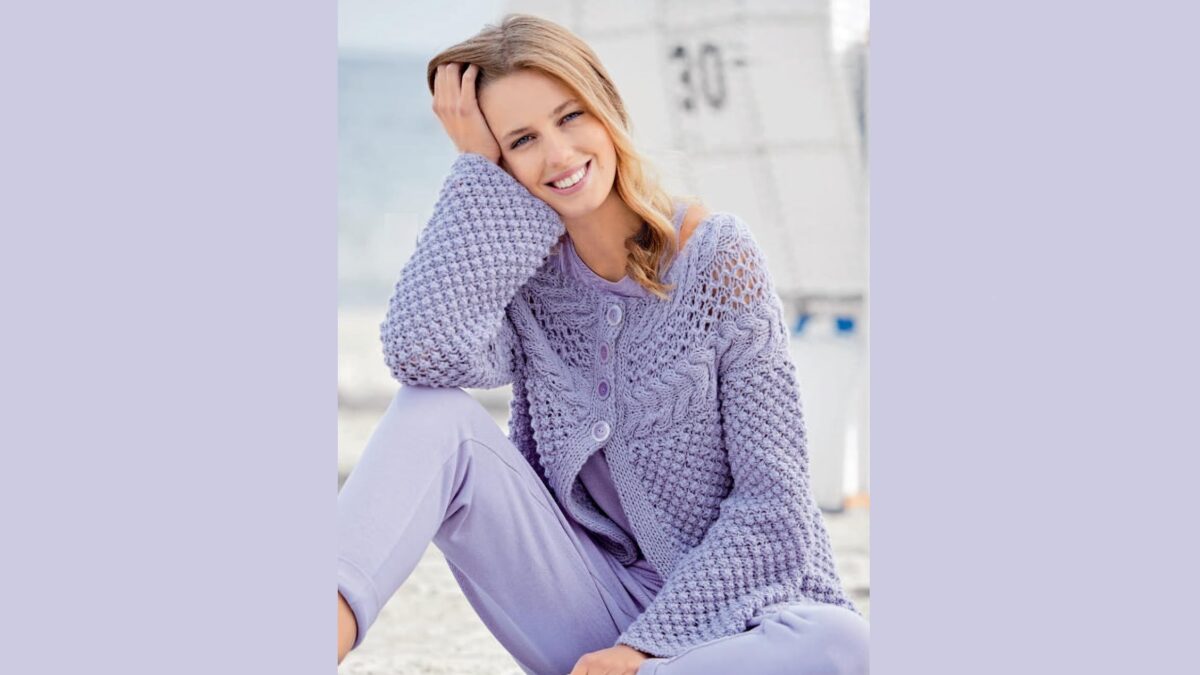
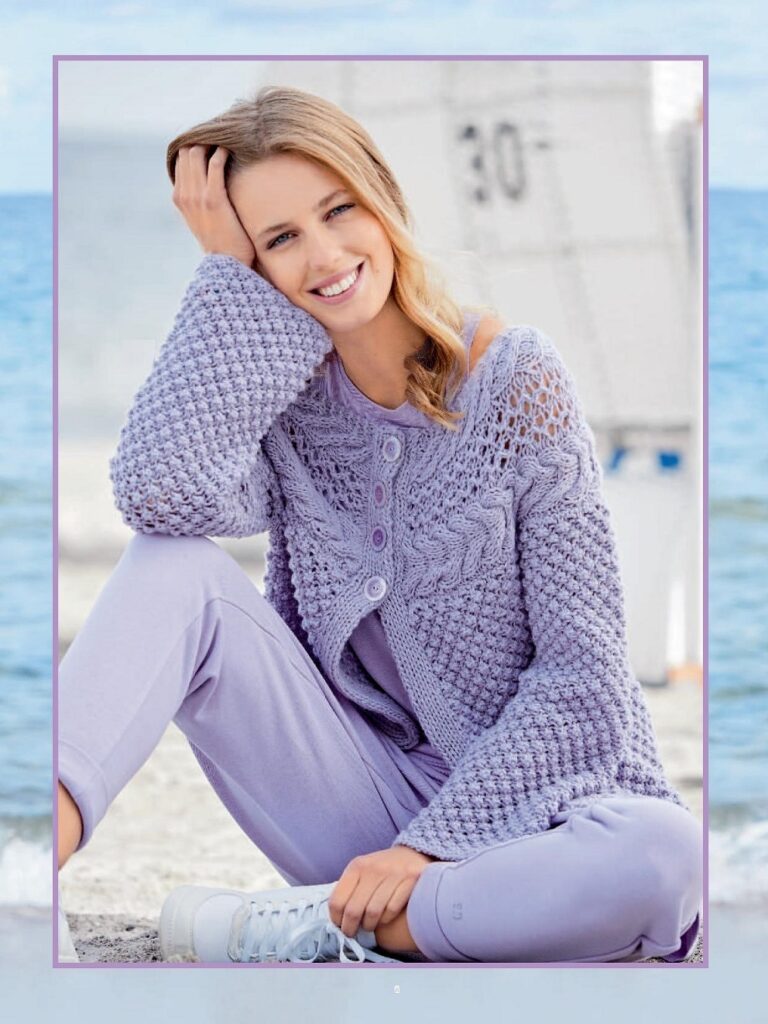
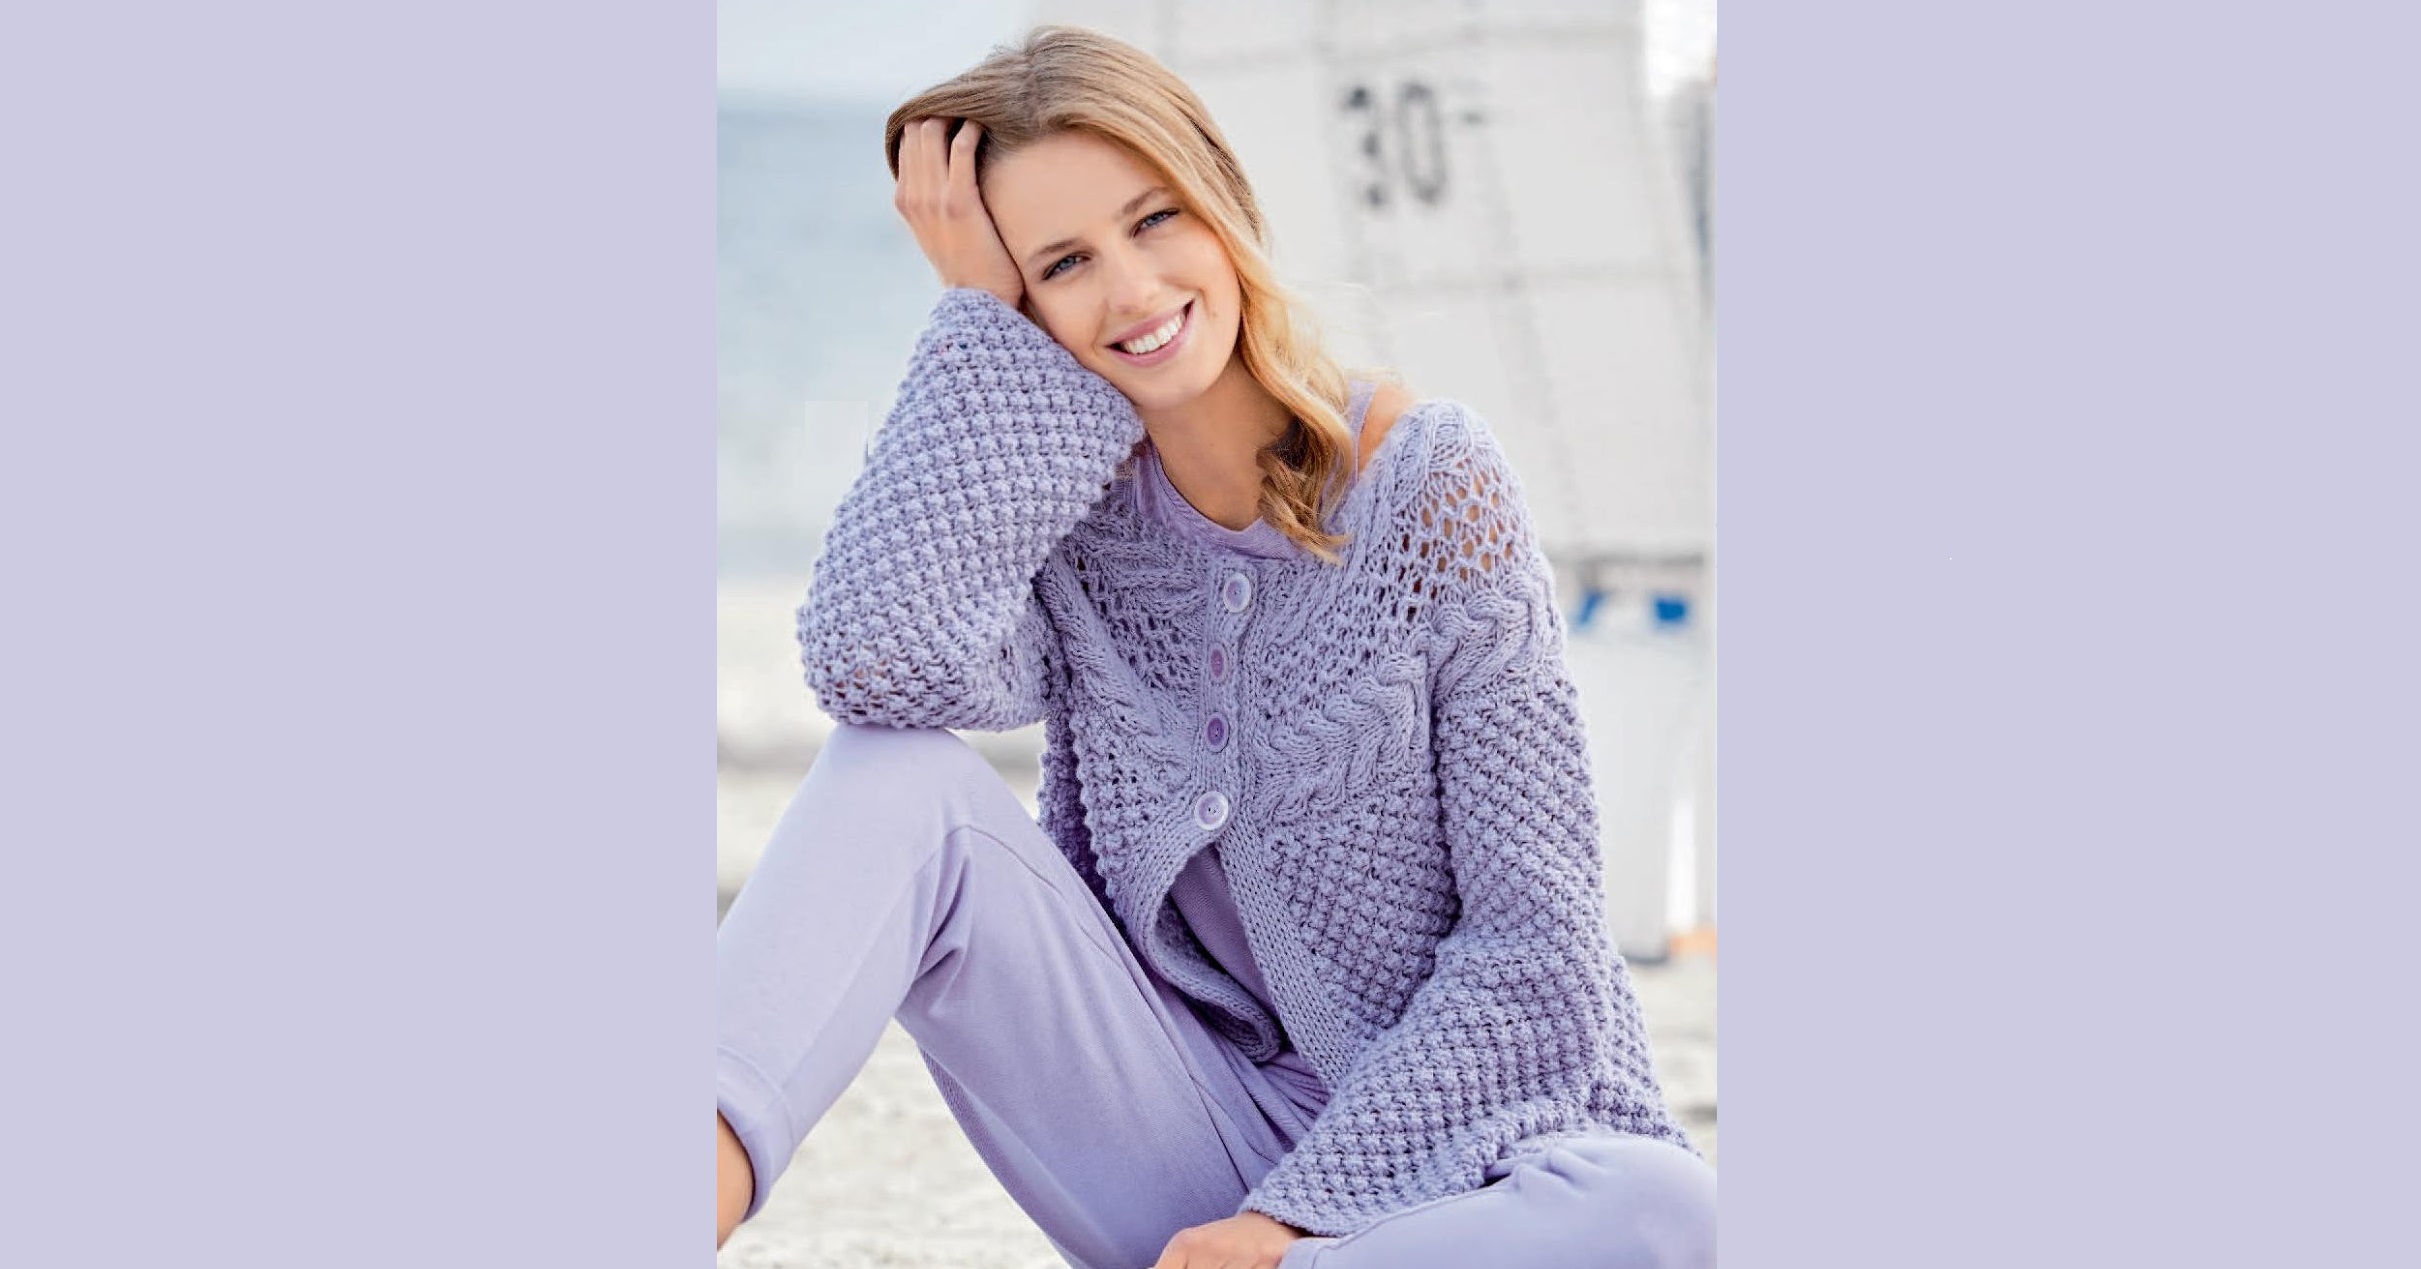
Lilac cardigan with a rosette pattern with a round openwork yoke framed by braids. The cardigan is knitted from 100 % cashmere on thick needles No. 7.
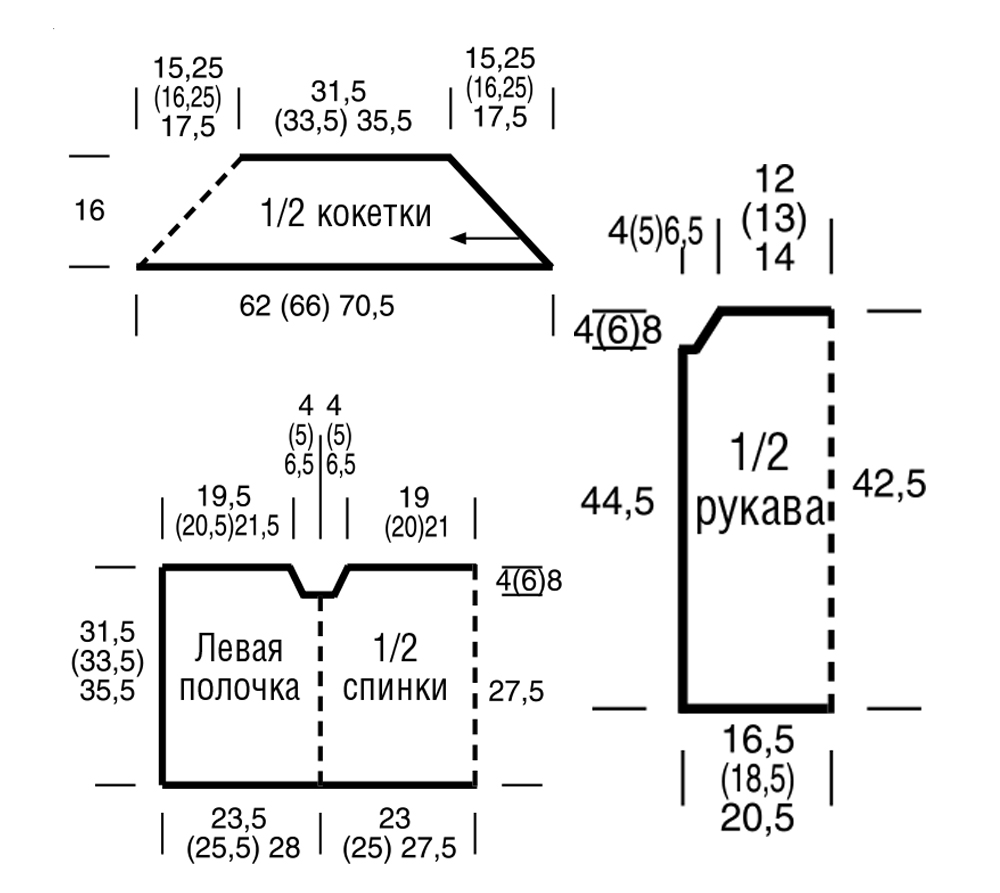
Dimensions:36/38 (40/42) 44/46.
You will need: yarn (100% cashmere; 115 m/25 g) - 450 (475) 500 g lilac; knitting needles No. 6 and 7; 4 buttons.
Attention!Knit only with double thread!
Rosette pattern.The number of loops is a multiple of 4 + 2 edge loops.
1st and 3rd rows (= front rows): purl all stitches.
2nd row: edge stitch, * knit 3 stitches from the next stitch (= 1 knit, 1 purl, 1 knit), knit 3 stitches together purlwise, from * constantly repeat, edge stitch.
4th row: edge stitch, * purl 3 stitches together, knit 3 stitches from the next stitch, from * constantly repeat, edge stitch.
Constantly repeat rows 1-4.
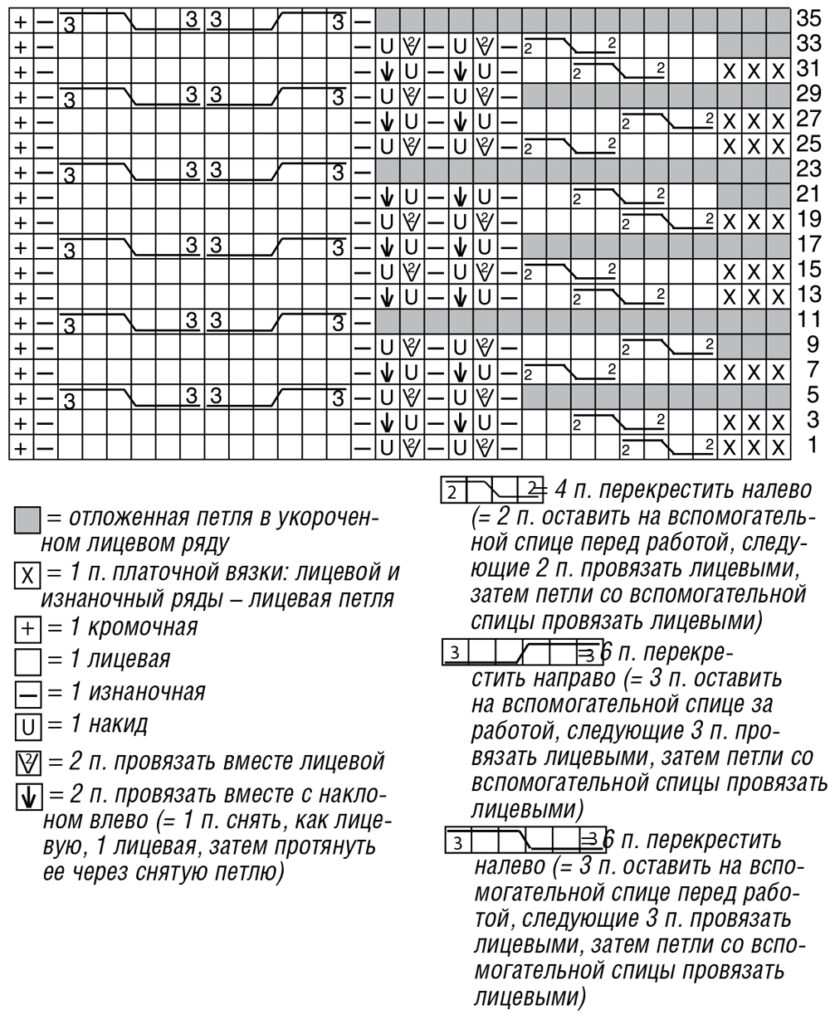
Yoke pattern (32 p.).Knit according to pattern with shortened rows. The diagram shows the facial rows. In the purl rows, knit all the loops according to the pattern, knit the yarn overs purl.
Work the purl row before the shortened knit row only to the left stitches (= squares highlighted in grey), turn the work with 1 yarn over and perform a shortened knit row. Work the next purl row on all stitches, while constantly knitting the turning yarn over with the next stitch together with the purl stitch to avoid the formation of holes.
Work 7 (7) 8 times rows 1-36, finish 1-8 (1-26) rows 1-8 = 260 (278) 296 rows along the left edge of the work (= bottom edge) and 132 (140) 150 rows along the right edge (=neck).
Tunnel patent pattern.Odd number of loops. Do not perform edging!
1st row (= front row): * 1 knit, 1 purl, from * repeat constantly, 1 knit.
2nd row: * slip 1 p. as a purl, with the thread stretched in front of the loop, knit 1, from * constantly repeat, remove the last loop as a purl, thread in front of the loop.
3rd row: * Knit 1, slip 1 p., as if purling, with the thread stretched in front of the loop, from * constantly repeat, knit 1. 4th row: knit as 2nd row.
Perform rows 1-4 once, then constantly repeat rows 3 and 4.
Knitting density:19 p. x 22 r. = 10 x 10 cm, knitted with a pattern of “roses”; 20 p. x 21 r. = width 10 x 10 cm, knitted with a yoke pattern.
Attention.Before the beginning of the raglan, knit the fronts and back with a single fabric on circular knitting needles in rows in forward and reverse directions. Knit the yoke crosswise in short rows. Start from the side of the right shelf. Arrow on pattern = knitting direction.
Description of knitting
Shelves and back.Using a double thread, cast on 178 (194) 210 sts on the knitting needles and knit 1 purl row; this row is not taken into account in subsequent calculations. Continue working with the “roses” pattern.
After 27.5 cm = 60 rows from the initial row, divide the work and first continue working for the right shelf on the first 45 (49) 53 stitches with a pattern of “roses”, set aside the remaining 133 (145) 157 stitches.
At the same time, in the 1st row from dividing the work, close for a raglan bevel along the inner edge 1 x 2 p., then in every 2nd row 2 x 2 p. and in every 4th row 1 (2) 3 x 2 p.
After 31.5 cm = 70 rows (33.5 cm = 74 rows) 35.5 cm = 78 rows from the initial row, close off the remaining 37 (39) 41 stitches, purlwise.
Knit the left front on the last 45 (49) 53 stitches in a mirror image.
Then for the back, continue working on the middle 88 (96) 104 stitches with pattern 1, while making raglan bevels on both sides, as described above. At the height of the shelf, bind off the remaining 72 (76) 80 stitches, like purl stitches.
Sleeves.Using a double thread, cast on 62 (70) 78 stitches on the knitting needles for each sleeve and knit 1 purl row.
Continue working with the “roses” pattern.
After 38.5 cm = 84 rows (36.5 cm = 80 rows) 34.5 cm = 76 rows from the initial row, make raglan bevels on both sides, as on shelves.
After 42.5 cm = 94 rows from the initial row, bind off the remaining 46 (50) 52 stitches, purlwise.
YOKE.Using a double thread, cast on 32 stitches on the needles and knit 1 purl row; this series is not taken into account in subsequent calculations.
Continue working with the yoke pattern.
After 124 cm = 260 rows (132 cm = 278 rows) 141 cm = 296 rows from the starting row on the left edge (= bottom edge of the yoke) or 63 cm = 132 rows (67 cm = 140 rows) 71 cm = 150 rows from the starting row along the right edge (= neck) close all loops according to. pattern.
Left clasp strap.Using a double thread, cast on 9 stitches and knit with a tunnel patent pattern.
After 47.5 (49.5) 51.5 cm from the beginning of knitting the strap, knit 4 x 2 stitches together in the next purl row and bind off, knit the last loop, cut the thread and pull through the last loop.
Right clasp bar.Knit similarly, but with 3 holes for buttons.
For the 1st button hole, after 31.5 (33.5) 35.5 cm from the initial row, knit as follows: front row: 1 front, 1 p. remove as purl, 1 front, knit 1 purl and 1 front , then on the right knitting needle, stretch the 1st stitch through the 2nd, purl 1 and on the right knitting needle, pull the 1st stitch through the 2nd, knit 1, remove 1 stitch as if purling, knit 1. Purl row: slip 1 stitch, knit 1, slip 1 stitch, knit 1, cast on 2 new stitches, slip 1 stitch, knit 1, slip 1 stitch.
In the next front row, on the newly cast on loops, knit 1 purl and 1 knit, then continue working according to. pattern; button hole height = 1 cm. Make 3 more button holes at intervals of 3.5 cm.
Attention.The lower button hole is subsequently located at the height of the beginning of the yoke, the upper button hole is located approximately 1 cm below the closed edge.
Assembly.Sew raglan seams, as well as side seams and sleeve seams. Sew the yoke to the top edge of the cardigan, aligning the middle of the bottom edge with the middle of the back. If necessary, press the edge of the cardigan slightly. Sew the left and right straps of the fastener to the corresponding sides of the shelves. Sew buttons to the middle of the left fastener bar.

Openwork pullover with “bumps”
Ажурный пуловер с «шишечками», связанный снизу вверх из пряжи DROPS Belle
Классический джемпер с косами и вырезом на спине
Когда вязание проникается духом Высокой моды, рождается такой пуловер из тонкой мериносовой шерсти. Жемчужно-серый цвет создает прекрасный фон для милого ажурного узора и исключительных деталей: рукава, перед и спинка украшены «косами», глубокий каплевидный вырез сзади соединен шифоновой лентой в тон пряжи.