![fillet knitting](http://d2r2bgdt20g104.cloudfront.net/media/2020/11/1.png)
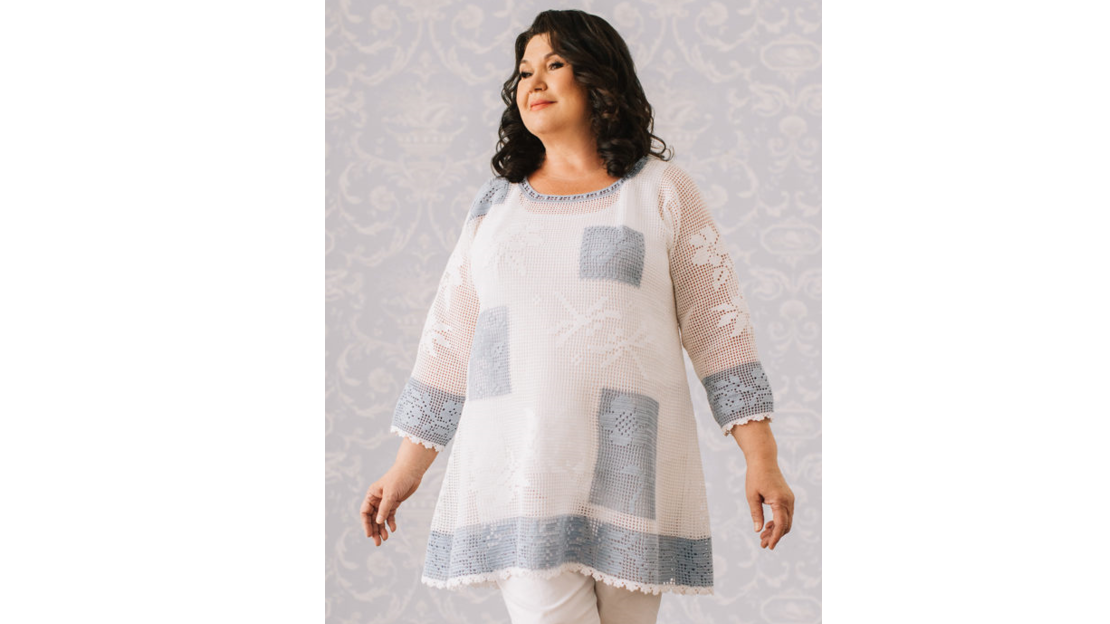
Tunic “White Fog” using patchwork technique.
Recommended yarn: Anna 16 (100g/530m)
Clover hook No. 1
Yarn consumption: 600 g
White yarn - 3.5 skeins, blue yarn - about 2.
Size 60.
Tunic length – 80cm.
This post contains a detailed description of knitting colored fragments into the main fabric of the tunic, knitting the hanging corners of the tunic (if such are suggested by the style of the product), as well as two links to MK on constructing a product pattern according to the fillet pattern, and a detailed explanation of the procedure for making the product using the fillet technique. Valentina Dyachenko.
Worth a look:
“How to build a pattern using a fillet pattern.
MK from Valentina Dyachenko”
You can view and study in detail the tutorial on knitting products using the fillet technique, which is offered by Valentina Dyachenko here:
The detailed MK of Valentina Dyachenko somewhat helps to understand how to knit insert fragments into fillet fabric.
The calculation of the required number of cells (as well as the number of VPs to start knitting) is described in detail in the post, which can be accessed via the previous link.
We tie the beginning with a thread of the main color:
![fillet knitting](http://d2r2bgdt20g104.cloudfront.net/media/2020/11/2.png)
The main thread always remains on the right side, in this case it is white. We tie a colored thread in the right place and begin to knit the pattern that we liked as an insert fragment. In the proposed example, the “Rose” fragment has a height of 26 rows (there must be an even number of squares in height so that the thread returns to the side of the product from which they started knitting). In this example, we knit a rose according to this pattern:
![fillet knitting](http://d2r2bgdt20g104.cloudfront.net/media/2020/11/3.png)
They tied a red thread and began to knit a fragment with a rose:
![fillet knitting](http://d2r2bgdt20g104.cloudfront.net/media/2020/11/4-1.png)
![fillet knitting](http://d2r2bgdt20g104.cloudfront.net/media/2020/11/5.png)
After the snippet is finished:
![fillet knitting](http://d2r2bgdt20g104.cloudfront.net/media/2020/11/6.png)
We cut the thread and carefully hide it with a needle like this:
![fillet knitting](http://d2r2bgdt20g104.cloudfront.net/media/2020/11/7-2.png)
After steaming the fragment, this place cannot be found at all. It is recommended to hide the threads when you already know for sure that you won’t have to retie.
![fillet knitting](http://d2r2bgdt20g104.cloudfront.net/media/2020/11/8.png)
Now the most important thing in Patchwork: how to continue knitting with the main thread after completing the knitting of the fragment. Or in other words, embedding a fragment.
Scheme for tying the insert fragment with the main thread:
![fillet knitting](http://d2r2bgdt20g104.cloudfront.net/media/2020/11/9-2.png)
The diagram, in my opinion, does not provide an accurate understanding of how to correctly attach the main thread to a colored fragment.
But a large number of photographs taken by Valentina Dyachenko at each stage of this process complement the picture. Many thanks to the master!
![fillet knitting](http://d2r2bgdt20g104.cloudfront.net/media/2020/11/10.png)
There is now one loop on the hook. Next: 2 ch and insert the hook into the next dc of the colored fragment, knit in 1 single loop. That is, we go up along the edge of the fragment.
![fillet knitting](http://d2r2bgdt20g104.cloudfront.net/media/2020/11/11.png)
Now we turn the work so that it is convenient to knit in the opposite direction, with a fillet mesh in this case. And we repeat all the steps described above.
![fillet knitting](http://d2r2bgdt20g104.cloudfront.net/media/2020/11/12.png)
After we have finished tying the fragment with the main fabric, we continue to knit the entire row with the main thread according to the pattern.
![fillet knitting](http://d2r2bgdt20g104.cloudfront.net/media/2020/11/13.png)
Or we knit other fragments, checking the tunic diagram. Here is an example of the arrangement of colored fragments of another tunic:
![fillet knitting](http://d2r2bgdt20g104.cloudfront.net/media/2020/11/14.png)
What else do you need to know to knit this tunic? Of course, knitting the corners of the tunic if you want them to sag at the sides of the tunic.
Knitting the corner of the tunic
The corner can be knitted directly from the armhole or from the waist if desired.
There is only one principle: 1) tie a thread at the beginning of the hem of the back or front (it doesn’t matter); 2) we knit according to the pattern to our corner (to the armhole or to the waist) without knitting 3 squares; 3) we start without VP, immediately knit without finishing 1/2/3 cells on one side and 1/2/3 cells on the other side; 4) knit 3+3+1, the first loop on the hook into one loop.
Photos demonstrate the step-by-step implementation of this process:
![fillet knitting](http://d2r2bgdt20g104.cloudfront.net/media/2020/11/15.png)
![fillet knitting](http://d2r2bgdt20g104.cloudfront.net/media/2020/11/16.png)
![fillet knitting](http://d2r2bgdt20g104.cloudfront.net/media/2020/11/17.png)
![fillet knitting](http://d2r2bgdt20g104.cloudfront.net/media/2020/11/18.png)
This is how we knit our trapezoid in rotating rows. If you want a long angle. Then we knit 2 squares together.
![fillet knitting](http://d2r2bgdt20g104.cloudfront.net/media/2020/11/19.png)
Next, another method is proposed, the author of which is Tatyana Sopova.
![fillet knitting](http://d2r2bgdt20g104.cloudfront.net/media/2020/11/20.png)
So, we tie a thread in the middle behind the CH.
Row 1 – 3CH, 2VP, I tie into the 2nd square in CH, turn the work and in the opposite direction I knit the 2nd row -2VP, CH 1VP CH 1VP CH 2VP I tie into the 2nd square of CH. Turn the work and knit in the opposite direction. Row 3 – 2VP CH, 2VP CH 2VP CH 2VP CH we tie into the 2nd square B CH. , 4th row as 1. I show in the photo step by step.
![fillet knitting](http://d2r2bgdt20g104.cloudfront.net/media/2020/11/21.png)
![fillet knitting](http://d2r2bgdt20g104.cloudfront.net/media/2020/11/22.png)
![fillet knitting](http://d2r2bgdt20g104.cloudfront.net/media/2020/11/23.png)
![fillet knitting](http://d2r2bgdt20g104.cloudfront.net/media/2020/11/24.png)
![fillet knitting](http://d2r2bgdt20g104.cloudfront.net/media/2020/11/25.png)
We repeat this until the end of our shelf and back, until all the cells are finished.
Now let's move on to the series of photographs that Valentina Dyachenko offers as MK on this tunic.
![fillet knitting](http://d2r2bgdt20g104.cloudfront.net/media/2020/11/26.png)
Recommended yarn for tunic “White Fog” Anna 16
![fillet knitting](http://d2r2bgdt20g104.cloudfront.net/media/2020/11/27.png)
![fillet knitting](http://d2r2bgdt20g104.cloudfront.net/media/2020/11/28.png)
Below are a few photos showing how inserts of a different color are arranged:
![fillet knitting](http://d2r2bgdt20g104.cloudfront.net/media/2020/11/29-1.png)
![fillet knitting](http://d2r2bgdt20g104.cloudfront.net/media/2020/11/30-1.png)
![fillet knitting](http://d2r2bgdt20g104.cloudfront.net/media/2020/11/31-1.png)
![fillet knitting](http://d2r2bgdt20g104.cloudfront.net/media/2020/11/32.png)
Schemes of used and recommended patterns:
![fillet knitting](http://d2r2bgdt20g104.cloudfront.net/media/2020/11/33-1.png)
![fillet knitting](http://d2r2bgdt20g104.cloudfront.net/media/2020/11/34.png)
![fillet knitting](http://d2r2bgdt20g104.cloudfront.net/media/2020/11/36-1.png)
![fillet knitting](http://d2r2bgdt20g104.cloudfront.net/media/2020/11/37-2.png)
![fillet knitting](http://d2r2bgdt20g104.cloudfront.net/media/2020/11/38-1.png)
![fillet knitting](http://d2r2bgdt20g104.cloudfront.net/media/2020/11/39.png)
![fillet knitting](http://d2r2bgdt20g104.cloudfront.net/media/2020/11/40.png)
![fillet knitting](http://d2r2bgdt20g104.cloudfront.net/media/2020/11/41.png)
![fillet knitting](http://d2r2bgdt20g104.cloudfront.net/media/2020/11/42.png)
![fillet knitting](http://d2r2bgdt20g104.cloudfront.net/media/2020/11/43.png)
![fillet knitting](http://d2r2bgdt20g104.cloudfront.net/media/2020/11/44.png)
![fillet knitting](http://d2r2bgdt20g104.cloudfront.net/media/2020/11/45.png)
Trapezoid:
![fillet knitting](http://d2r2bgdt20g104.cloudfront.net/media/2020/11/46.png)
Sleeves:
![fillet knitting](http://d2r2bgdt20g104.cloudfront.net/media/2020/11/47.png)
Decreasing (narrowing the sleeves), one of the ways:
![fillet knitting](http://d2r2bgdt20g104.cloudfront.net/media/2020/11/47.png)
![fillet knitting](http://d2r2bgdt20g104.cloudfront.net/media/2020/11/48.png)
![fillet knitting](http://d2r2bgdt20g104.cloudfront.net/media/2020/11/49.png)
![fillet knitting](http://d2r2bgdt20g104.cloudfront.net/media/2020/11/50.png)
![fillet knitting](http://d2r2bgdt20g104.cloudfront.net/media/2020/11/51.png)
![fillet knitting](http://d2r2bgdt20g104.cloudfront.net/media/2020/11/52.png)
![fillet knitting](http://d2r2bgdt20g104.cloudfront.net/media/2020/11/53-1.png)
![fillet knitting](http://d2r2bgdt20g104.cloudfront.net/media/2020/11/54-1.png)
![fillet knitting](http://d2r2bgdt20g104.cloudfront.net/media/2020/11/55.png)
![fillet knitting](http://d2r2bgdt20g104.cloudfront.net/media/2020/11/56.png)
Hem and sleeves (banding)
![fillet knitting](http://d2r2bgdt20g104.cloudfront.net/media/2020/11/57.png)
![fillet knitting](http://d2r2bgdt20g104.cloudfront.net/media/2020/11/59.png)
![fillet knitting](http://d2r2bgdt20g104.cloudfront.net/media/2020/11/60.png)
Neck strap
1 Row RLS,
2 Row CH,
Row 3 CH 2 VP CH 2 VP etc. to the end of the row.
4 row CH 2 VP, CH, 1 VP (5 unfinished CH with one tip), 1 VP CH. so until the end of the row. 5 row sc.
![fillet knitting](http://d2r2bgdt20g104.cloudfront.net/media/2020/11/61.png)
![fillet knitting](http://d2r2bgdt20g104.cloudfront.net/media/2020/11/63.png)
![fillet knitting](http://d2r2bgdt20g104.cloudfront.net/media/2020/11/62-1.png)
![fillet knitting](http://d2r2bgdt20g104.cloudfront.net/media/2020/11/64.png)
![fillet knitting](http://d2r2bgdt20g104.cloudfront.net/media/2020/11/65.png)
Related posts
About the Author
![About the Author](https://liliavignan.com/wp-content/uploads/2020/01/46-762x1024.jpg)
Welcome !
My name is Lilia. The main hobby of my life is knitting. I started with knitting needles and switched to a knitting machine. In 1988 I got acquainted with crochet - Romanian lace. About 10 years ago I became interested in Irish lace and Shetland knitting. And now I’m trying fillet crochet. On this site I want to share with you my 45 years of experience in various knitting techniques.
Latest publications
Короткий хлопковый вязаный пуловер с сочетанием узоров
Выразительный модный короткий пуловер из хлопковой ленточной пряжи с шелковистым отливом, которая придает модели со сквозными дорожками и узором из «листьев» элегантный вид.
Blog Subscription
Be the first to receive new items!