
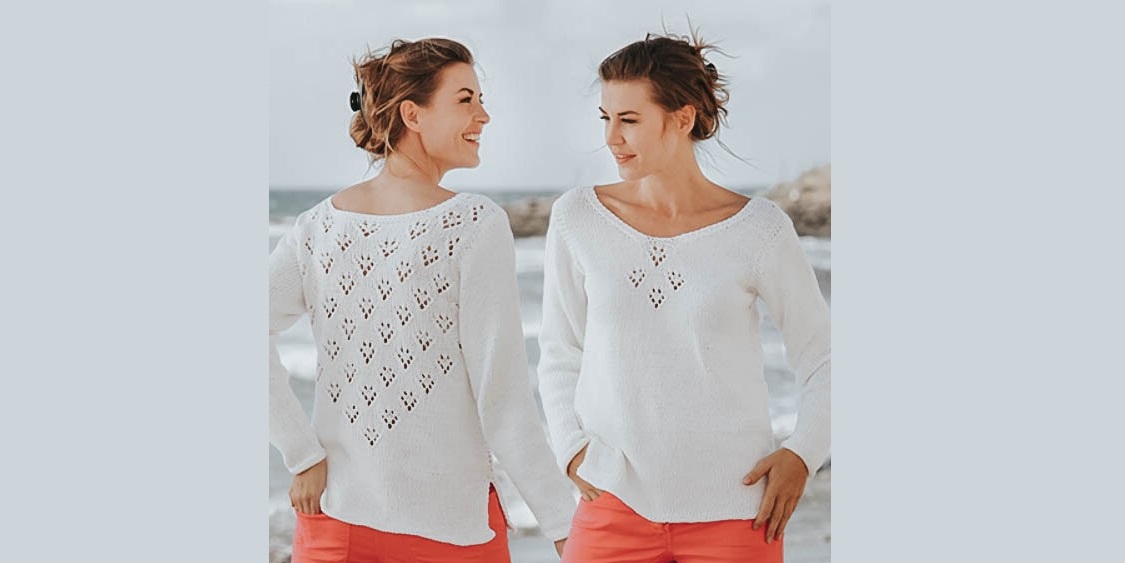
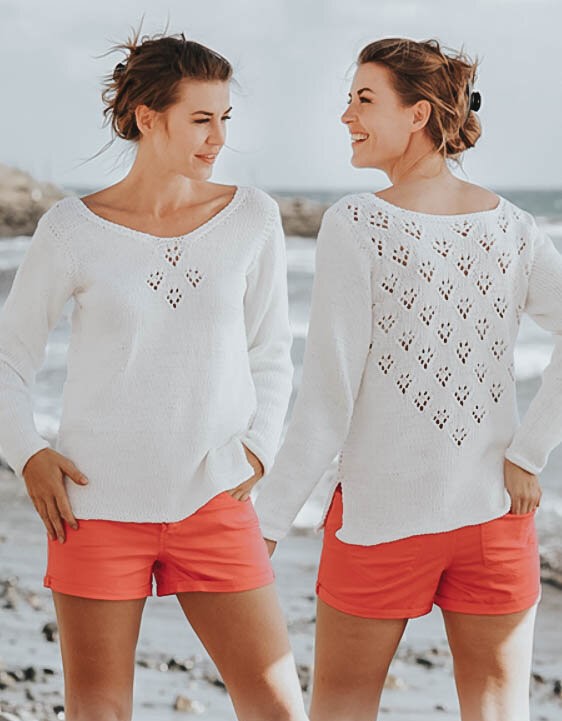
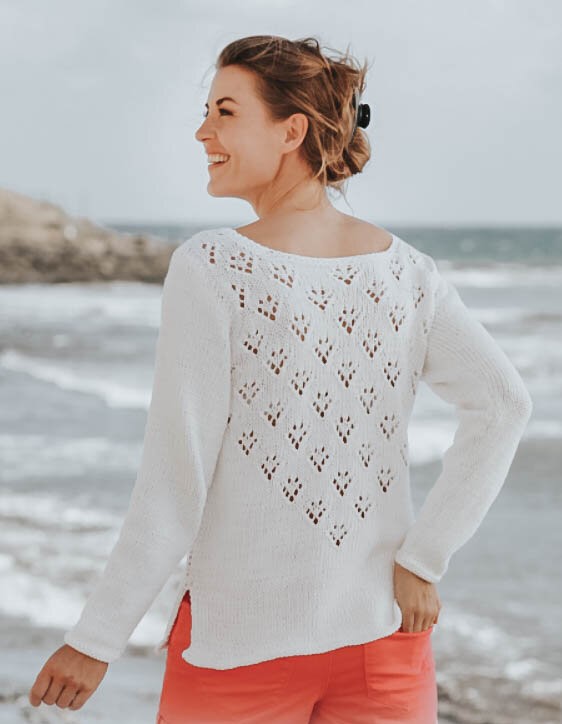
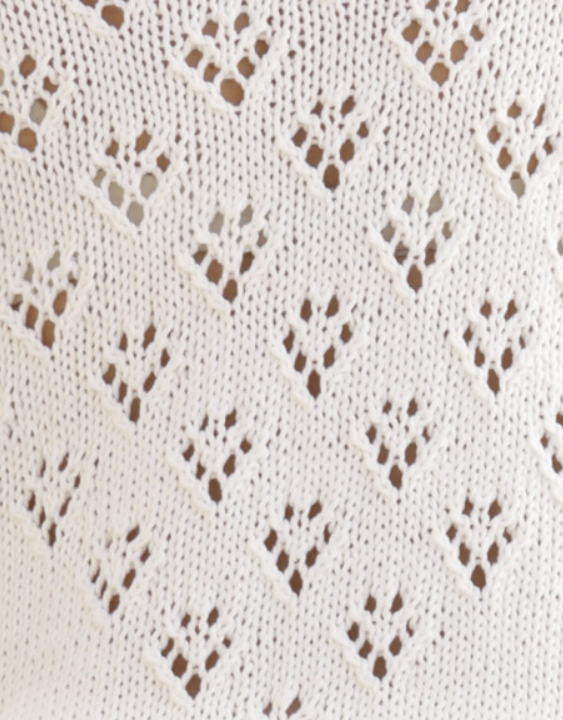
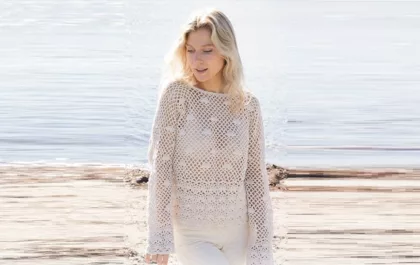
Summer jumper with openwork back
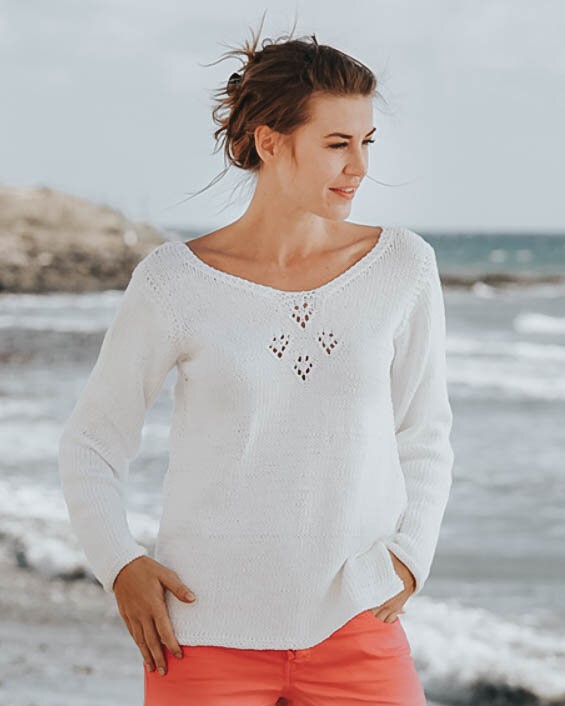
Cotton jumper with an openwork back and a small openwork accent on the front. This jumper consists of two parts that are knitted from bottom to top. The sleeves are knitted in the round.
In the description we are asked to knit from white yarn, but it seems to me that pale blue, yellow, pink, light turquoise are suitable for a summer jumper.
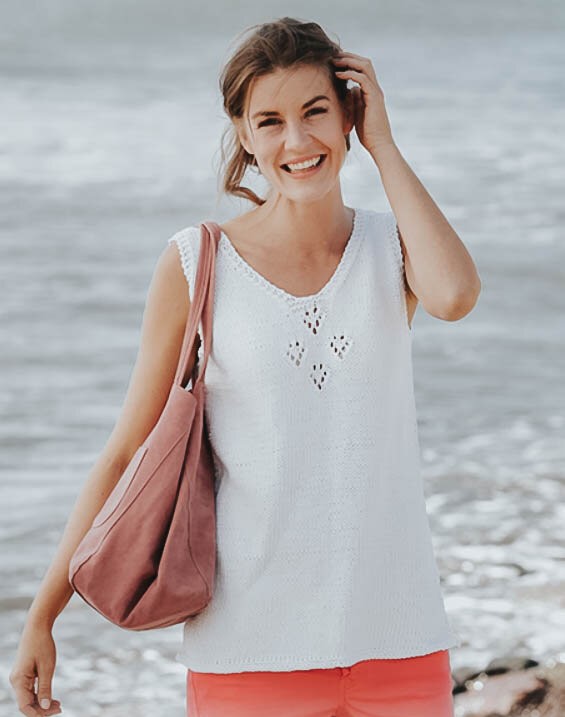
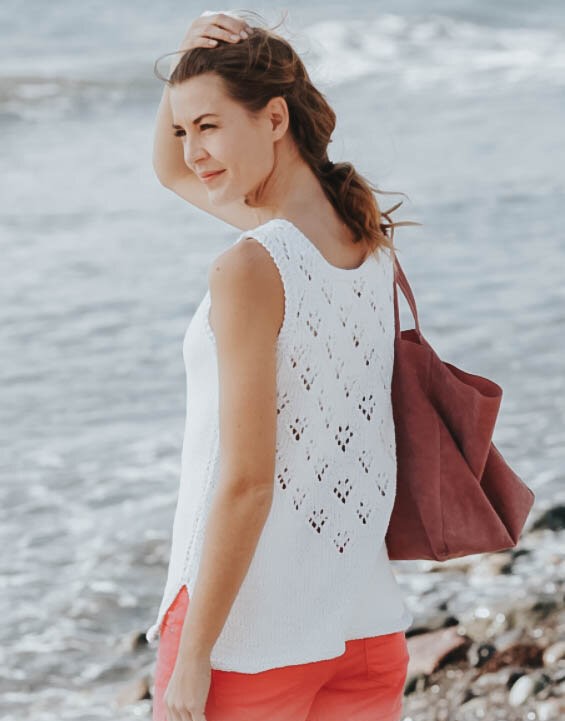
By the way, this jumper could well be a summer T-shirt, if you don’t knit the sleeves.
With the same openwork back
Author of the translation Ksenia Kukanchik
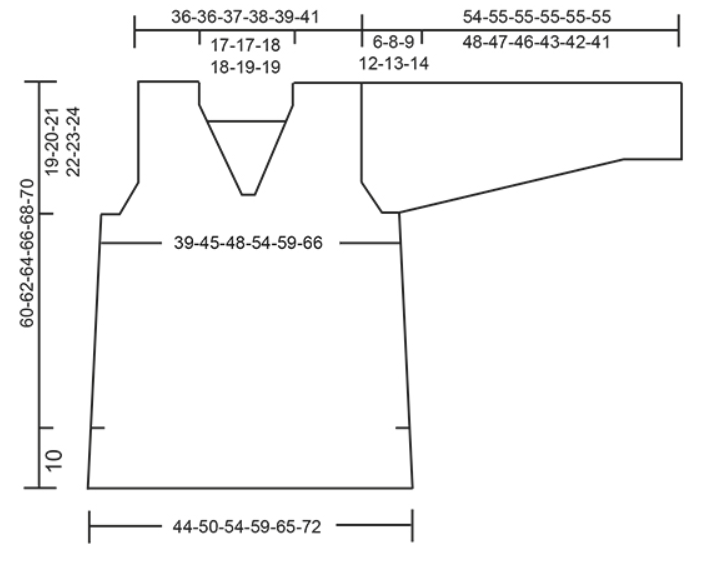
Dimensions: SML-XL-XXL-XXXL
Yarn: Drops Paris, color 16 (white)
550-650-700-750-850-900 grams
Spokes:
- Circular knitting needles 4 and 5 mm
- Double needles 4 and 5 mm
Density:
17 sts x 22 rows = 10x10 cm
Knitting the back
1. Cast on 75-85-91-101-111-123 stitches using 4mm needles.
2. Work 4 rows in garter stitch according to the instructions “Garter Stitch in Turned Rows” (see instructions below).
3. Place marker after first 37-42-45-50-55-61 stitches. You will get 38-43-46-51-56-62 stitches on the needle after the marker.
4. Switch to 5mm needles and knit in stockinette stitch, leaving 2 edge stitches on each side
5. When you knit 12 cm, decrease 1 loop on each side according to the “Decrease” instructions (see instructions below)
6. Decrease on both sides every 8-8-7-7-7-7 cm for a total of 4-4-5-5-5-5 times. 67-77-81-91-101-113 stitches remaining
7. At the same time, when the back piece reaches 15-16-17-14-15-16 cm, start knitting according to pattern A1 45 stitches in the middle of the back. Arrow in diagram A1. - this is the marker that you placed earlier in the middle of the back.
8. Knit pattern A1. 1 time and continue knitting according to pattern A1, placing it in the fabric in a checkerboard pattern
9. In places on the side, where there is complete repeat of scheme A1. It will no longer fit, knit in these places according to patterns A1B (left) and A1A (right).
10. When the back piece reaches 40-41-42-43-44-45 cm, knit 4 rows in garter stitch with outermost 5-7-8-9-10-11 stitches on each side (knit the remaining stitches as before)
11. Cast off first 2-4-5-6-7-8 sts at beg of next 2 rows for armhole
12. Continue knitting the pattern with 3 edge stitches on each side
13. At the same time, make decreases for the armholes on each subsequent right row: decrease 1 stitch 1-4-4-7-10-14 times according to the “Decreases” instructions (see instructions below). There will be 61-61-63-65-67-69 stitches left on the needles
14. Continue knitting the pattern with 3 edge stitches on each side.
15. When you have knitted 52-54-56-58-60-62 cm, knit 4 rows in garter stitch over the middle 29-29-31-31-33-33 stitches (continue to knit the remaining stitches as before)
16. On next RS row cast off middle 23-23-25-25-27-27 stitches for neckline and finish each shoulder separately
17. At the same time, make decreases for the neckline in each row: decrease 1 stitch 3 times according to the “Decreases” instructions (see instructions below). There will be 16-16-16-17-17-18 stitches left on the shoulder.
18. Continue knitting until the piece reaches 60-62-64-66-68-70 cm and bind off the stitches
19. Knit the second shoulder in the same way.
Knitting before
1. Cast on 75-85-91-101-111-123 stitches using 4mm needles.
2. Work 4 rows in garter stitch according to the instructions “Garter Stitch in Turned Rows” (see instructions below).
3. Place marker after first 37-42-45-50-55-61 stitches. You will get 38-43-46-51-56-62 stitches on the needle after the marker.
4. Switch to 5 mm needles and knit in stockinette stitch 35-37-38-39-40-42 cm, leaving 2 edge stitches on each side
5. Start knitting according to pattern A2. (the arrow in the diagram is your marker)
6. At the same time, when you knit 40-41-42-43-44-45 cm, knit 4 rows in garter stitch with outermost 5-7-8-9-10-11 stitches on each side. Continue knitting the remaining loops as before.
7. Cast off first 2-4-5-6-7-8 sts at beg of next 2 rows for armhole
8. When you connect diagram A2. Knit 4 rows in garter stitch 1 time, 9 medium stitches.
9. Bind off the middle 3 stitches for the neckline and finish each shoulder separately.
10. Continue working in stockinette stitch with decreases for the armhole: decrease 1 stitch 1-4-4-7-10-14 times according to the “Decreases” instructions (see instructions below).
11. At the same time, make decreases for the neckline in each front row: decrease 1 stitch 13-13-14-14-15-15 times according to the instructions “Decreases” (see instructions below)
12. After all the decreases for the armholes and neckline, there will be 16-16-16-17-17-18 stitches left on the shoulders
13. Knit the piece to a height of 60-62-64-66-68-70 cm and bind off the loops
14. Knit the second shoulder in the same way
Knitting sleeves
1. Cast on 32-34-36-38-40-40 stitches on 4 mm double needles
2. Work 4 rows in garter stitch in the round according to the instructions “Garter Stitch in the Round” (see instructions below)
3. Switch to 5 mm double needles
4. Place a marker at the beginning of the row (in the middle of the armhole) and knit in stockinette stitch
5. When you knit 7-6-10-6-6-12 cm, add 2 loops according to the instructions “Increases for sleeves” (see instructions below)
6. Make increases every 3.5-3-2.5-2.5-2-1.5 cm 12-14-14-15-17-19 times. You will get 56-62-64-68-74-78 loops
7. When you knit a sleeve with a length of 48-47-46-43-42-41 cm, bind off the middle 4-8-10-12-14-16 loops for the armhole
8. Continue knitting the sleeve in turning rows in stockinette stitch, casting off the outer stitches on each side of each row: cast off 2 stitches 2-2-3-3-3-3 times and 1 stitch 1-1-2-4-7-8 times
9. Next, bind off 2 loops on each side of the sleeve until you knit 53-54-54-54-54-54 cm
10. Cast off 3 stitches from edge of next 2 rows
11. When the sleeve reaches 54-55-55-55-55-55 cm, bind off all the loops.
12. Knit the second sleeve in the same way
Assembling the jumper
1. Sew the shoulder seams
2. Sew the side seams, leaving about 10 cm at the bottom on each side.
3. Sew in the sleeves
Instructions
Garter stitch in turning rows
Knit all stitches
Garter stitch in the round
Knit row 1 with all stitches, purl for row 2 with all stitches. Repeat, alternating.
Decreases (side seams, armholes, neckline)
Decrease along the side seams of the body 2 stitches before the edge on the front and back of the body.
Decrease in the armholes and at the neckline 3 stitches before the edge.
1. Decreases after 2-3 stitches from the edge: slip 1 stitch as a knit stitch, knit 1 stitch, pull it through the slipped stitch.
2. Decreases before 2-3 sts from the edge: knit 2 sts together.
Increases for sleeves
1. Stop 1 stitch before the marker, yarn over, knit 2 stitches. (marker between them), yarn over.
2. In the next row, knit yarn overs crossed to avoid holes.
Scheme
The diagram shows all the rows: both front and back.
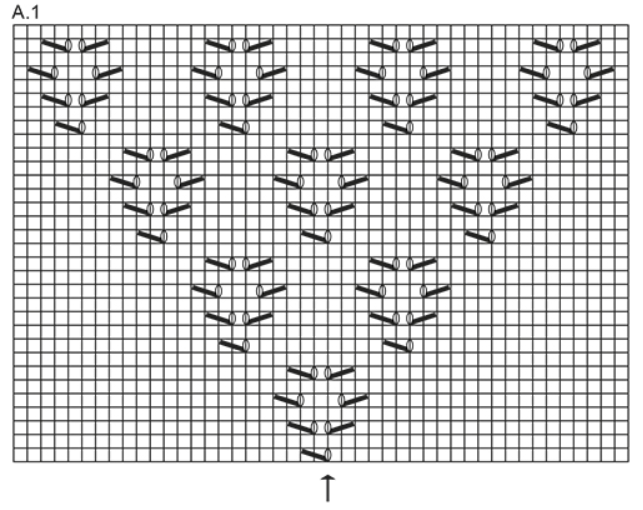
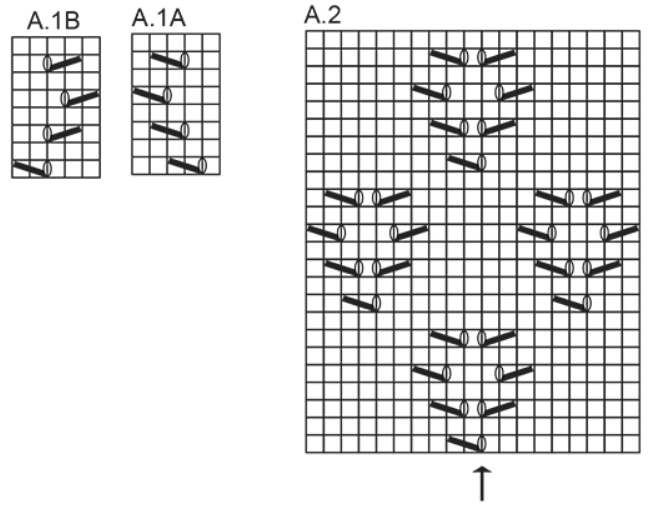
Symbols for the diagram
White check – persons p. in the front row, purl. p. in purl row
A cage with an oval in the middle – yarn over between 2 loops
A square with an oblique line from right to left - 2 stitches together.
Cell with a slash from left to right – remove 1 loop as a knit stitch, knit 1 stitch, pull it through the removed loop.

Openwork pullover with “bumps”
Ажурный пуловер с «шишечками», связанный снизу вверх из пряжи DROPS Belle
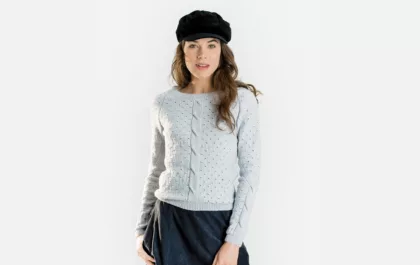
Классический джемпер с косами и вырезом на спине
Когда вязание проникается духом Высокой моды, рождается такой пуловер из тонкой мериносовой шерсти. Жемчужно-серый цвет создает прекрасный фон для милого ажурного узора и исключительных деталей: рукава, перед и спинка украшены «косами», глубокий каплевидный вырез сзади соединен шифоновой лентой в тон пряжи.