
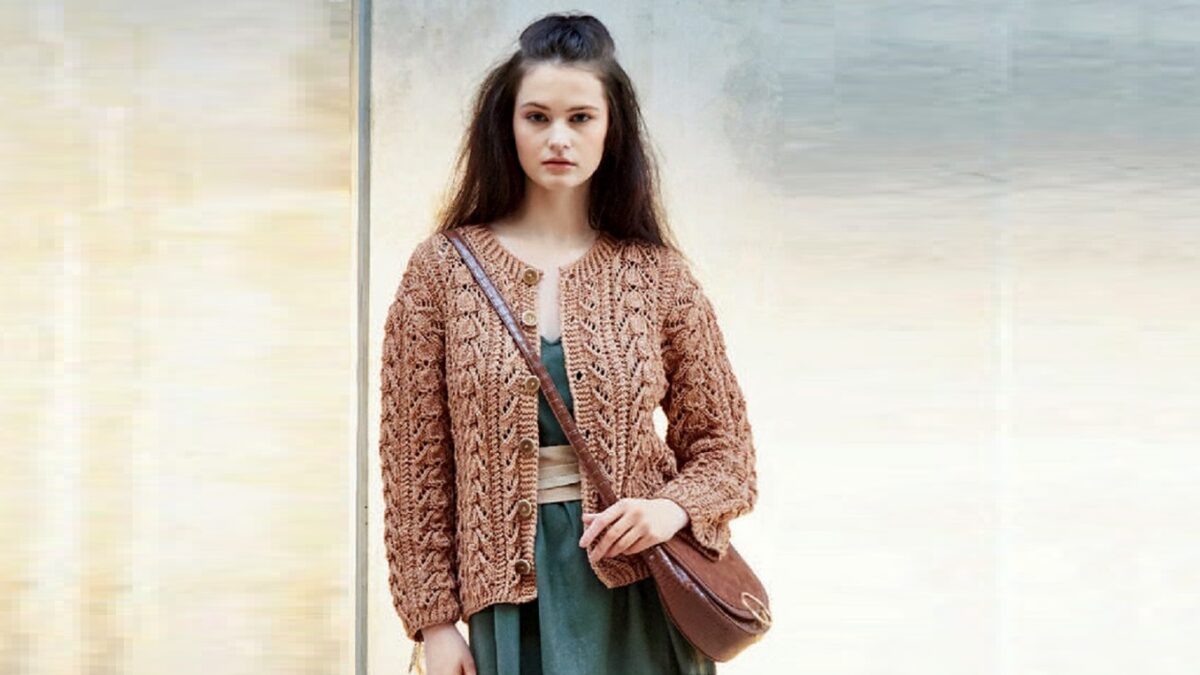
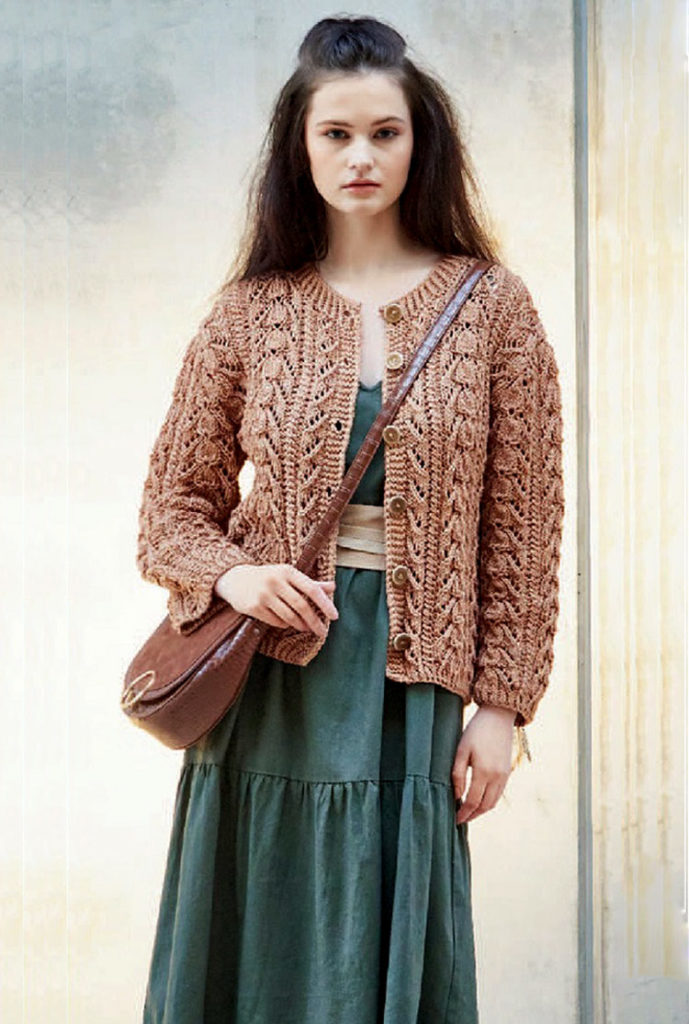
The classic jacket is knitted using cotton yarn with a voluminous braid pattern. This model goes well with a variety of things and will become the basis of any wardrobe.
Size: 38/40
You will need: yarn (100% cotton; 70 m/50 g) - 750 g brown; knitting needles No. 4 and 4.5; circular knitting needles No. 4; 6 buttons with a diameter of 35 mm.
Pattern 1 (knitting needles Ns 4): elastic band (odd number of loops).
Purl rows: edge, alternately 1 knit, 1 purl crossed, finish with 1 knit, edge.
Front rows: edge, alternately 1 purl, 1 knit crossed, finish with 1 purl crossed, edge.
Knit the following patterns on knitting needles No. 4.5.
Pattern 2: openwork pattern of “braids” (the number of loops is a multiple of 22 + 5 + 2 edge loops) = knit according to pattern 1. It shows the front rows. In the purl rows, knit the loops according to the pattern, and purl the yarn overs.
Start with 1 edge, repeat the repeat all the time, finish with loops after the repeat and 1 edge.
Constantly repeat 1-8th r.
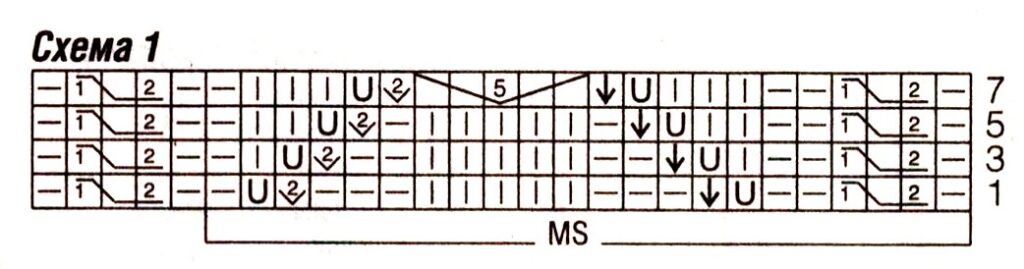
Pattern 3: purl stitch = knit rows - purl loops, purl rows - knit stitches.
Pattern 4: garter stitch = knit and purl rows - knit stitches.
Decreases for the armhole: knit according to pattern 2, it shows a total of 13 decreases in the 1st rapport along the right edge.
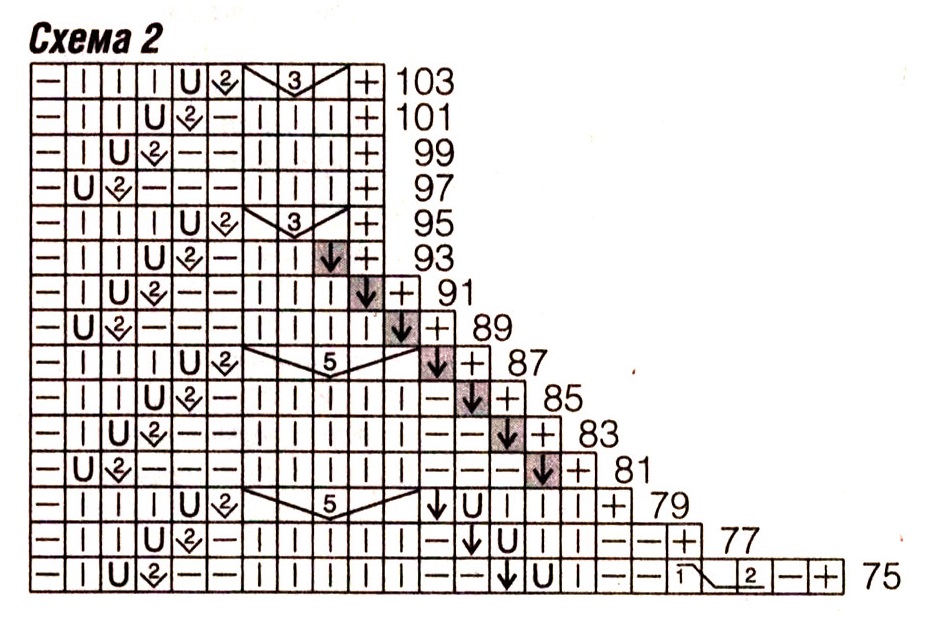
To start the armhole in 77 r. first close 1 x 4 p. on both sides and in the next 2 p. 1 x 2 p. Then perform another 7 decreases (81-93rd p.) along the right edge according to the diagram, they are highlighted in gray; Along the left edge, knit in a mirror image; for this, in the last repeat before the edge, instead of the 2 stitches highlighted in gray, knitted together with a tilt to the left, knit 2 stitches together with the front one.
On the given external loops, perform
1 time 75-104th r., then repeat 2 more times 97-104th r. = only 120 rub.
Reductions for the neck: knit according to pattern 3, it shows a total of 24 decreases on the left front, which reach the 2nd rapport.
To start the neck in 102 r. from the bottom bar (= purl row) close along the left edge 1 x 11 p. and in the next 2 p. 1 x 6 p. Then perform a further 7 decreases (105-117th row) in the front rows according to. scheme; they are highlighted in grey.
On the right shelf, starting in the 101st row, bind off 1 x 11 stitches and in the next front row 1 x 6 stitches, then make decreases, highlighted in gray, in a mirror image, for this, after the edge knit 2 stitches together. with a tilt to the left respectively.
Perform 1 time 101-120 r.
Knitting density: pattern 2 - 22.5 p. x 25 r. = 10 x 10 cm; pattern 4 (= clasp bar) - 5 p. = width 2.5 cm.
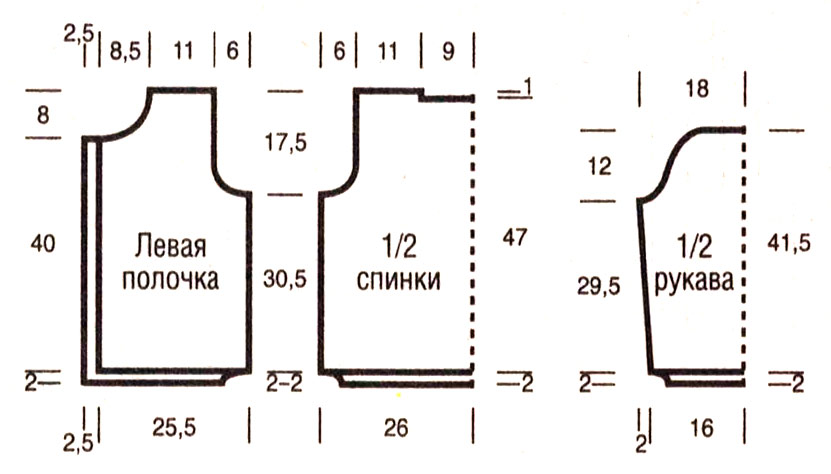
Description of knitting a jacket
Back: cast on 97 sts on the knitting needles and for the bottom strap knit 2 cm = 5 r. pattern 1, start with 1 purl row and in the last purl row evenly add 20 sts = 117 sts. Continue working with pattern 2.
After 30.5 cm = 76 r. From the bottom bar, make armholes on both sides acc. pattern 2, as described above = 91 p. After 47 cm = 118 r. From the bottom bar, close the middle 41 stitches for the neckline and finish both sides separately.
After 48 cm = 120 rub. From the bottom bar, close off the remaining 25 shoulder stitches.
Left shelf: cast on 53 sts on the knitting needles and for the bottom bar, starting from the 1st purl row, knit 2 cm = 5 r. as follows: 5 p. pattern 4 (= fastener bar), 47 p. pattern 1, edge.
In the last purl row on the loops of pattern 1, evenly add 9 sts = 62 sts.
Continue working as follows: edge, 55 stitches with pattern 2 {= repeat 2 times and 1 time with 1-11th stitches of repeat), 1 stitch with pattern 3.5 stitches. Continue knitting with pattern 4 for the fastener bar. Make an armhole along the right edge according to. pattern 2 = 49 p.
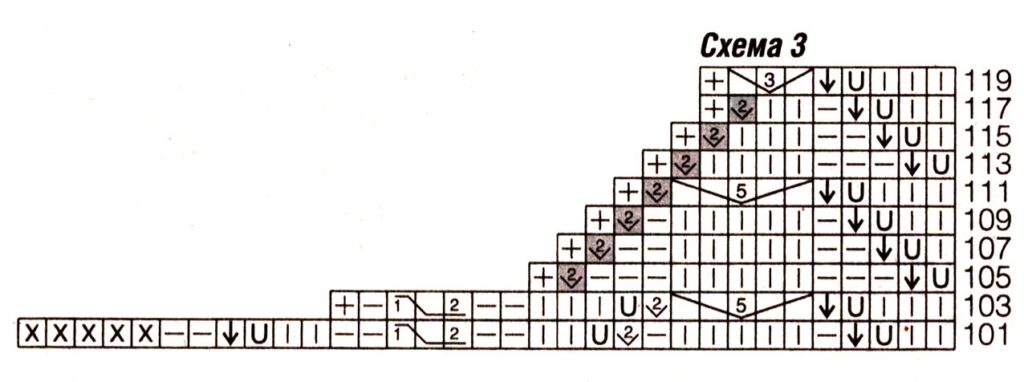
After 40 cm = 100 rub. From the bottom bar, make a neckline along the left edge acc. scheme 3. After 48 cm = 120 r. From the bottom bar, close off the remaining 25 stitches of the shoulder.
Right shelf: knit the same as the left front, but in a mirror image and with 5 holes for buttons. To do this, after the bottom bar, knit as follows; 5 p. pattern 4 (= fastener bar), 1 p. pattern 3, 55 p. pattern 2 (= perform the last 6 p. repeat once, then repeat 2 times, finish 5 p. after the repeat), hem. At the same time, for the 1st button hole, knit every 5 cm = 13 r. from the initial row as follows: in the front row, knit 3 stitches of the fastener strip with the front row, 1 yarn over, 2 stitches of the strap together with the front one; In the purl row, knit loops and yarn overs.
Make the next 4 button holes at intervals of 7 cm = 18 r. similarly. Make an armhole as on the left edge of the back. Make the neckline along the right edge according to. Scheme 3 in mirror image.
Sleeves: cast on the knitting needles for each sleeve 61 p. and for the strap knit 2 cm = 5 r. pattern 1, start with 1 purl row and evenly add 12 sts = 73 sts in the last purl row.
Continue working with pattern 2. At the same time add on both sides for bevels in every 14th row. from the bar 4 x 1 p. pattern 3 = 81 p.
After 29.5 cm = 74 r. close from the bar on both sides to roll 1 x 3 sts, then in every 2nd p. close 2 x 2 p., 10 x 1 p. and 2 x 2 p.
After 41.5 cm = 104 r. close off the remaining 39 sts from the bar.
Assembly: sew shoulder seams. For the neckline, cast on 85 stitches on circular needles along the edge of the neckline, including the ends of the strips, and knit 1 purl row.
Continue working with pattern 1, while between the edges, start and end with 1 face crossed. At 5 p.m. pattern 1 (= front row) make 1 more hole for a button in the fastener bar of the right front. To do this, knit the edge stitch, 1 knit stitch crossed, knit 2 stitches together and make 1 yarn over. Yarn over in purl row, purl crossed.
With a binding width of 3 cm = 7 r. bind off all stitches like knit stitches. Sew in the sleeves, sew side seams and sleeve seams. Sew buttons.

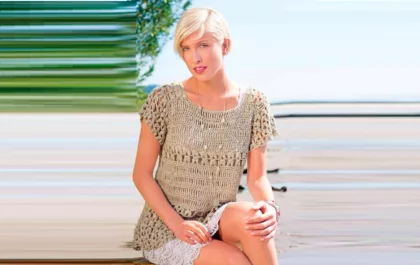
Ажурный пуловер с коротким рукавом
Изумительный джемпер с коротким рукавом из льняной пряжи лучший выбор для теплой погоды. Универсальный бежевый цвет отличный выбор.
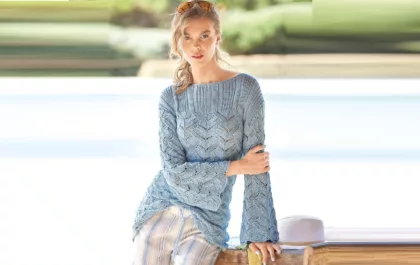
Голубой ажурный джемпер
Удобный прямой силуэт, красивый узор и приятная к телу пряжа из хлопка с небольшим содержанием кашемира делают этот джемпер желанным в любом гардеробе.