
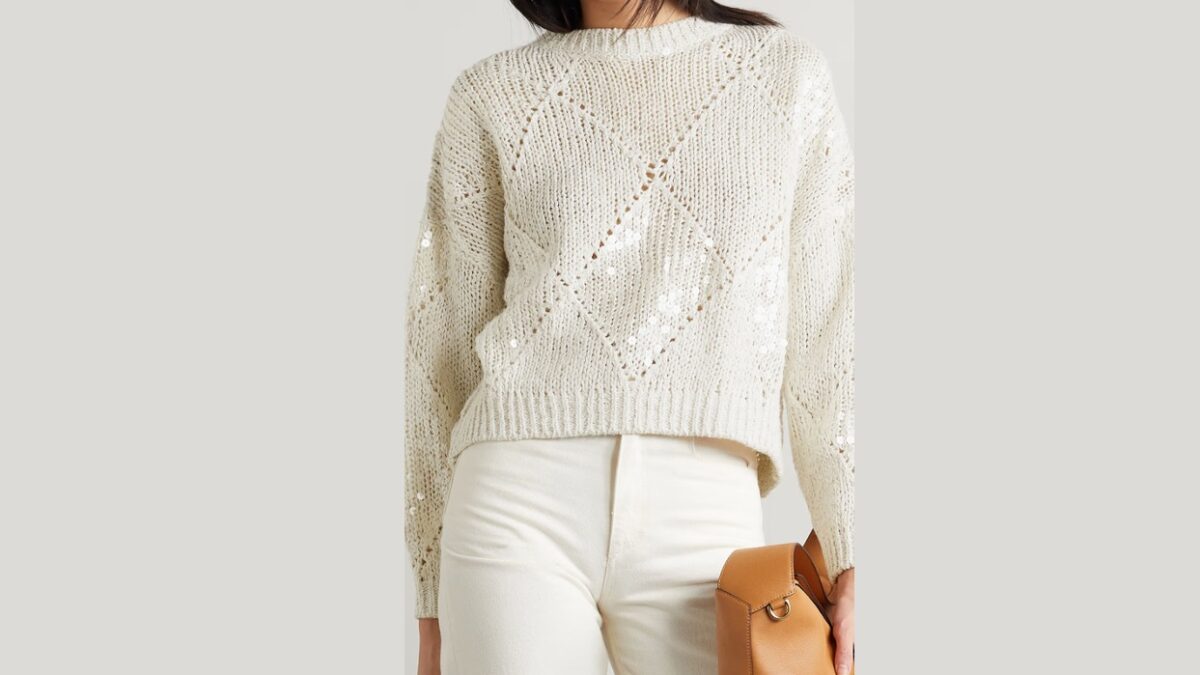
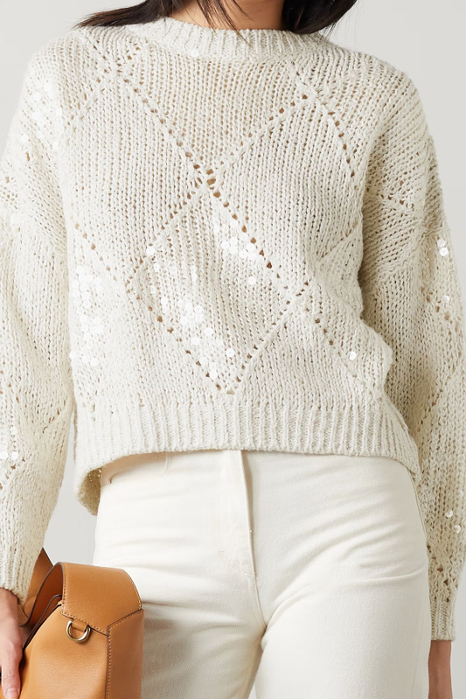
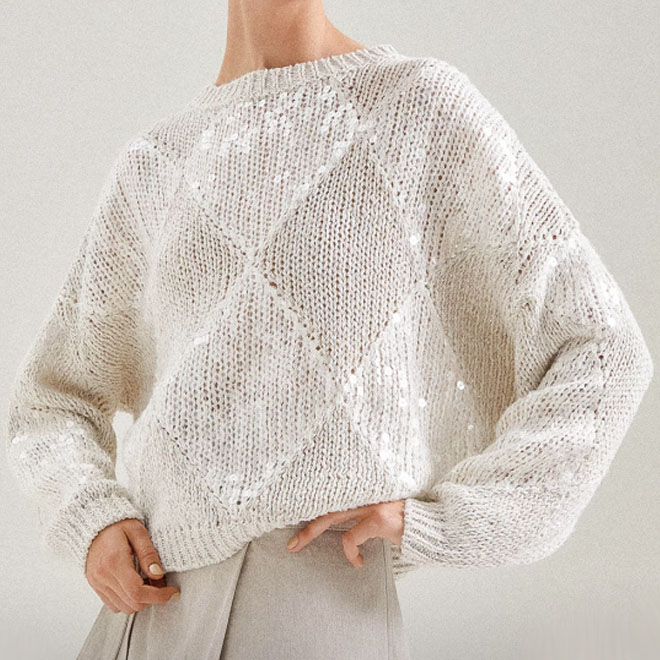
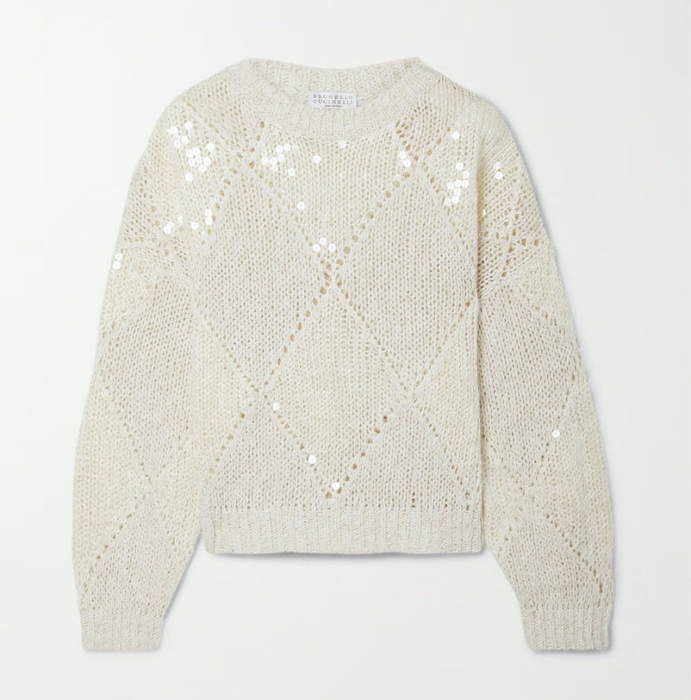
Jumper based on Brunello Cucinelli “Rhombuses”
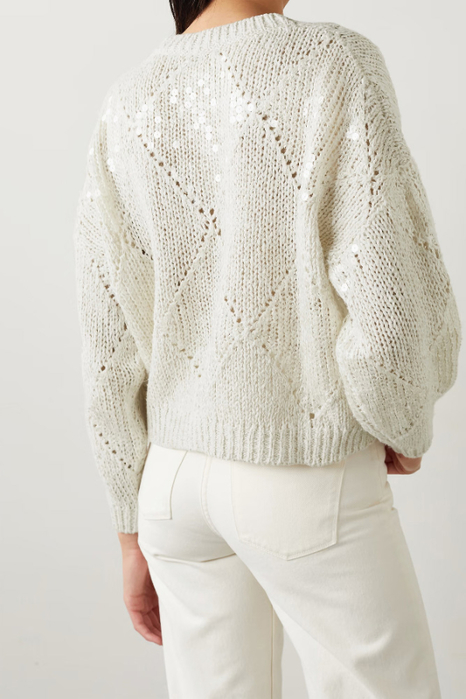
Brief description of the model. The jumper is knitted based on the great master of knitwear Brunello Cucinelli. The main pattern is a diamond shape, formed using decreases and increases. You will adjust the width of your product yourself depending on your wishes and recommendations.
The jumper is knitted from the bottom up in two fabrics, a separate front and a separate back. A bevel is knitted at the shoulders. The sleeve loops are picked up directly from the fabric, after sewing the shoulder seams. The neckline is tied in a circle. The neckline, elastic at the bottom of the product and sleeve cuffs are tied with 1/1 elastic. The MK is not hinged, it allows you to make calculations for any size. Within the framework of this microcontroller, calculations will be made using the example of S/M size.
Tools and materials used.
Knitting needles No. 5.0 mm - main fabric. No. 3.5-4.5 mm – elastic band.
Yarn. Any will do. I knitted from yarn of different compositions in several plies - 500 g and thread with transparent Chinese sequins - consumption 160 g. The total weight of the product is about 650 g.
General recommendations for consumption, general theory.
When calculating yarn consumption, it is not entirely correct to use only the weight characteristics of the yarn. For example, for identical models of thick merino thread it will take 1 kg, and a mohair yarn for the same size will take 100g. It is more accurate to calculate the consumption in meters. We start from the following data.
With an average yarn thickness (180-250m/100g) for a women's jumper size of medium length, medium loose fitting, size S/M we take 1200 meters, men's size S/M -1300 meters. Each next size + 100 meters. The thicker the yarn, the less the consumption will be in meters and the more in grams. For example, the same S/M size in thick yarn 100m/100g - the consumption will be 800-900 meters (800-900 grams, respectively) and vice versa, the thinner the yarn, the less the weight of the product will be. Convert meters to grams. If you have yarn 200m/100g Our conditional 1200m/200m = 600 grams will be the approximate yarn consumption. If the yarn is 250m/100g, then 1200/250 = 480 grams of yarn will be needed for size S/M. All these data are approximate, but this is a base from which you can build. The above consumption data is a general theory. In our case, it is difficult to calculate the consumption by footage, since many threads are involved. Therefore, I recommend using my thread consumption data, proportionally increasing the consumption of each thread for subsequent sizes.
Yarn recommendations.
The yarn can be absolutely any, depending on the season in which you are going to wear the jumper, your personal preferences in composition, etc. For summer options, I recommend cotton/linen/silk and its blends. A combination of linen and silk threads would be ideal. This mixture ensures the fluidity and plasticity of the fabric. Kid mohair is added to create a contrast of texture between the diamonds. If you have thin bobbin yarn, below is information on how to count thread in several plies.
How to calculate the meter of thread in 100 g using several additions.
Theory. Suppose you have 500 meters of yarn in 100 grams. You need to get a thick thread of 100 meters in 100 grams. So you need to divide 500 meters by 100 meters. It turns out that in order to have a yardage of 100 meters in 100 grams, you need to knit in 5 folds.
Suppose you have Italian yarn in a bobbin. Meterage 1500 meters per 100 grams. We want to knit in 3 threads - the question is what yardage will we get? 1500/3=500 meters in 100 grams. And if in four additions 1500/4 = 375 meters in 100 grams. Accordingly, five additions 1500/5 = 300 meters in 100 grams. Principle – available yardage / number of thread folds = meterage of 100 grams. If the ball is 50 grams? For example, Alize baby wool is 175 meters in 50 grams.
And our task is to obtain footage close to 120 m in 100 grams. We count two additions 175 / 2 = 87.5 m. Since we have 50 g, and our guidelines are 100 g, we multiply by 2, 87.5 x 2 = 175 m, it will not be enough. We count three additions 175 / 3 = 58.3 x 2 = 116.6. We got the desired result, the closest to the task.
If the thread is different in meter?
Suppose we knit in two layers from threads of different thicknesses. How to calculate how much footage we have? For example, I have a fold made of cotton thread and viscose thread. 1st thread – 300m/100g, 2nd thread – 320m/100g.
First we need to calculate the weight of the thread in 1 meter. I immediately convert the balls into centimeters 100 g: 300 m = 0.3 the weight of 1 meter of our threads. 100 g: 320m = 0.32.
Then we simply add up our calculations. 0.3 + 0.32 = 0.62g. 1 meter of my thread mix weighs. Let's convert to the usual values: 100: 0.62 = 161.2. We got the usual footage. This means that by mixing our threads we will get a thread with indicators of 161m/100g.

Figure 1. Taking measurements - general theory. The main measurement for shoulder items is chest circumference.
1. Chest circumference – (OG).
For shoulder products, the main measurement is the chest circumference - (OG). The measurement is taken with a measuring tape (at least with the husband's tape measure) along the most protruding points of the chest, strictly horizontally, parallel to the floor.
2. Waist circumference – (OT).
This measurement will not be needed in our product.
3. Thigh circumference – (OB).
5. Product length – (DI).
The measurement is taken from the junction of the neck with the shoulder to the desired length, through the protruding points of the chest. In the picture, the measurement is to the waist. You remove it to your desired length.
6-8. Sleeve length – (DR).
In the diagram, 6 is the length of the shoulder, 8 is the length of the sleeve. I recommend taking this measurement from the junction of the neck to the shoulder to the desired sleeve length, that is, measure 6 + measure 8.
9. Arm circumference – (OR).
Removed horizontally to the floor at the widest upper part of the arm.
10. Neck circumference – (ОШ).
The measurement is taken below the base of the neck, not tightly, along the prominent bones of the collarbone.
My measurements.(Author) Using their example, I will show all the calculations. Chest circumference (CH) – 88 cm. Next, we need to decide on the freedom of fit, that is, understand how wide the jumper you want for yourself.
Freedom of fit. General theory.
The freedom of fit can be zero, i.e. be absent altogether. For example, when knitting a summer viscose T-shirt or a tight-fitting top. In other cases, the freedom of fit is added from 2 cm to infinity.
When knitting sweaters, I add at least 7-10cm for a loose fit.
Of course, this depends on many indicators, and, first of all, on the model of the jumper and the yarn from which it is knitted. In the case of knitting a jumper such as a tight-fitting turtleneck, the freedom is made from 3-5 cm, but taking into account the yarn from which the product is knitted. Some yarns give a strong distortion of parameters, especially after WTO.
If you find it difficult to decide on the looseness of the fit, try using an item from your wardrobe. Just measure the width of your favorite sweater.
Another way that helps is to close the measuring tape around yourself to the expected width. Move the tape around your chest, lower it to your hips, feel the comfortable width of the future jumper you need.
Well, the last recommendation is for oversized models. Spread your arms to the sides and over your shoulders, and use a measuring tape to measure the width of your future product. In this case, it will be easier for you to understand how low your jumper should go down the sleeve.
My recommendations for the loose fit of our jumper model from 30cm. In my example, I added about 50cm to the chest circumference for a loose fit.
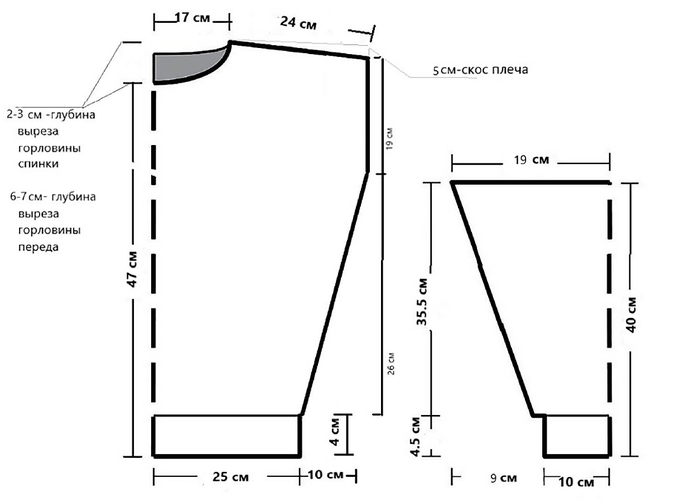
Figure 2. Pattern diagram.
Drawing of the model with data on S/M size. My height is 1.7m. Product length 54cm. The width of the product at the widest part is 70cm.
Sample. Theory.
Knitting a sample is a must! On the yarn label, on the reverse side, we look for a sign with crossed knitting needles, under the knitting needles there are two meanings from and to! Each knitter has her own knitting density, it is individual, so the yarn manufacturer gives recommendations from start to finish. We choose the average value, take the knitting needles and knit! There is no general recommendation “such and such yardage is knitted with such and such knitting needles”! Fluffy yarn, for example, such as kid mohair, angora, alpaca, is knitted with thicker knitting needles. This is due to the fact that the villi need room to open up! If you knit fluffy yarn with too thin knitting needles, after the WTO you can end up with felt boots!
The sample must be 10 cm in size. The larger the sample, the more accurate the data on it will be. I usually cast on 30 stitches. The sample is knitted in exactly the same stitch as the product is supposed to be knitted with.
If you are knitting a complex pattern with a lot of repeat, then the sample can be half the size of a sweater! In our case, practice crocheting decreases and increases to form a diamond shape. When knitting the pattern, do not forget to knit an elastic band.
For elastic, as a rule, knitting needles are used that are 0.5-2mm smaller than the knitting needles used to knit the main fabric. In my case, the yarn did not hold the pattern at all, so I separately calculated the density of the elastic band.
Description of the drawing.
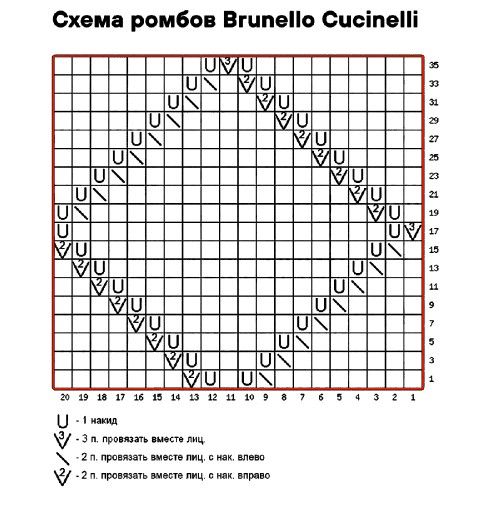
The main pattern in our product is a rhombus. The rhombus is formed by decreasing and increasing each front row. The purl row is knitted according to the pattern. Each diamond must consist of an odd number of loops.
WTO: wet-heat treatment.
Both the sample and the finished product must be subject to WTO! Now let's just talk about washing.
Wash.
Add detergent to a container with cool water, which is cool for your hands, and immerse our sample there. It should be well saturated with water. Italian bobbin yarn requires special attention at this stage, since, as a rule, it is stock yarn intended for machine knitting. To make it easier to slide in the loom, the yarn is treated with a special compound. Our task is to free her from this composition.
Sometimes it's not easy at all. If the seller promised you a fluffy, but in fact you received a rope, you will most likely have to suffer to see that very fluffy! The scarier the Italian yarn is when received, the more interesting it should be after the WTO. If gentle handling does not help your sample to reveal itself, you will have to do more than one wash, and perhaps also bathe it in dishwashing detergent!
Hank yarn generally does not require such effort. We simply saturate the sample well, right in the water we try to correct and align our loops, slightly pulling it with our hands along and across! Then we lay the sample on a towel, straightening it thoroughly with our hands. Once dry, it is ready for measurements!
We measure the knitting density.
This is a very important point! We apply a ruler and a centimeter to the sample and take measurements. We measure our sample as a whole, without needing to stretch it too much or crumple it. You should measure it as if in a free state, put it on the table, straighten it with your hands and take measurements. We do the same with the rows, according to the same pattern! It is more convenient to count rows on the wrong side.
Be sure to record all the data in your notebook: the name of the yarn, the footage, the knitting needles that were used and the resulting density. Will definitely come in handy in the future! My horizontal density = 1.7 loops / 1cm. Vertical density (number of rows in 1 cm) = 2.3 rows / 1 cm.
Let's start with the calculations. General calculation.
All calculations given in the material are shown as an example. Each has its own size, its own density. My numbers can be used as a guide, but everyone will have their own calculations. Based on this material, you can make calculations for any other sweater.
Example. Let's do the calculation using my sizes as an example. OG – 88cm. Let's decide how wide the jumper we want for ourselves! That is, we must decide on the freedom of fit. How many centimeters should we add to make the jumper the desired width?
My recommendation for an increase in this model is 30-50cm. I have an increase of 52 cm. 88 + 52 = 140cm. – the circular width of the jumper that I want to achieve.
We count the required number of loops. 140 * 1.7 (density) = 238 loops, rounded to an even number = 240 loops. This is how many stitches I need to cast on for the entire pullover. We will knit the front and back separately, so we divide the loops in half. 240:2 = 120 loops. 120 stitches will make up my jumper at its widest part. In the pattern we see the tapered bottom of the jumper. Let's take additional measurements.
Like all horizontal measurements, we take them strictly parallel to the floor, hip circumference in the place where the length of your product should end.
My measurement at the hip bones is 86 cm.
The sample showed that the elastic in this yarn does not hold its shape at all.
Therefore, I do an additional calculation for the elastic band. The density of the elastic is 2 loops per 1 cm. 86 cm * 2 = 172 loops I need to cast on to knit the elastic. Divide into front and back 172: 2 = 86 loops. That is, in order for the jumper to fit around the hips, but be loose in the chest area, we will cast on a smaller number of loops on the elastic band and then by increasing the side seams we will return the originally calculated number of loops.
Let's calculate the rate of increase. We will make increases along the fabric in the area of the side seams from the elastic band until the formation of the armhole begins.
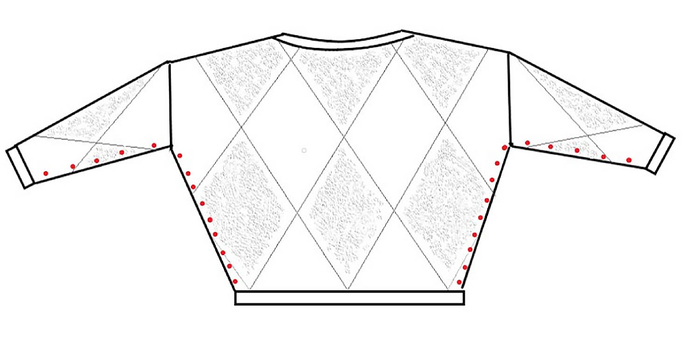
Figure 3. In the figure, the increases are shown schematically with red dots.
In the body of the sweater these are increases, in the sleeves - decreases, since the sleeves are knitted from top to bottom.
The sleeve armhole line is knitted in a straight line. To calculate the rate of increase, we need to know the height of the sleeve armhole.
Calculate the height of the sleeve armhole.
To calculate the sleeve armhole, I propose the following formula.
OG/6 + 5cm.
88/6 + 5 = 19.6 cm.
19-20cm armhole height.
54 cm total length of the jumper – 19 cm armhole height – 4 cm elastic – 5 cm shoulder bevel = 26 cm. We count the loops that need to be added 120 – 86 = 34 loops. We divide the loops into two since we increase in pairs 34: 2 = 17 times in two loops we will have to increase by knitting 26 cm of the length of the jumper from the elastic to the armhole. 26 cm: 17 cm = 1.5 cm. That is, approximately every 1.5 cm I will perform increases at the beginning and end of the row. We have done the basic calculation.
Let's start knitting.
The front and back are knitted the same way, with a difference in the depth of the neckline.
- Let's start with the shelf.
Knitting an elastic band. We cast on loops the Italian way. Don't forget to change the needle to a smaller size. I have knitting needles No. 3.5mm. I cast on 86 loops. After the cast-on row, I knit 2 rows with a hollow elastic band. In straight back rows, the hollow elastic is knitted equally on the front and back sides. The knit loop is knitted, the loop is removed from the inside, the thread is removed before work. Next, we change the knitting needles (I have 4.5 mm) and knit 1/1 elastic. The height of the elastic band is 4 cm. I change the knitting needles again (I have #6 cubic needles; round ones are #5mm) and move on to knitting the main fabric.
Main canvas.
In the first front row of the main fabric, we introduce balls of sequins and distribute the loops into diamond shapes. For convenience, in the first front row I introduce only balls with sequins, while I knit the areas without sequins with thread from the ball that was used to knit the elastic band. Diamonds with sequins begin to be knitted from the increase loop. That is, in the first front row I will have an increase of three loops, made from newly connected balls.
And only in the next purl row I introduce all the other balls without sequins. Let's distribute the loops into rhombuses.
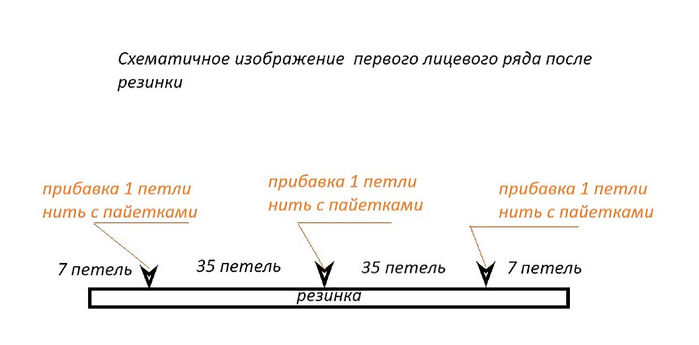
Figure 4. See diagram below. The edge loops are not indicated on the diagram.
The width of my diamond at the widest part is 35 loops (21-22cm). Perhaps you will have a different number of loops. A prerequisite is an odd number of loops per diamond. Let's use my example. I have 86 loops. 35 loops - the width of one diamond. Therefore, 2 full diamonds will fit 86 – 35 – 35 = 16 loops. Minus 2 edge stitches 16 – 2 = 14 loops. 14:2 = 7 loops.
This is how we distributed the thread loops without sequins. Diamonds with sequins will be formed from increments of one loop in the first front row of the main pattern.

Figure 5. For a complete diagram of the arrangement of diamonds throughout the jumper, see the figure below.
Transition from elastic to main fabric.
1st person row – the first row of transition from the elastic band to the main fabric. Edge stitch, 7 knit stitches using working thread without sequins, connect a new ball of sequins, knitting one loop with an increase. I increase from the loop of the row below. You can perform the increase in any way convenient for you. If you make an increase from a broach or yarn over, be sure to knit the loop crossed so that there is no hole left.
Next, using the main thread without sequins, we knit 35 loops of the next diamond. We connect the second ball of sequins, knitting an increase of one loop. Next 35 loops with the main thread. We connect the third ball with sequins, knitting an increase of one loop and finish the row with 7 loops with thread without sequins, edge.
2nd purl. row – in all purl rows, all loops are knitted according to the pattern (purl loops), without decreases or increases. The peculiarity of this second purl row will be that in it we will connect all the remaining balls of thread without sequins. So, from the first thread without sequins, which we used in our work, we knit the first section with purl loops.
Next, we knit 1 loop with sequin thread. And now we connect a new ball of thread without sequins to knit the next section. Thus, in this purl row we introduce all the remaining balls of thread without sequins.
3rd person row – in this row we begin to make decreases and increases according to the drawing rule.
In this row and further, each subsequent front row is an expansion of diamonds with sequins (increases). Diamonds without sequins are knitted by shortening the loops (decrease).
We knit this way up the pattern until we run out of loops in a rhombus without sequins. Each diamond must have an odd number of loops. Therefore, in the last row of the rhombus closure without sequins, after knitting the last reduction on both sides, there should be one loop left.
We knit the purl row according to the pattern. And already in the next front row we begin to knit increases in rhombuses without sequins, and decreases in rhombuses with sequins. Keeping the pattern, we knit upward until the armhole begins to form.
Don't forget to knit increases to expand the fabric along the side seams. According to my calculations, increases in side seams are made every 1.5 cm.
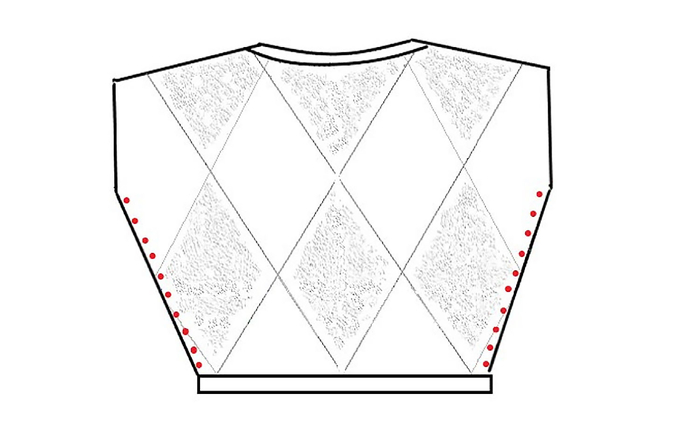
Figure 6. In the figure, the lateral increases are schematically indicated by red dots. Side increases should also fit into the main pattern.
In my case, increases from the elastic along the side seam go first along the fabric without sequins, then they are made among the loops of the outer rhombuses with sequins. Remember that the main guide for saving the design will be the central diamond with sequins. In the picture below, the central diamond is marked with a vertical red line.
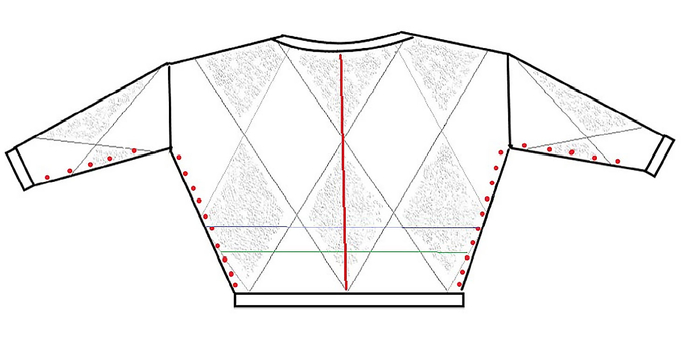
Figure 7. In any row (green and blue lines in the figure), the number of loops in the outer diamonds with sequins should be either the same as the central diamond, or less. In my case, it turned out that the number of loops in all three diamonds was the same.
Keep track of the number of loops in each of the three diamonds. As soon as the number of loops of the outer diamonds is equal to the number of loops of the central diamond, the next lateral increase must be made with thread without sequins.
So, keeping the pattern, we knitted the front up to the required height before the formation of the armhole began. For me this is 28 cm of the main drawing. 54 cm (total length of the product) – 5 cm (shoulder bevel) – 19 cm armhole – 4 cm elastic = 26 cm.
Before the formation of the armhole begins, there should be an initially calculated number of loops on the knitting needles. In my case it is 120 loops. Next, we will knit without increases, in a straight line, maintaining the pattern until the neckline of the front begins to form.
Calculation of the front neckline and shoulder bevel.
I'm going to cut out the neckline of the shelf about 6-7 cm high, the shoulder bevel is 5 cm high. Divide the loops of the shelf into 3 parts. 120 loops: 3 = 40 loops. 40 loops on the shoulders, and 40 loops on the neckline. Double-check this simplified method of dividing loops using centimeters or hold the workpiece to yourself. Are you satisfied with this proportion of division of loops? Check to see if your neckline is wide enough. If necessary, make adjustments to increase the number of stitches per neck.
Now let’s calculate the height of the shoulder bevel and neckline in the rows using vertical density. In my case, the vertical density is 2.3 rows per 1 centimeter. The height of the shoulder bevel is 5 cm. 5 x 2.3 = 11.5 rows, rounded to an even number = 12 rows. 12 straight and reverse rows must be knitted to ensure the required shoulder bevel height of 5cm. This means there will be 6 knit rows and 6 purl rows and 6 turning points on each shoulder. 6 turning points will divide the shoulder loops into 7 sections. Divide them evenly to get a straight line. 40/7 = 5.6 loops. This means that my sections will have 5 or 6 loops each (see the picture below. The depth of the neckline is 7 cm.
7 x 2.3 = 16 rows.
To knit the neckline, we will need to knit 8 knit and 8 purl rows, which means there will be 8 turning points. 8 turning points will divide the loops of each half of the neck into 9 sections.
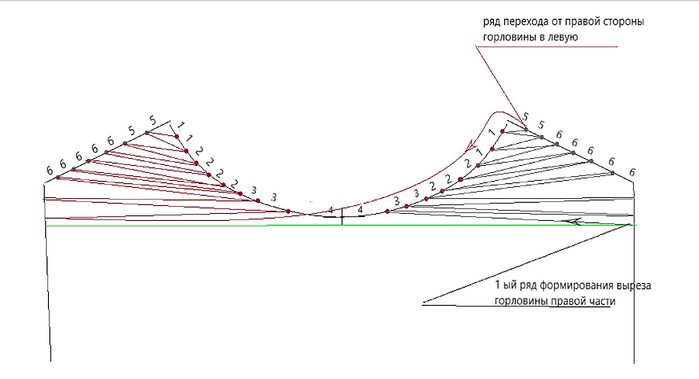
Figure 8. In the picture below you will see my stitch distribution. With this distribution you will get a boat neck.
So, all the calculations for the shelf are ready, we can knit. Neck depth – 7cm. This means I subtract 7cm from the total length of the sweater. 54cm – 7cm = 47cm.
Having knitted 47cm of elastic from the beginning, I began to form the neckline.
The neckline is knitted without tearing off the thread, first the right side, then the left.
In the diagram, the right side is indicated by black lines. The formations on the left side are indicated by red lines. The green line is the last row (purl), knitted across the full fabric.
After this we begin to form the neck of the shelf. The first two turning points along the neck are made in the direction of the neck - edge. This is the same difference between the depth of the neck and the height of the shoulder bevel - 2 cm.
Next, I knit shortened rows in the direction of the neckline and shoulder bevels. We knit until we use all the planned turning points.
Next, we move from the right side to the left (in the diagram there is a broken red line with an arrow) and on the second side we mirror all the turning points.
That is, on one side we perform turns from face to back, on the second side from back to front.
Having knitted all the planned rows on the left side, we knit the final unifying row in order to get rid of the double loops remaining after the turns. Next, close the hinges of the shelf. The shelf is ready.
- Knitting the back.
The back is knitted in exactly the same way as the front. The only difference will be in the neck. Let's do the calculation for the back neck. We already have a calculation for the shoulder bevel, it is calculated on the shelf. All that remains is to make adjustments to the back neckline. The cutout on the back is of small depth, 2–3 cm. 3cm * 2.3 = 6.9. We need an even number of rows. I take 6 rows, 3 turning points. The calculation for the back neck is ready.

Figure 9. So, to knit the back, we cast on the same number of loops on the elastic band as for the front.
We knit an elastic band to the required length, not forgetting to compare it with the already finished shelf. Add loops in the first row of the main fabric, attach balls of sequins. In the second front row of the main canvas, we begin to form a pattern. We also make increases along the side seams.
Do not forget to timely check the length of the backrest with the length of the shelf. It is important that when connecting the parts along the side seam, the patterns of the rhombuses of the shelf and back match. So, we got to the armhole and knitted most of it.
We measure the canvas. From the beginning of knitting to the beginning of the formation of the shoulder bevel, I have 49 cm. 54 cm (total length of the jumper) – 5 cm (shoulder bevel) = 49 cm. The depth of the neckline along the back is 2 cm less than the shoulder bevel. Therefore, having knitted 49cm, I begin to form a shoulder bevel in the shoulder-to-shoulder direction. In the diagram above, these rows are indicated by black lines.
Having knitted 6 rows, using 3 turning points in the shoulder bevels, I began knitting the back neckline along with the formation of the shoulder bevels. That is, I knit in the neck-shoulder direction. First the right side, then the left. Then we knit the connecting row and close the back loops. The back is ready.
- Shoulder seam connection.
Before connecting the parts, do not forget to wash and steam the shelf and back separately. Only after this we begin sewing the shoulder seams. You can sew shoulder seams in any way convenient for you. Shoulder seams are made on both sides. Next, we can start knitting the neckline, or knitting the sleeves.
If I understand that I am satisfied with the height of the neckline, and I don’t have to bandage anything, I boldly take up the sleeves. If there is any doubt about how the neckline will fit on the figure (too wide, too narrow, short neckline, etc.) I start by tying the neckline. Then, making sure the neckline is perfect, I move on to the sleeves. We will take the sleeves straight from the body of the pullover, so adjusting the neckline after the sleeves will be very labor-intensive.
- Neck tying
We take knitting needles 0.5 - 1 mm smaller than the knitting needles with which you will knit elastic. We put loops into each jumper between the rows, moving the edge. That is, for each row of the main fabric there are two cast-on loops. Next we will knit a hollow elastic band. You can cast on loops at the rate of 1 row of fabric = 1 neck loop. Then in the next row, knitting a hollow elastic band, the loops must be doubled through the yarn over. I got 192 loops. We knit 4-6 rows with a hollow elastic band.
We knit the last row of hollow elastic 2 loops together. I knitted it with knit stitches, you can knit it with purl stitches. Then you will have a finishing row that imitates a loop. I got 96 loops. I change the knitting needles to a larger diameter and switch to knitting 1/1 elastic. The height of the elastic is about 3cm. I close the loops with a needle.
- Sleeve calculation.
We will take the sleeves directly from the jumper fabric. We have already calculated the height of the armhole. The height for my size is 19-20 cm. Based on the horizontal density, I determine how many loops need to be cast on for this length. Let's do the calculation. 19.6 x 1.7 = 33.3 loops. That is, the entire sleeve will be 39.2 cm and 66.6 loops. I round up to 70 loops, in my case it will be exactly two diamonds. Do not get carried away with rounding so that the sleeve does not become too wide.
We calculate the sleeve contraction loops. There are two ways. The first one is for the lazy), we just make cuts on both sides. Contractions are performed every 4-6 cm, one loop at the beginning and at the end of the row. If there are any extra stitches left, they are cut off in the last row of the transition from the main pattern to the cuff rib.
The second way is calculated. First, we count how many loops we need to complete the sleeve cuff. This is how I do it. We already have a ready-made sample in the form of an elastic band for our jumper. Just throw the elastic band over your wrist, clamp it at the desired width and count the number of loops obtained.
I got 52 loops. Subtract the cuff loops from the total number of sleeve loops. We need to cut 70 – 52 = 18 loops. Reductions along the sleeve are made in two loops in one row. 18 / 2 = 9. When knitting a sleeve from the cast-on edge to the cuff, I will cut 9 times with 2 loops (at the beginning of the row and at the end). A total of 19 loops will be shortened. The length of the sleeve excluding the cuff is about 35 cm. 35/9 = 3.8 cm. This means that I will cut the loops approximately every 4 cm.
- Knitting the sleeves.
We measure the required number of centimeters in different directions from the shoulder seam. Mine is 19 cm. 1st cast-on row - using a thread without sequins, on the front side, using a knitting needle one size smaller, we begin to cast on the sleeve loops. There should be an equal number of stitches on both sides of the shoulder seam. I have 70 loops. I cast on 35 loops on the front and back. In the cast-on row I immediately insert one loop using a thread with sequins. I picked it up right in the middle near the shoulder seam. The diamond with sequins will begin from this loop. Next, this loop will be a plus to your design loops.
I showed how my drawing went further in the diagram. Diamonds with sequins are indicated in gray.
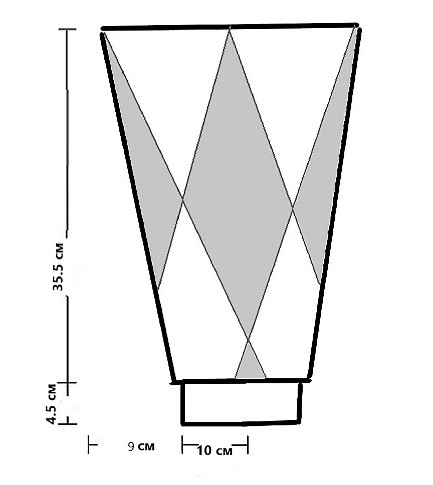
Figure 10. 2nd row purl. – change the knitting needle to the main one, and knit the wrong row with purl loops according to the pattern.
3rd row of persons. – in this row we begin to knit a pattern from the central loop, in my case I connect two more balls from the beginning to the end of the row.
4th purl. row - we knit all the loops according to the pattern.
We knit the 5th and all subsequent rows the entire length of the sleeve while maintaining the pattern.
Do not forget to perform sleeve reductions according to preliminary calculations. I cut 9 times per loop = 18 loops. In my case, I knitted 35.5 cm.
Let's move on to knitting the sleeve cuff. My cuff is knitted with 1/1 rib. The height of the cuff is 4.5 cm. Close the loops of the cuff using a needle.
- Assembly of product parts.
We will sew with one seam from the sleeve cuff to the elastic at the bottom of the product. Join your workpiece according to the pattern or details, pin it together with needles or knitting needles. Now using a hook we sew the parts together. I like to use this particular method of stitching a product, you can use any other method.
We thread the ends of the threads. We wash according to the general rules for washing knitted items (see the beginning) and dry them in a horizontal position. The jumper is ready.

Ажурный удлиненный пуловер
Ажурный удлиненный пуловер связанный из 100% биохлопка не оставит равнодушным никого. Сияющий коралловый цвет пленит кого угодно!