
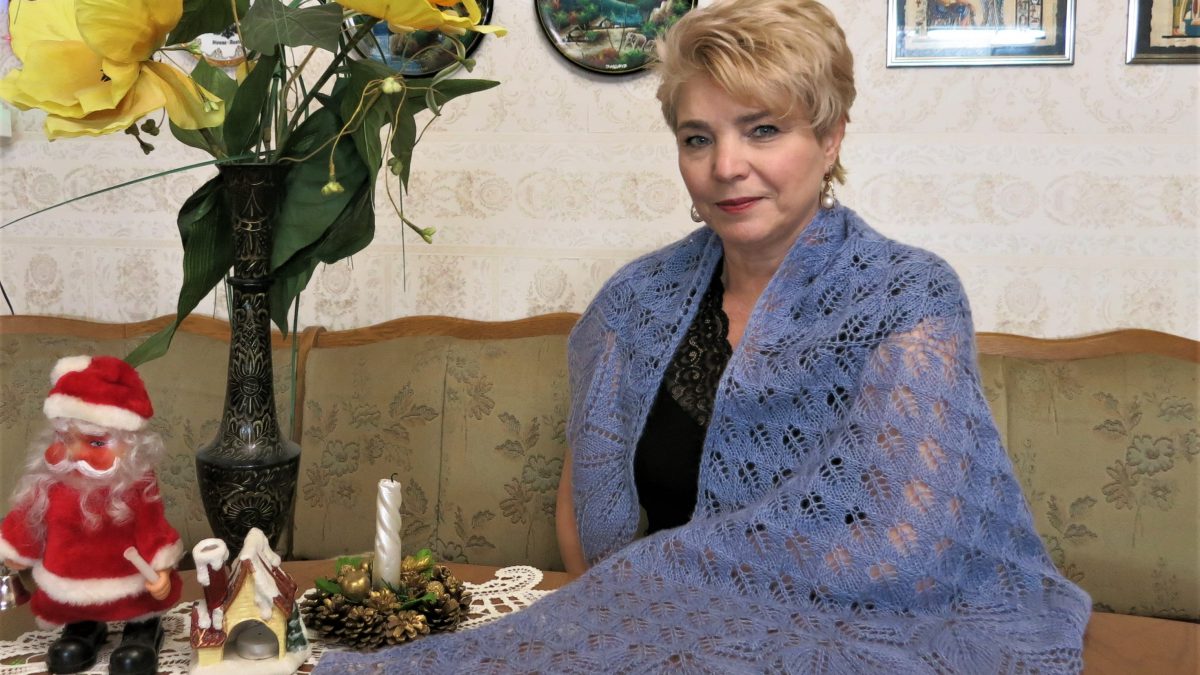

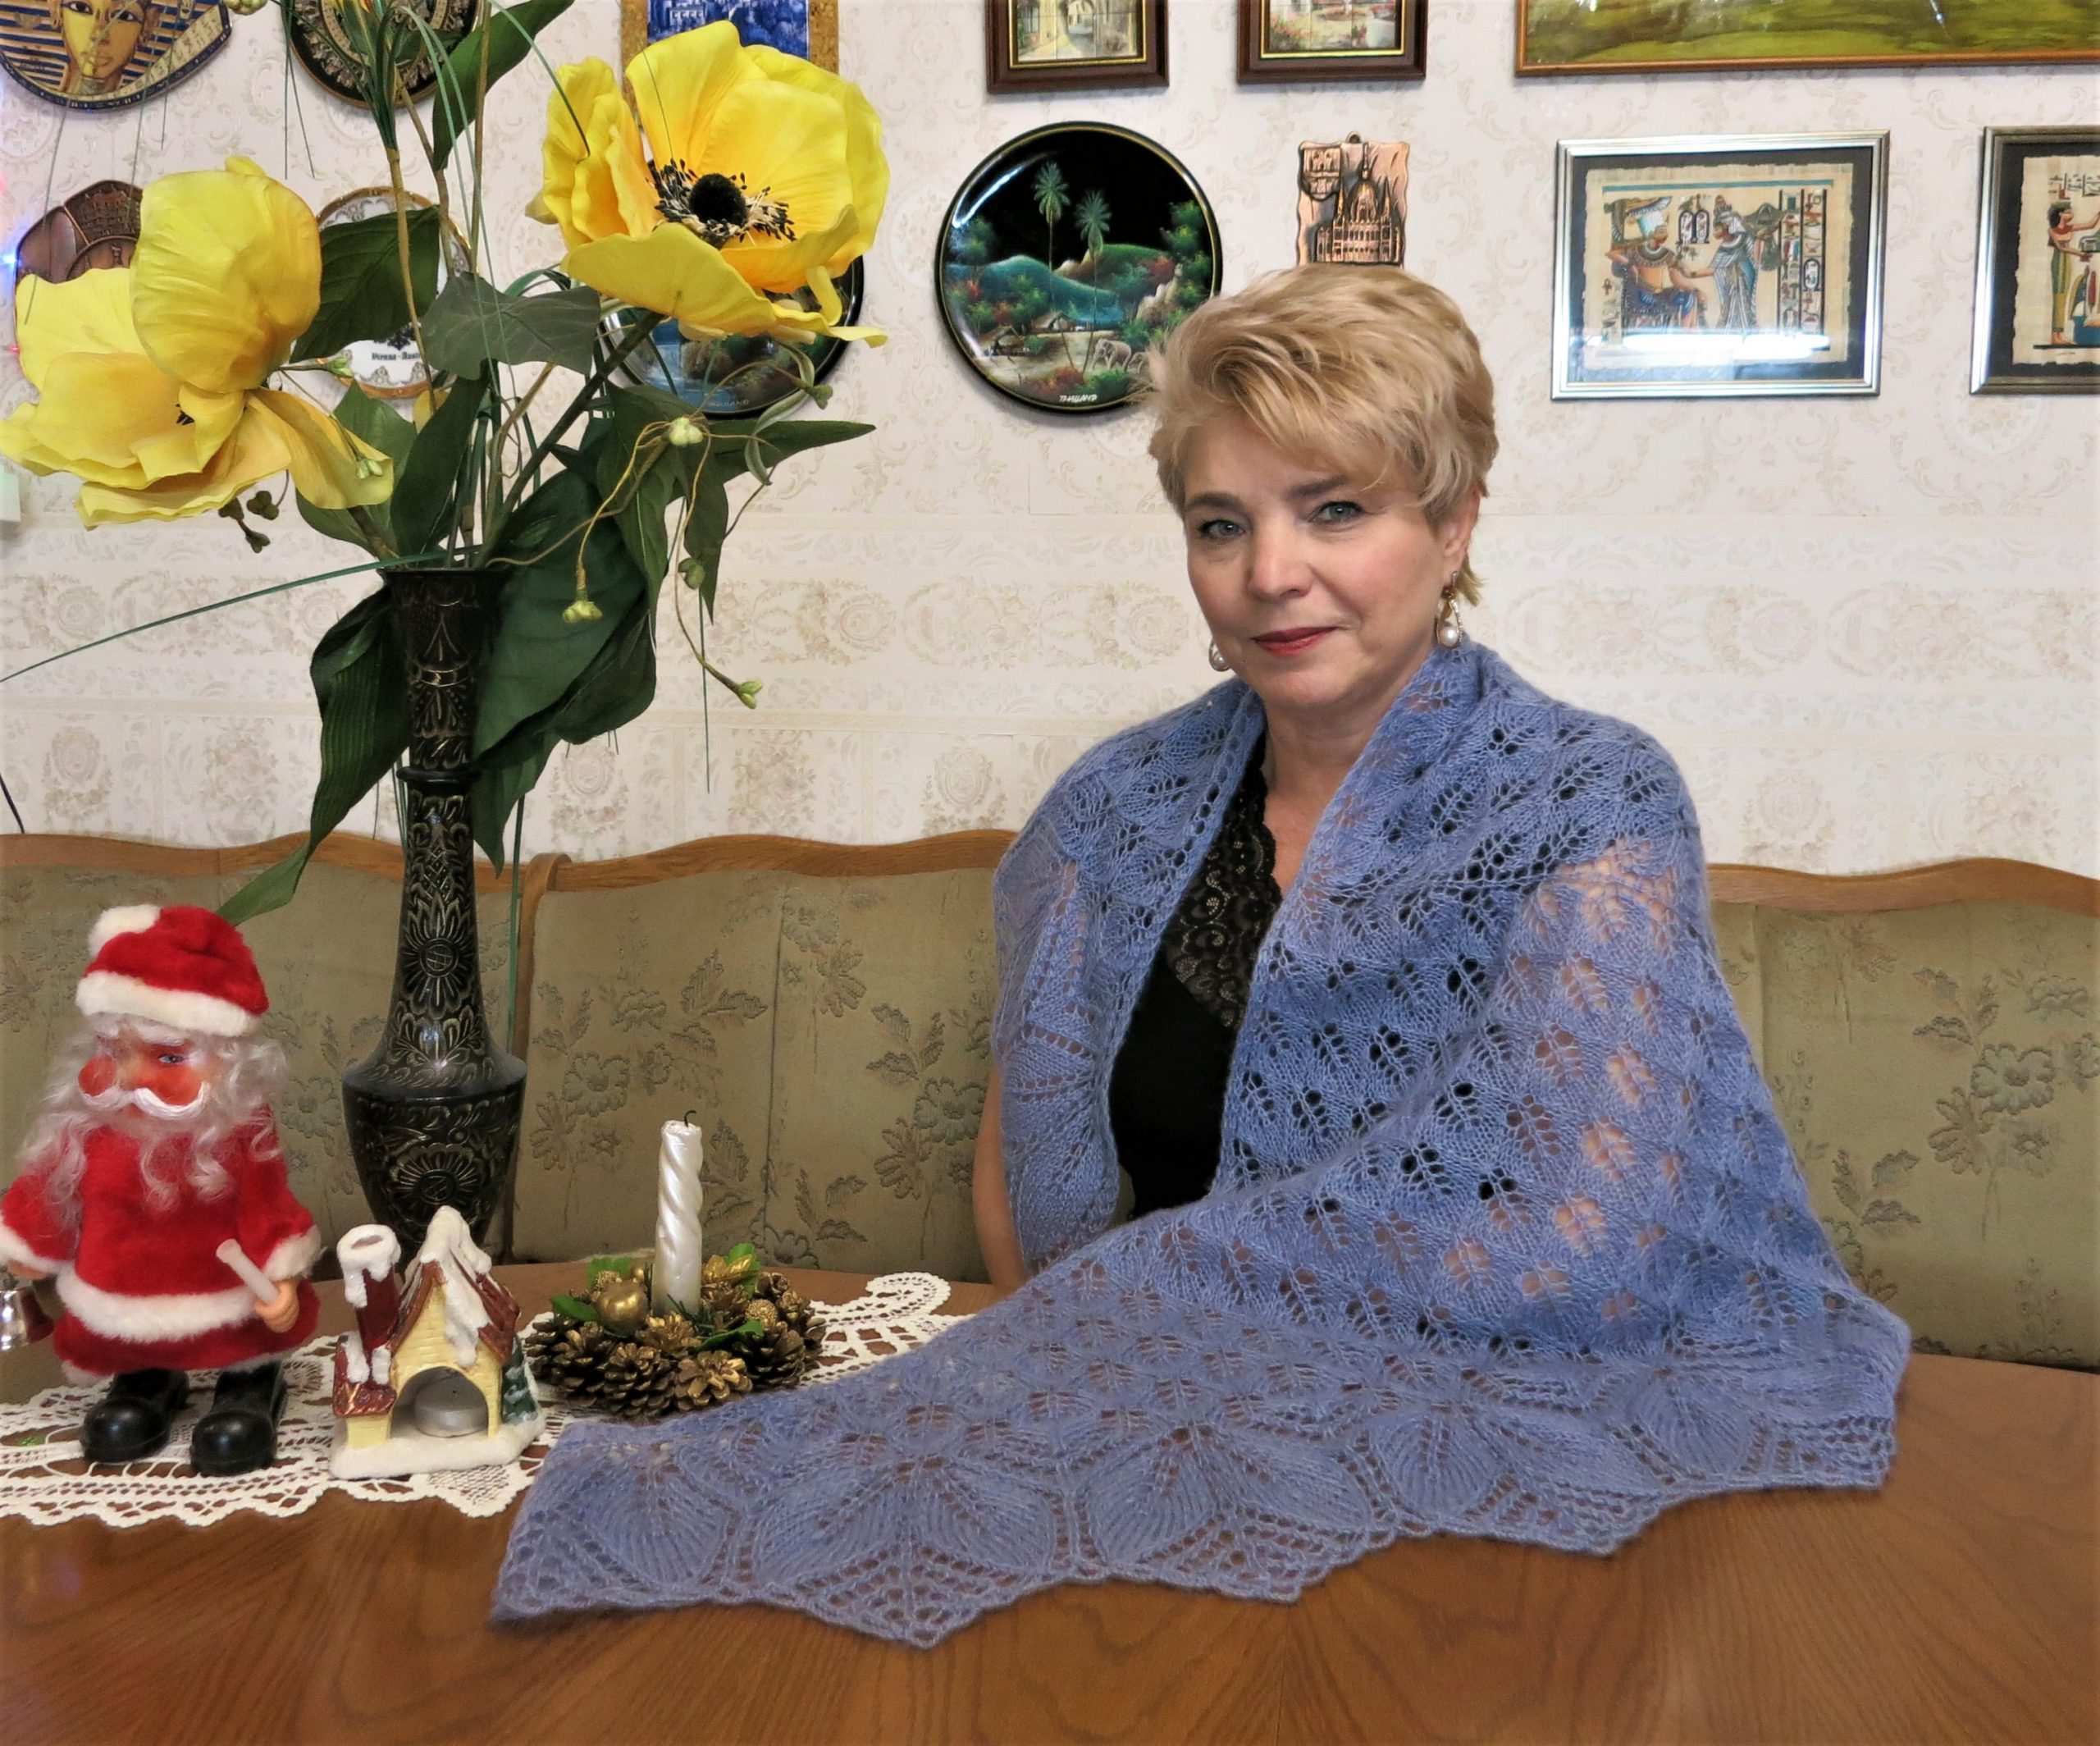
Knitted by hand, Haruni's shawl will become a unique and versatile accessory or a great gift, and will take a special place in every woman's wardrobe.
Simple patterns form an elegant openwork, emphasizing the natural femininity and lightness of the image.
The list of necessary skills to create this shawl is minimal: the ability to knit and patience when studying patterns. The work will take no more than 3 free evenings, and the finished product will be a reason to be proud.
The Haruni shawl with knitting needles, the pattern and description of which was created by Emily Ross, is a harmony of an easy knitting process and an incredibly beautiful result.
The combination of these qualities makes the shawl the most popular among beginning craftsmen.
The unusual name of the product is taken from the fictional language of Tolkien's works and means “grandmother”. The Haruni shawl has an interesting shape: it is crescent-shaped on the inner edge (which gives an ideal fit on the shoulders) and conventionally triangular on the outside, which adherents of the classics like so much.

The shawl is knitted from Turkish Angora Gold yarn (10 % mohair – 10 % wool – 80 % acrylic) – 550 m/100g

Finished product weight 113g
Knitting needles 3.5mm; 3.5mm hook for closing loops; markers.
Dimensions: 155cm x 80cm
The shawl is knitted according to the following order:
A set of loops with ribbon.
Cast on 3 stitches using any invisible cast-on.
Remove 1, thread before work, k2. Slip the first loop very loosely, this will allow you to stretch the shawl correctly later. If desired, you can not remove the first loop, but knit it. Repeat this row 5 more times.
Next row: turn work, pick up 3 sts along side edge of ribbon and 3 sts in invisible cast on. There are 9 stitches in total on the needles. The first and last 3 stitches of each row form a garter stitch edge.
Insert a marker into the center stitch of the row.

Scheme A.
Start knitting according to pattern A.

The diagram shows only half of the shawl. The diagram does not show 7 loops: the first 3 and last 3 edge loops and the central loop.
Knit the entire row like this: slip 1, knit 2 (= three edge stitches), then knit according to the pattern from right to left, then knit 1 = center loop, then repeat the pattern from right to left, finishing with 3 edge stitches).
All even rows = slip 1, k2, purl to last 3 stitches, k3.
Continue knitting according to pattern A until you have 12 “cuttings” on each side of the central loop (that is, repeat rows 17-32 4 more times, rapport is highlighted in yellow in the pattern).
“Shaft” is a single knit stitch with yarn overs on both sides of it. If you want to make the shawl larger or smaller, you need to finish pattern A with an even number of “cuttings” in each half.
If you have a limited amount of yarn, keep in mind that due to the rapid additions in pattern B, it (pattern B) will use approximately half of the total yarn.


Scheme B.

In pattern B, you will add stitches much faster in the first half of the pattern (the first 15 rows), then in the second half of the pattern you will decrease the number of stitches per row.
Similar to diagram A, only half of the shawl is shown.
Unlike diagram A, diagram B shows edge loops.
For the first 15 rows of the pattern, you will grow pairs of leaves, while decreasing the loops between the pairs.
Each half of the shawl should begin and end with a pair of leaves (highlighted in yellow in the diagram).
So, to knit a full row of pattern B, you begin by knitting the pattern from right to left, repeating the entire pattern (except for the edge stitches), ending with the last repeat of the first half, the last yellow stitch.
Then the central loop (not shown in the diagram).
Repeat for the second half of the shawl, starting and ending with the yellow segment.
Finish with three edges.
On rows 17-27 you will decrease stitches to form leaflets, adding stitches only between leaflets (shown in pink) and not between groups of leaflets.
When you get to 4 leaves (2 pairs) that form the center of the shawl, work a section of increase (shown in pink) between all the leaves.
From row 17 onwards there is no longer a center stitch, but instead a center section (shown in pink).
In addition, the edge loops should be knitted as follows: yarn over, knit 2 together, knit 2 (instead of knit 3). Pay attention to the special loops in the 17th row.
Closing the loops.
After the last row (wrong side of the product), you can close the loops. Two options are offered (hook or cord), the second option uses more yarn. For fine yarn, either the second option or the first in two threads is recommended.
Option 1.
Crochet 4 knit stitches together, a chain of 6 chain stitches, crochet the next 3 stitches on the left needle together with knit stitch. Bind off 1 stitch by folding the first stitch (on the hook) over the stitch you just knitted. Chain of 6 chains, p, knit 3 together, bind off 1 p. Continue in the same way, always knitting 3 together. The initial 4 knit stitches together were just for the edge. 3 together, the front one should match the pattern, covering the top of each leaf.
If you decide to use a different method of casting off stitches, it may be helpful to work another round of the pattern first to complete the decreases for the tops of the leaves.
Regardless of the method you choose to close the loops, close the loops very loosely.

Option 2.
2 knits together, 2 knits together. Return the stitches you just knitted to the left needle (without twisting or turning). Knit these 2 stitches. Return 2 stitches to the left needle again and knit them. Knit these 2 loops 8 times in total, the result will be a thin cord.
Keeping these 2 stitches on the right needle, knit 3 stitches together, then cast off one stitch by bringing the middle stitch over the one you just knitted and dropping it off the needle.
Return the remaining 2 stitches to the left needle, k2.
Repeat along the entire edge of the shawl. Make sure that the 3 front ones together cover the tops of the leaves.
Blocking.
Stretching or blocking is necessary for the shawl to open and unfold in size. The tension smoothes the fabric and fixes it in this form until the next wash: First of all, the finished shawl must be carefully washed with a special product for delicate materials. Rinse and gently squeeze out excess water without twisting. Lay out the shawl on a flat surface into which you can stick safety pins. Give it a crescent shape. Secure the shawl with pins, straightening and stretching it well. At the same time, it is important to monitor the symmetry and correct direction of the patterns on the product. Particular attention should be paid to the border and the numerous arches with which it ends. If necessary, during the stretching process, you can adjust the position of the previously fixed needles.
A well-blocked shawl should be left to dry completely.

Haruni shawl - a triangular shawl with a rounded bottom corner - will become a real decoration for a woman’s delicate shoulders
“Haruni” will look harmonious with both casual wear and a festive dress.
If you strictly follow the description and diagram, the “Haruni” shawl will become a real work of art and the pride of its creator.


Пуловер с ажурным узором из «листьев»
Пуловер нежно-розового цвета ручной работы, связанный ажурным узором из шелковистой пряжи.
Knitted coat with an openwork pattern in light green color
Knitted coat with an openwork pattern in light green color